
For those that use iMovie on Mac, there may be a time when the program warns you that there is not enough disk space. This issue can easily create headaches, as you will not be able to fully utilize the program until you free up some storage on your device. There’s also rare occasions where you may get this message even if you have the disk space. Regardless, I’m going to take a look at some ways you can free up disk space, or fix the issue if you do have the space.
Apple’s iMovie is a rather powerful movie editing tool. Featuring a wealth of features and options, it can be extremely useful for those trying to cut their teeth in the world of video-editing. However, as powerful as it is, it isn’t all that useful if you don’t have the space it needs to create and edit projects. If you’re running low on disk space, let’s take a look at some ways to clean it up.
How Do I Fix Not Enough Disk Space on My Mac?
A good thing to know is that whenever you import video into iMovie, the app will create a duplicate of the file. This means that anything you import will now be in two locations: the new file in your Original Media folder for iMovie, and then the original one in your Finder. Note that if you delete files in the Original Media folder, this may disable any projects that implement them.
This is something to keep in mind when you are deleting projects and files: delete the project itself rather than deleting the Original Media files. Of course, please continue reading, as the methods below will explain this a bit more in-depth.
What Do I Do When iMovie Says Not Enough Disk Space?
One of the first things you want to do is check your disk space. When it comes to using iMovie, video files can take up a lot of space, especially when you get into higher resolutions. Personally, if you have the means, I would recommend getting an external hard-drive, and this goes double if you plan on editing and creating a lot of projects.
Of course, there are disk cleaners available on the Apple App Store. A highly recommended app is Intego Washing Machine X9. It is totally worth the price because it gets the extra disk space by removing all duplicate, unwanted files and other build-ups within minutes.
You can also clean your own disk drive manually, though this may take a bit of time. If you want to go this route, you can get an idea of what’s taking up the most space on your hard-drive by navigating to the Menu Bar and going to Apple > System Settings > General > Storage. (Note that it may be System Preferences rather than System Settings, depending on what version of macOS you’re using.)
Looking at your storage can give you an idea of what’s taking up the most space on your drive. Again, if you use iMovie a lot, there’s a good chance that video files are occupying the most space.
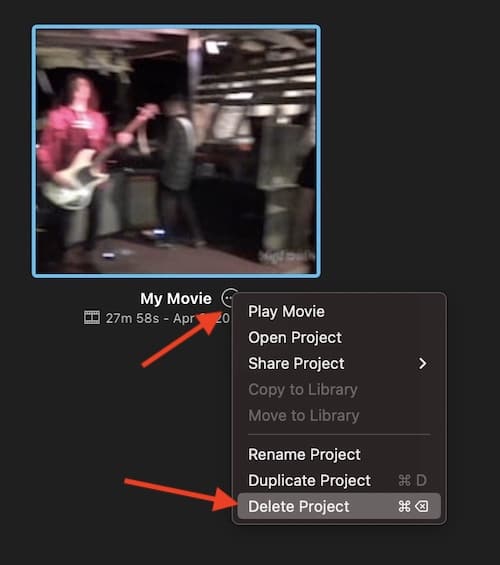
Delete Old Video Projects
Another route a user can take to free up some disk space is to delete old and outdated video projects in iMovie. This can be particularly helpful for cleaning up disk space, and it may also make navigating your newer projects a bit easier on your eyes. Fortunately, this is also really easy to accomplish.
- Launch iMovie on your Mac.
- Look for the projects you want to delete.
- Next to the project name, click the three-dot menu and select Delete Project.

If you need to know where a video file is, click on any video in your TimeLine, then go to the Menu Bar and select File > Reveal in Finder. This will show you your Original Media folder. Again, I would recommend deleting iMovie projects individually rather than deleting things from this folder.
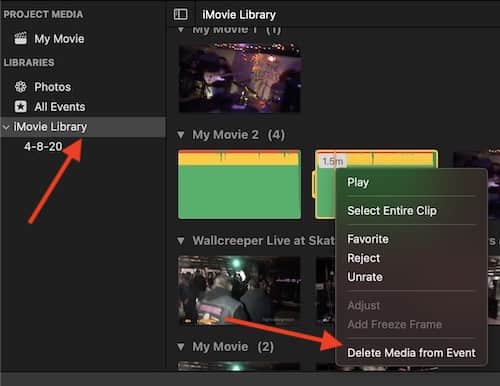
Delete iMovie Library Files
Users can also delete unused or unnecessary video files from their iMovie Library directly in the app. This can be useful if you imported a lot of different videos, and then decided at some point not to use them.
- Launch iMovie on your Mac.
- Open a project.
- In the iMovie sidebar, click iMovie Library. Choose which clips you would like to remove, and then either right-click or Control-click and select Delete Media from Event.

Delete Rendered iMovie Files
Another great way to free up some storage space is by deleting any rendered files. This can be helpful, as it will not have an impact on any of your iMovie projects. However, it may affect the performance of iMovie until the app regenerates the necessary render files that you actually use.
- Open iMovie and select a project.
- In the Menu Bar, go to iMovie > Settings. Note that it may be iMovie > Preferences depending on what version you are using,
- Next to Render Files, click the delete button.
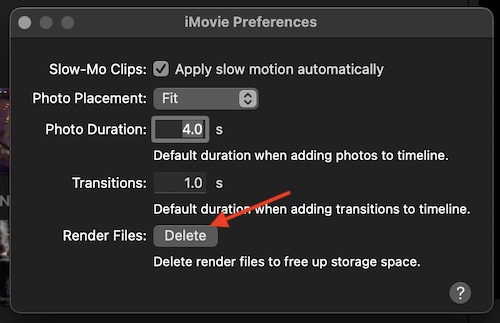
- You will get a pop-up window, click delete again.

Uninstall and Reinstall iMovie
There may also be an instance when you have plenty of disk space, but iMovie is telling you that there is not enough storage. Whatever the reasoning, you can uninstall and then reinstall iMovie to fix this problem.
Time needed: 2 minutes
How to uninstall and reinstall iMovie on Mac.
- Open a Finder window and locate iMovie in the Applications folder.
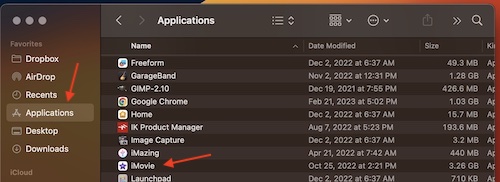
- Move the iMovie icon to the Trash.
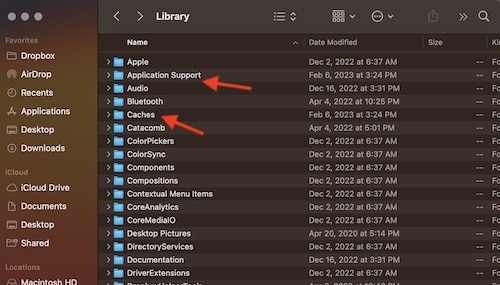
- Then, click the Go from the Finder Menu Bar and choose Library. You can also hold down the Option key while using the Menu to bring up your Library folder.
You can also find your Library in the Menu Bar by going to Go > Go to Folders and type /Library/.
- You will then need to look for file related to iMovie. This includes Preferences, Cache, Container and Application Support folders. Move these to the Trash as well.
Note that if you don’t find anything related to iMovie in these folders, you’re more than likely fine.
- Empty your Trash, then reinstall iMovie from the Apple App Store.
You can empty your Trash by right-clicking or control-clicking on the Trash icon.


Get the Most Out of Your Storage
When it comes to iMovie, there’s a lot of things that you can do with this rather powerful program. However, the program itself isn’t that useful if you don’t have the disk space to implement it properly. As mentioned, I would recommend just getting an external hard-drive, especially if you plan on using the program extensively. High-resolution files are always going to take up a lot of disk space, and they’re only going to take up more the longer and larger your projects get.
Of course, there’s plenty of other things you can do with iMovie, such as create a green-screen effect, or you can also take advantage of converting your iMovie project into an MP4 file. Once you have the space again to operate iMovie, the world is your oyster.
And try it with Final Cut Pro! I had to move a lot of archive files to external disks. My next Mac will have terabytes of built in storage.