
Sometimes, we all need to capture a moment on our screens. Whether it’s for work, sharing something funny with friends, or creating a tutorial, knowing how to take a screenshot on your Mac is essential. Lucky for you, I’ve got your back! Let’s dive right into the world of MacBook Air, Pro, and Mini screenshots, and learn the ins and outs together.
What Are the 3 Ways To Take a Screenshot?
1. How To Take a Screenshot on Mac With a Shortcut
To take a full screenshot on your MacBook Air, Pro, or Mini, you need to press CMD+Shift+3 at the same time. By doing it that way, the screenshot is saved as an image – by default, it is stored on your desktop.
How to take a screenshot on Mac and paste it? If you need to screenshot the full screen, but just want to copy and paste the image of the screen, i.e. not save it, press down Ctrl+CMD+Shift+3.
2. Take a Picture of One Part of Your Mac’s Screen
To take a screenshot of a particular segment, hold down CMD+Shift+4 and a small crosshair will appear onscreen. If you don’t spot the crosshair right away, move your mouse or trackpad as if you’re moving an ordinary cursor and you will see it. Drag the crosshair across the screen. You will start creating a box from the top left to the bottom right. Arrange that box so it covers the part of the display you want to take a screenshot of. Release and that will take the screenshot of the portion within the box. If at any point you find yourself making a box where you don’t want it, press the escape key and it will return you to the normal cursor. Again, the image is saved to your desktop by default.
As with an image of the whole screen, you just copy to the clipboard instead and save, a screenshot of part of the screen. Press Ctl+CMD+Shift+4. The crosshairs will appear as before and you can proceed as described above.
3. Take a Screenshot of an Individual Window
If you have different windows open because you are using various applications you may want to capture an image of just one of those. To do so press CMD+Shift+4+Space. A camera icon will appear. Now, when you hover over a window it will be highlighted blue. Left-click on your mouse/trackpad to take an image of the selected window.
How To Take a Screenshot on Mac Without a Keyboard
Capturing a screenshot on a Mac without a keyboard might appear puzzling, but there are actually several workarounds. Here’s one of the easiest ways to take a screenshot on your MacBook Air, Pro, or Mini without a keyboard:
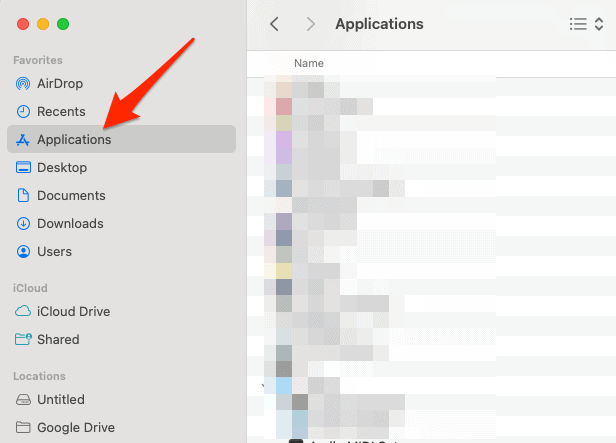
- Go to Finder > Applications.
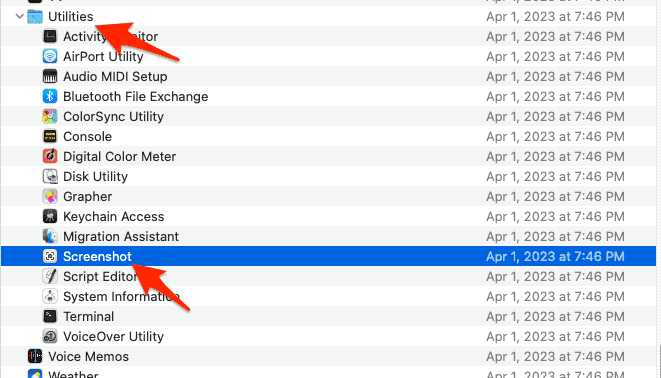
- Next, go to Utilities and press the Screenshot option.
Also check out how to directly paste screenshots into documents on Mac.
Record Your Screen as a Video
To see a full range of screenshot options, press Cmd+Shift+5. Once you press them, a menu will appear at the bottom of your screen. This menu also allows you to record either your full screen or a portion of it as a video. If you select the Option menu you can adjust a further range of settings, including where your screenshots are saved and whether or not the pointer appears in them.
Is There a Snipping Tool on Mac?
Indeed, macOS comes with an integrated snipping utility named “Screenshot” (formerly referred to as “Grab” in earlier macOS versions). This tool enables you to capture screenshots of the entire screen, individual windows, or designated areas. To use the tool on your MacBook Pro, Air, or Mini, follow the instructions mentioned above.
Conclusion: How Do I Take a Screenshot
In conclusion, taking screenshots on MacBook Air, Pro, and Mini models has never been more convenient, thanks to the versatile built-in tools and shortcuts provided by macOS. Whether you’re capturing the entire screen, a specific window, or a custom-selected area, the Screenshot tool and its associated keyboard shortcuts offer a seamless experience for users of all skill levels. For those without access to a keyboard or seeking alternative methods, virtual keyboards, third-party applications, and connected devices present viable solutions. Furthermore, we recommend checking out our guide on popular keyboard shortcuts you must know.