
If you’re looking for some retro gaming on your Mac, then knowing how to install OpenEmu might just be for you. While the world of emulation is in a weird legal-limbo, installing and running an emulator on your machine is perfectly legal. However, when it comes to the games for an emulator, that’s a bit of a different story. Keeping this in mind, I’m going to explain what OpenEmu is, while also showing you how to install it.
OpenEmu is a Mac-based emulator, capable of imitating previous-generation video game consoles. Available for free (though, if you like it, you should donate), I personally recommend using this emulator for all your classic virtual console needs. Fortunately, getting it running is rather straight forward. Let’s take a look.
Are OpenEmu Games Free?
This really depends. Technically, it is perfectly legal in the U.S. to own an emulator, which is what OpenEmu is. However, when it comes to ROMs, I.E., the files that contain the actual games, this is where it gets tricky. You are technically only allowed to use a ROM if you created it yourself, or if you own the original game. With this in mind, I will tell you how to get and use OpenEmu, but I will not be telling you how to get ROMs.

However, users may also want to know that there is no legal precedent in the United States that says individual possession of ROMs is illegal. Though, distributing ROMs of copyrighted games is highly illegal. This is why a lot of video game companies enjoy sending cease and desist letters to websites that host ROMs.
What Consoles can OpenEmu Emulate?
As of this writing, OpenEmu supports the following consoles: Atari 2600, Atari 5200, Atari 7800, Atari Lynx, ColecoVision, Famicom Disk System, Game Boy and Game Boy Color, Game Boy Advance, Game Gear, Intelliviison, Neo Geo Pocket, Nintendo (NES), Nintendo 64, Nintendo DS, GameCube, Odyssey/VideoPac+, PC-FX, SG-1000, Sega 32X, Sega CD/Mega CD, Sega Genesis/Master Drive, Sega Master System, Sega Saturn, Sony Playstation, Sony PSP, Super Nintendo (SNES), TurboGrafx-16/Pc Enginge/SuperGrafx, TurboGragx-CD/PC Engine CD, Vectrex, Virtual Boy and WomnderSwan.
Is OpenEmu Available for Windows?
No. OpenEmu is not available for Windows. However, there are alternatives available, with RetroArch being one of the more popular choices. Additionally, OpenEmu only supports macOS 10.14.4 or above, so keep that in mind if you want to give this emulator a try.
How to Install OpenEmu (Ventura)
If you don’t have it setup so that your Mac will run software from unidentified developers, you will need to do that first. Using my guide, I’m going to presume that this hasn’t been done.
If you are using macOS Ventura, all you need to do to install the app is download OpenEmu and then try to open it. You will get a message saying that you cannot. Close this option. Then, locate OpenEmu in Finder (most likely in your downloads folder) and right-click or Control-Click on it. You will then be able to select Open, and open it anyway. From here, you just need to move OpenEmu to the applications folder, which you will receive a prompt to do so upon opening.
From there, you will then need to ensure that OpenEmu has keyboard access. When opening the app, you will receive a prompt to adjust your settings. Clicking this prompt will take you to your System Settings, where you can give OpenEmu permission to access your keyboard. You may need to toggle this setting on and off to get it working properly.

Users may also need to remove OpenEmu from Input Monitoring and add it back manually. To do this, follow these steps.
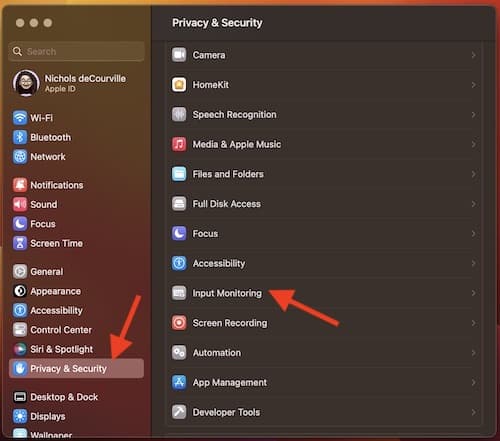
- From the Menu Bar, go to Apple > System Settings
- Go to Privacy & Security.
- Select Input Monitoring.
- Single click on OpenEmu, and then click the Minus button.
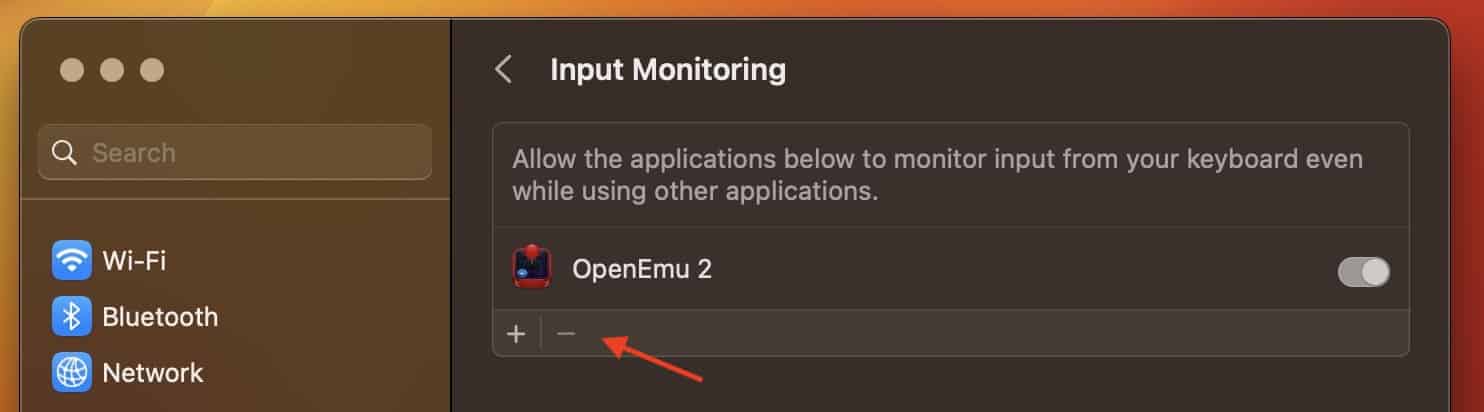
- Then click the plus sign button and choose OpenEmu again.


How to Install OpenEmu (Big Sur, Monterey, Etc)
If you are using something other than Ventura, you will need to give permissions, which takes a little bit more effort. This includes giving permissions for installation as well as keyboard access.
Time needed: 2 minutes
Follow these steps to give OpenEmu installation and keyboard permissions.
- Try to open the OpenEmu installer. You will get a prompt saying it is from an unknown source. Close this prompt by hitting cancel.
- From the Menu Bar, go to Apple > System Preferences.
- Navigate to Security & Privacy.
- Select the General tab.
- Then, click the lock in the bottom left corner within the Security & Privacy window.
- Enter your System Administrator password, and then click Unlock.
- Then, select Open Anyway under the Allow Apps Downloaded From section. OpenEmu then may open automatically.
- If it did not open automatically, open OpenEmu. Then, select Open System Preferences when you see a prompt. We are then going to allow OpenEmu to receive keystrokes from any application. You can now close OpenEmu.
- Once again, click the lock in the bottom left corner when you receive a pop-up in the Security & Privacy window. You will need to enter your System Administrator password.
- Click Unlock again.
- You will need to tick the box next to OpenEmu to allow it to monitor your inputs from the keyboard while using other apps.
- You then need to click the lock one last time to prevent any additional changes.
How do I Use OpenEmu on Mac?
Once you get OpenEmu installed and running, you are going to have to go through the setup wizard.
- Launch OpenEmu.
- Select Next on the welcome screen.
- From here, select all of the emulator cores you want to use with this software. This will download the necessary files for these emulators.
- Select Next and then hit Go.
Additionally, adding games to OpenEmu is rather easy. All you need to do is locate the ROMs within your Finder window, and then drag and drop them into OpenEmu. The app will then keep your games organized by what system they belong to.
You can also change your input methods from the Menu Bar by going to OpenEmu > Settings > Controls. You can either set up different controls on your keyboard, or this where you can also add controllers that are supported by OpenEmu.

If you’re looking for games, this isn’t the place. Again, depending on what region you’re in, ROMs are typically a grey area in general. So long as you own the original game, you’re usually in the clear. With that in mind, I would recommend checking out ROMhacking.net. This site offers a lot when it comes to HomeBrew and hacked games. They even provide tools to hack your own games. However, keep in mind that they do not provide ROMs of licensed games.
Running OpenEmu on Your Mac Gets You Gaming
While Emulation is in a weird-legal standing, downloading and running an emulator is perfectly legal. Of course, you may find yourself in a grey area when it comes to ROMs. Following this guide, you will be set up to run virtually any video game console from your Mac, but it will be up to you to find or access games for it.
With the ability to emulate practically any classic console, OpenEmu is a sure-fire win for those that are into gaming. Featuring a plethora of consoles, and support for a variety of modern controllers, this can be a great app for those looking to venture into the past. However, just remember that you’re responsible for finding your own ROMs/Games.