
By now, we can all accept the fact that the iPhone has one of the best camera systems among the many smartphones available today. The iPhone’s main camera is capable of taking great quality photos of landscapes and sceneries, panoramic shots, and yes, professional-looking portrait shots. For those who have not taken advantage of the iPhone camera for taking portrait photos, keep reading to learn how to use portrait mode and create depth of field on your iPhone.
What is Depth of Field?
If you search for the definition of depth of field (DOF) you’ll probably get more confused if you keep on reading the different search results defining what it is. So, I’ll try to take out the complexity and define Depth of Field (DOF) in the simplest way I can. Depth of Field is the degree of focus that the subject of your photo has. If you’ve taken portrait shots and the background appears blurred while the subject is clear and has a level of “acceptable sharpness”, that means that you have taken a photo with a shallow depth of field.
Using depth of field in iPhone photos you take is important in photography because it not only helps you tell a story through your photo but also helps people who see your work understand more clearly what you are trying to convey. With the depth of field, you can isolate the subject from everything else in the picture.
The Limitations of the iPhone Camera
In case you’re unaware, the iPhone 14 now sports a 48MP main camera. The other two camera lenses that you see protruding at the back are the Telephoto and Ultra-Wide Angle lenses. Since we’re talking here about portrait photos and achieving shallow depth of field, we will focus our discussion on the main iPhone camera which has been bumped into 48 MP by Apple. The iPhone 13 could only muster up to 28 MP for its main camera.
Unlike regular DSLR cameras, the iPhone camera lens has no mechanical aperture adjustment. But you can adjust the exposure of the background to make it as blurred as possible during the post-processing of your photo. Digital aperture adjustment may be fine with casual photography enthusiasts but I’m pretty sure professionals would not be fine with it. They would still seek the quality of DOF when creating it properly using a regular camera. But for social media and aesthetic purposes, adjusting the background of iPhone photos to make the subject in the foreground more in-focus would be enough.
Some Techniques in Creating a Depth of Field Using Your iPhone
When it comes to taking photos with shallow depth of field using your iPhone, there’s nothing much you can do when adjusting its settings to achieve the results you desire. You just have to rely on the iPhone camera’s features and built-in settings, take your shots, and adjust how it looks later using various photo editing techniques to blur the background of your photo. These post-processing procedures include using the masking brush and applying gradient blur. Both methods are used by most photo editors to create depth of field when editing their photos.
Apps to Consider When Creating Depth of Field
The use of advanced iPhone photo editors has given photographers and photography enthusiasts the ability to create stunning photos with blurred backgrounds no matter what device they used for taking photos. Whereas before, photographers would try hard to create the same effect, it has become easier now with the availability of mobile apps.
One app that you may consider using is Tadaa – Camera Focus & Depth. Tadaa is possibly one of the best, if not the best, iPhone photo editors that let you create a shallow depth of field on your photo. What’s good about this app is that it does its job elegantly. This means, Tadaa creates bokeh in such a way that you would think that it was taken by a DSLR.
Another app worth considering is Snapseed. Snapseed is a feature-rich iPhone photo editor that offers non-destructive editing of your iPhone photos.
Some Things to Know About Tilt-Shift Effect When Creating Photos with Blurred Background
The tilt-shift effect is another method of creating a stunning photo wherein only a tiny part is in focus while the rest of the background or foreground is blurred using a shallow depth of field. The idea here is to create a miniature landscape or scenery, highlighting a small part of the photo.
When you are using a DSLR camera, there is a specialized lens for taking photos with a tilt-shift effect. But you can’t do that with your iPhone per se. To create miniature photos of sceneries or landscapes, you have to use an iPhone app that supports the tilt-shift effect. And there are several of these apps on the App Store. Most of these apps include Snapseed, Fotor, TiltShiftGen2, Instagram, and more. These apps allow you to create the miniature effect with ease.
Other Tips and Tricks to Create Photos with Shallow Depth of Field
One question that you are probably asking right now is whether you can change the depth of field on iPhone. The straight answer to that is yes, your iPhone allows you to change the depth of field while taking the photo or after you’ve taken the shot in Portrait Mode.
To change the depth of field when taking the photo, simply tap on the Depth button at the upper-right corner of the screen (circle with letter f which means f stop). This is Apple’s way of simulating the aperture measurement in a DSLR camera. The lower the f-stop number, the more blur will be added to your photo. You can also do this after you’ve taken the shot by simply editing the photo in the Photos app.
How to Achieve a Natural Depth of Field In Your iPhone Photo
By now, you should know that the iPhone camera doesn’t have a mechanical aperture like a DSLR camera that can adjust depth of field during actual shooting, the iPhone relies on digital means. The result no matter how good the photo may look would still be inferior to a photo taken by a DSLR camera.
So, the question now is how are you going to achieve a natural depth of field in your iPhone photo? Therlly no exact way of doing it. The outcome would always depend on how people will look at your photo. But one rule of thumb that you may want to consider is to apply as little blur as possible to achieve a more natural depth of field. Overdoing it might make your photo, well, unnatural.
Use of Artificial Intelligence in iPhone Photography:
Through the years, Apple has been employing Artificial Intelligence (AI) technology so that the iPhone camera can produce better photos. Well, that’s aside from the fact that the camera system has been improving as well. However, Apple is not the only one using AI to maximize the potential of the iPhone camera. Third-party iPhone photography apps have been greatly improving as well with the use of AI.
One area that developers have explored and which I have recently had an experience with has something to do with photo transformation. I’m referring to apps that transform your photo into either caricature, anime-style photos, cartoons, and more. Illy amazing how these apps can make this task so easy. And they are giving digital artists a big run for their money.
Although this is good news for casual iPhone users who just want to transform their photos into something new and fun, professional digital artists may find it simply annoying. That’s pretty understandable since artists spend countless hours trying to produce great works of digital art. And suddenly here comes developers with their apps having the capability to produce similar kinds of digital artwork.
But then again, it’s still up to art consumers whether they are willing to spend that much to have a certain piece of digital artwork.
Still, there is no denying that AI technology has revolutionized not just iPhone photography but mobile digital photography as a whole.
Tutorial on Using iPhone’s Portrait Mode for Depth of Field
As previously mentioned, you can take photos with blurred backgrounds using the iPhone Portrait Mode. All you have to do is enable portrait mode, point your iPhone to a subject, and adjust the distance until the message that says “move further away” disappears. Then you can take your shot.
But aside from that basic step, there are other features of the iPhone’s Portrait Mode and depth-of-field that you need to know and can greatly enhance your photos. One of that features is editing the lighting of your photos. You can do this either on the camera app before taking the photo or in the Photos app when editing your photo.
How to Use and Adjust Lighting Effects in Portrait Mode
Time needed: 1 minute
Follow the steps below to adjust the lighting effects of a photo taken using Portrait Mode:
- Open the Camera app and tap Portrait Mode.
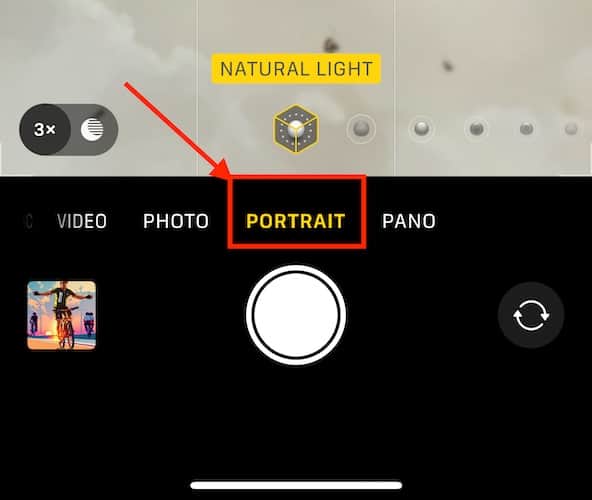
- Position your iPhone close enough to the subject for the effect to show on your screen.
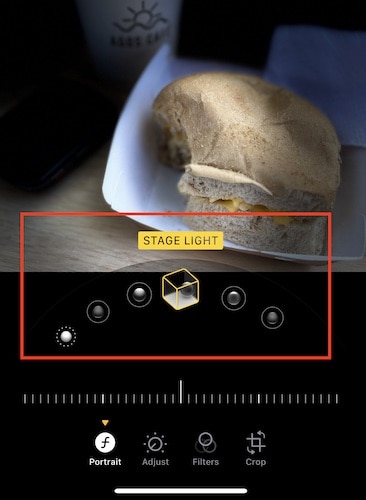
- Tap on any of the Lighting Effects available (See below)
Natural Light: The face is in sharp focus against a blurred background.
Studio Light: The face is brightly lit, and the photo has an overall clean look.
Contour Light: The face has dramatic shadows with highlights and lowlights.
Stage Light: The face is spotlit against a deep black background.
Stage Light Mono: The effect is like Stage Light, but the photo is in classic black and white.
High-Key Light Mono: Creates a grayscale subject on a white background (on supported models). - Drag the slider left or right to adjust the intensity of the lighting effect.
- Tap the camera shutter to take the photo.


Follow the steps below to adjust the lighting effect of photos taken using Portrait Mode in the iPhone Photos app.
- Tap any photo taken in Portrait Mode.
- Tap Edit, then touch the cube icon below the photo.
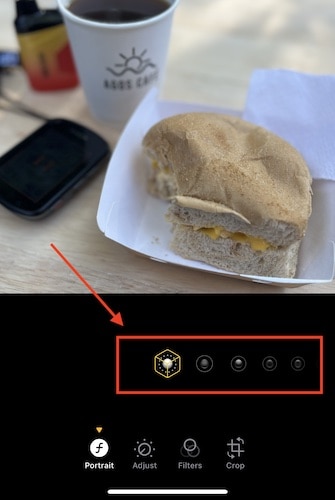
- Drag to use the lighting effect (see above).
- Drag the slider left or right to adjust the intensity of the lighting effect.
- Tap Done to save your changes.

How to Adjust Depth Control in Portrait Mode
When taking photos in Portrait Mode, you can use the Depth Control to adjust the level of background in your photo. See the below steps to do so.
- Tap any photo taken in Portrait Mode to view it in full screen.

- Tap Edit, then tap the f icon at the top of the screen.
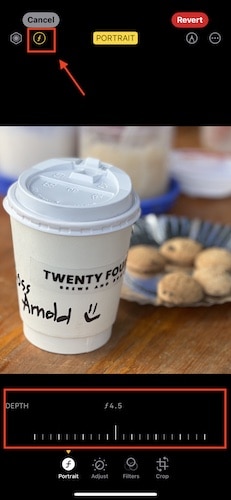
- Drag the slider left or right to adjust the background blur effect.
- Tap Done to save your changes.


Alternatively, you can also do the same step before taking your photo.
Conclusion
Undoubtedly, Apple has transformed the iPhone into a more powerful camera device aside from its other features. If you’ve been following the iPhone’s development through the years, you would easily realize that every year, Apple has put more premium in upgrading its camera system. That’s understandable since the iPhone camera is one of the most used features of the device.
If you own an iPhone, we encourage you to keep on exploring the many things that you can do and achieve using its camera. Taking great photos is just one aspect of it, shooting great videos is another topic altogether.
To maximize the potential of the iPhone camera, we also suggest trying out various third-party apps that fully capitalize on the camera’s advanced features. Even apps that use AI to generate fun and great photos might get you hooked on iPhone photography. Experimenting to achieve depth of field is just one of the exciting things that you can do with your iPhone’s camera, there are many other things left to be explored.
After I downloaded it I discovered that it requires a dual camera iPhone. I was able to play with the sample photo and I was impressed!
Kind of moot now this afternoon I got an a new iPhone XS. I had planned on waiting until later in the year, but I am traveling this month and wanted a longer lasting phone battery.
I love the phone, I hate the process of pairing my watch with it and not losing my workout data, awards, and history which is what happened.
Just curious if you’ve found any tricks for not losing any “workout data, awards, and history ” since you originally wrote that comment?