
Need to send those signature blue-bubble texts with your Apple devices? Enabling iMessage is quick and easy, and once it’s set up, you’ll unlock a faster, more secure way to communicate. iMessage works across iPhone, iPad, and Mac, allowing you to send texts, photos, videos, and more without relying on traditional SMS. It’s encrypted, syncs across your devices, and integrates seamlessly with Apple’s ecosystem.
In this guide, we’ll walk you through everything: what iMessage is, why you should use it, how to turn it on across your devices, and how to troubleshoot common activation issues. By the end, you’ll know exactly how to get started with iMessage and make the most of Apple’s messaging service.
Don’t miss the best of The Mac Observer
Set us as a preferred source and our Apple reporting ranks higher in your Google Search results and Discover feed — one tap, no account changes.
Table of contents
- What Is iMessage & Why Should You Use It
- How to Turn On iMessage on iPhone/iPad
- How to Turn On iMessage on a Mac
- How Do I Enable iMessage Messages?
- Why Is My iPhone Saying iMessage Needs to Be Enabled?
- How Do I Turn iMessage Back On?
- Do I Need to Activate My iMessage?
- Tips for Using iMessage
- Frequently Asked Questions
- Summary
- Conclusion
What Is iMessage & Why Should You Use It
iMessage is Apple’s built-in messaging service that lets you send texts, photos, videos, stickers, and even documents over Wi-Fi or cellular data instead of relying solely on SMS. Unlike regular text messages, iMessages are encrypted end-to-end, making them secure and private. They also sync across your Apple devices, meaning you can start a conversation on your iPhone and continue it on your Mac or iPad without missing a beat.
Another benefit of iMessage is its versatility. You can send high-quality images and videos that aren’t compressed the way they are with SMS. You also get fun extras like stickers, effects, and reactions. For Apple users, iMessage is often the default way to communicate, and enabling it ensures you’re getting the best messaging experience within the ecosystem.
How to Turn On iMessage on iPhone/iPad
Turning on iMessage on your iPhone or iPad is straightforward. Here’s how you do it:
- Open the Settings app.
- Scroll down and tap Apps > Messages.
- Toggle the switch next to iMessage to the on position.

When you enable iMessage for the first time, your device may prompt you to sign in with your Apple ID(Apple Account). This step is essential because iMessage uses your Apple ID (and phone number, if applicable) to send and receive messages.
You might also see a brief message saying “Waiting for Activation.” This process usually completes within a few minutes, and you’ll know it’s ready when you can send blue-bubble messages in the Messages app.
If you want to check which addresses are linked to iMessage, go to Settings > Messages > Send & Receive. Here, you can manage whether people can reach you through your phone number, your Apple ID email, or both.
How to Turn On iMessage on a Mac
iMessage works just as smoothly on a Mac, letting you keep your conversations going while you work or browse. To enable it:
- Open the Messages app from the Dock or Applications folder.
- If prompted, sign in with your Apple ID.
- Once signed in, go to the Messages menu in the top-left corner and choose Settings.
- Click the iMessage tab and make sure your Apple ID(Apple Account) is signed in.
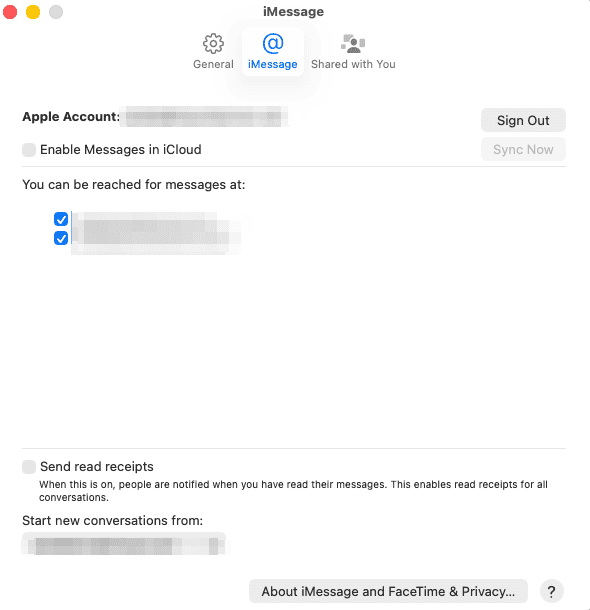
- Check the boxes next to the phone numbers and email addresses you want to use with iMessage.

Once enabled, your conversations will appear on your Mac, synced with your iPhone and iPad through iCloud. You can send and receive texts, photos, and files right from your computer, which is especially convenient if you’re multitasking.

How Do I Enable iMessage Messages?
Sometimes users wonder if iMessage is actually being used instead of SMS. By default, once iMessage is enabled, your device will automatically send messages as iMessage if the recipient is also using an Apple device. These appear as blue bubbles in the Messages app. If the recipient doesn’t have iMessage, your message will revert to SMS (green bubbles).
To ensure you’re using iMessage:
- On iPhone or iPad, go to Settings > Messages, then check that iMessage is toggled on.
- On Mac, make sure you’re signed into the Messages app with your Apple ID.
Why Is My iPhone Saying iMessage Needs to Be Enabled?
If you see the message “iMessage needs to be enabled,” it usually points to an activation or settings issue. Common reasons include:
- Apple ID not signed in: Make sure you’re logged into iCloud and Messages.
- Connectivity issues: iMessage requires a stable Wi-Fi or cellular connection.
- Carrier settings: Sometimes your carrier must support SMS fallback for activation.
- Date and time mismatch: Incorrect system date or time can prevent activation.
To fix this, go to Settings > Messages, toggle iMessage off, wait a few seconds, and toggle it back on. If needed, sign out and back into your Apple ID. Restarting your device can also help clear up temporary glitches.
How Do I Turn iMessage Back On?
If you’ve disabled iMessage and want to re-enable it, simply return to Settings > Messages on iPhone or iPad and toggle the switch back on. On a Mac, open Messages > Settings > iMessage, then sign in with your Apple ID again.
Keep in mind that re-enabling iMessage may take a few minutes to activate, especially if you’re linking your phone number again. Once it’s active, your conversations will return to blue bubbles.
Do I Need to Activate My iMessage?
Yes, iMessage does require activation. When you first enable it, your device registers your Apple ID and phone number with Apple’s servers. This process happens automatically, but you may see a “Waiting for Activation” message during setup. In most cases, it resolves within a few minutes.
If activation takes longer, check your internet connection, Apple ID settings, and carrier support. In rare cases, you may need to reset your network settings under Settings > General > Transfer or Reset iPhone > Reset > Reset Network Settings.
Tips for Using iMessage
To get the most out of iMessage, here are a few tips:
- Enable Messages in iCloud: This ensures all your messages sync seamlessly across devices.
- Link both phone number and Apple ID email: This makes it easier for friends to reach you.
- Check storage settings: Large conversations with lots of photos and videos can take up space; use iCloud to manage them.
- Look for blue bubbles: Blue means iMessage, green means SMS/MMS. This helps you know whether you’re using Apple’s service or your carrier’s text system.
Frequently Asked Questions
Usually due to poor internet connection, Apple ID issues, or incorrect date and time settings. Toggling iMessage off and on often resolves it.
Yes. As long as you’re signed in with an Apple ID and connected to Wi-Fi, you can use iMessage on iPad and Mac without a SIM card.
Go to Settings > Messages on iPhone/iPad and check the toggle. On Mac, open the Messages app and ensure you’re signed in with your Apple ID.
iMessage uses whichever connection is available, Wi-Fi or cellular data. It does not use SMS messaging unless iMessage isn’t available.
Yes. Simply go to Settings > Messages and toggle iMessage off. You’ll still be able to send SMS/MMS through your carrier.
Summary
- iMessage is Apple’s encrypted messaging service.
- Enable it in Settings > Messages on iPhone or iPad.
- On Mac, sign in through the Messages app.
- Blue bubbles mean iMessage, green bubbles mean SMS.
- Troubleshoot activation issues by checking Apple ID, internet, and settings.
Conclusion
Enabling iMessage is one of the easiest ways to enhance communication on your Apple devices. With encrypted, seamless messaging across iPhone, iPad, and Mac, you’ll enjoy faster and more secure conversations than traditional SMS. Whether you’re sending photos to friends, syncing conversations across devices, or just appreciating those blue bubbles, iMessage is an Apple feature worth turning on. With a few quick steps, you’ll have it set up and ready to use.


The path is Settings>Apps>Messages in iOS.