
Unlike Windows, macOS blocks most attempts to spoof the MAC address. System Integrity Protection (SIP) locks down low-level changes, and persistent spoofing isn’t natively supported. Although you can disable SIP, that opens your system to risks. A better approach is to use MAC address changers designed to work within macOS, like spoof‑mac, MacMACSpoof, Private Wi‑Fi Address, plus a few Terminal tricks that get the job done.
The tricky part is that safely running these tools requires some technical know-how. One misconfigured script can mess with your network settings, or worse, compromise your PII. Let’s break down what you should (and shouldn’t) do.
Don’t miss the best of The Mac Observer
Set us as a preferred source and our Apple reporting ranks higher in your Google Search results and Discover feed — one tap, no account changes.
1. spoof‑mac
Time needed: 10 minutes
spoof‑mac is a Python-based utility that lets you temporarily spoof your MAC address without disabling SIP. It hooks into the network interface layer using standard system calls to give you control over the MAC address at runtime. Since it doesn’t attempt to persist changes across reboots, it stays within macOS security limits.
- Install Homebrew if you haven’t yet:
sudo /bin/bash -c "$(curl -fsSL https://raw.githubusercontent.com/Homebrew/install/HEAD/install.sh)"
- Run:
brew install spoof-mac - Open Terminal and check your interface:
ifconfig
- Run spoof‑mac with:
sudo spoof-mac random en0 - Replace
en0with the correct interface name if needed. - Confirm the change using:
ifconfig en0 | grep ether

2. MacMACSpoof
MacMACSpoof is a minimal GUI app that lets you change your MAC address manually without touching Terminal. It works by applying a temporary spoof on selected interfaces. This app is ideal for users who want quick changes without scripting.
- Download the app from its GitHub or trusted mirror.
- Launch the .dmg file and drag the app into Applications.

- Open System Settings > Privacy & Security.
- Scroll down and click Open Anyway for MacMACSpoof if prompted.

- Open the app, select your network interface, and enter a new MAC address.
- Click Apply and restart your network connection if needed.


3. Private Wi‑Fi Address
This setting is built into macOS for Wi‑Fi privacy. It randomizes your MAC address per network to routers or third-party networks from tracking you. It’s not user-customizable but serves as a system-level option for temporary spoofing.
- Go to System Settings > Wi‑Fi.
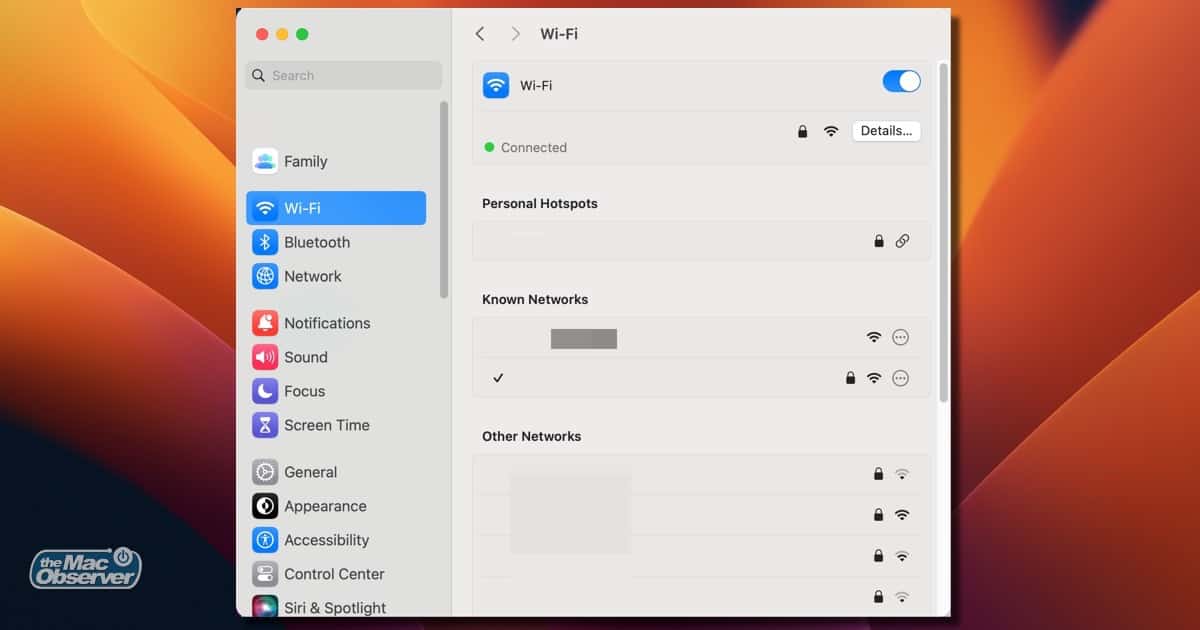
- Select your connected network.
- Scroll to Private Wi‑Fi Address and toggle it on.
- Reconnect to apply the randomized MAC.

 NOTE
NOTE
4. ifconfig
Using ifconfig is the native way to temporarily spoof a MAC address without third-party apps. It modifies the MAC at runtime, but the address reverts after a reboot. This method requires elevated permissions.
- Open Terminal.
- Run
ifconfigto list available interfaces. - To disable the interface:
sudo ifconfig en0 down - To change the MAC:
sudo ifconfig en0 ether xx:xx:xx:xx:xx:xx(replace with desired address)
- Re-enable the interface:
sudo ifconfig en0 up - Verify:
ifconfig en0 | grep ether

5. macchanger
macchanger is a Linux-native tool. If you use Parallels or UTM to run Linux on macOS, this gives full control over MAC spoofing without SIP restrictions. It’s a workaround, but effective for persistent control.
- Set up a Linux VM using Parallels or UTM.
- Open Terminal in the VM and install with:
sudo apt install macchanger - Identify interface:
ip link - Run:
sudo macchanger -r eth0or use-mto set a specific MAC. - Use macOS for routing through the VM network if needed.

6. Wireshark’s MAC Spoof Detection
While Wireshark won’t spoof your MAC, it helps validate whether changes are active. It reads low-level network data and displays current MAC info, useful for debugging spoofing attempts.
- Install from Wireshark.
- Launch and select your network interface.
- Start capturing packets.
- Look under the Ethernet II frame to confirm the current source MAC.
- Compare with your configured spoofed address.
7. Use a Secondary Network Adapter or USB Wi-Fi Dongle
Most spoofing limitations apply to built-in network interfaces protected by SIP. A USB Wi-Fi dongle with its own chipset and driver stack allows spoofing from user space. These adapters often bypass macOS’s SIP restrictions, making spoofing more flexible, without compromising the system’s security model.
- Purchase a compatible USB Wi-Fi adapter (e.g., TP-Link TL-WN725N v2 or Alfa Install the vendor’s macOS driver if required.
- Connect the adapter and verify it appears in System Settings > Network.
- Use
ifconfigorspoof‑macto spoof the MAC on this interface (usually en5 or higher). - Verify using:
ifconfigen5 | grep ether
Apple doesn’t officially support MAC address spoofing, so don’t expect much help from Apple Support if something breaks. They can step in if your system stops booting or your network disappears entirely, but when it comes to spoofing, you’re on your own. These tools work, but they also come with risks. One bad command could wipe your interface config or expose sensitive data. Tread carefully and know what you’re doing before making any changes.


Discussion