watchOS 10 has Auto Night Mode set as the default feature. It automatically transitions my Apple Watch Ultra to night mode in dark environments and low-light conditions. I recently upgraded my Apple Watch Ultra to watchOS 10. I know I’m late to the party, but I just hadn’t found the time. Imagine my surprise when I attempted to switch to night mode by turning the digital crown, only to be greeted by a collection of widgets.
It took quite a bit of digging, but I finally found the setting I needed to turn off the feature. Let me show you.
How Can I Disable Auto Night Mode on My watchOS 10 Apple Watch Ultra?
You can turn off auto night mode on your Apple Watch Ultra with watchOS 10 by adjusting the setting in customize mode on the watch. Alternatively, edit the watch face in the Watch app on your iPhone and disable night mode. I’ll guide you through the process.
Use Customize Mode on Your Apple Watch Ultra
In watchOS 10, you can’t switch between night and light modes via the digital crown anymore. You’ll now locate this setting within the customize mode. To turn off auto night mode, follow these steps:
Time needed: 1 minute
How to disable Auto Night Mode on watchOS 10
- Press and hold the watch face to enter customize mode.
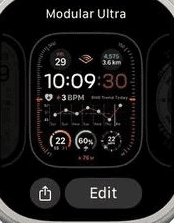
- Swipe right through the options until you come upon the Night Mode settings tab.
- Use the crown to scroll between On, Off and Auto, and select Off.
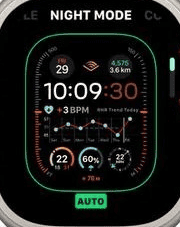


Et voila! You’ve just turned off night mode on your watchOS 10 Apple Watch Ultra. To activate it again, hold the watch face, click edit, swipe to the Night Mode tab, and choose On or Auto.
There’s an alternative way to disable the auto night mode feature in watchOS using the iPhone’s accompanying app. Allow me to demonstrate how.
Edit Your Watch Face in the Watch App on iPhone
You can personalize your watch face within the Watch app on your iPhone. This also allows you to access and modify the Night Mode settings. To accomplish this:
1. Launch the Watch app on your iPhone.
2. Select the My Watch tab on the bottom menu bar.

3. In the My Faces section, select one of the supported watch faces (Wayfinder and Modular Ultra) to open the edit screen.

4. In the Night Mode section, select Off to disable night mode for your Apple Watch Ultra.

You can select the On option to keep night mode enabled for the Wayfinder and Modular Ultra faces. If you cannot find the Night Mode option, recreate the watch face from scratch. This way, you can opt to disable night mode during the setup. Also, make sure your Apple Watch Ultra is running the latest watchOS version.
How Can I Get Auto Night Mode on My Apple Watch Series 8?
Night mode is currently exclusive to the Apple Watch Ultra 2 and its predecessor. However, I’ve discovered a method to enable Series 8 owners to enjoy this feature. The same trick can be applied to earlier Apple Watch models, so don’t hesitate to give it a try.
To get started, make sure you have the Shortcuts app on your iPhone and two watch faces, one for light and one for dark. Customize the dark watch face to closely resemble the night mode face on the Apple Watch Ultra 2 or its predecessor. Once you’ve prepared these, follow these steps:
1. Open the Shortcuts app on your iPhone, select the Automations tab and select Create Personal Automation.

2. Click Time of Day.

3. Enter the time of the day when you want night mode to kick in on your Apple Watch, and set the repeat schedule to Daily.

4. Click Next and select Add Action.

5. Switch to the Apps tab and select Watch.

6. Click Set Watch Face on the screen that follows.

7. Select the name of the light watch face you created in Set Active Watch Face To and click Next.

8. Turn off the Ask Before Running slider and click Done to complete the operation.

Your non-Ultra Apple Watch will now switch to the light watch face every morning at your specified time.
Now, let’s go through these steps once more for the dark watch face. Remember to select the appropriate time and choose the dark face when prompted. And with that, you’re all set.
Conclusion
The Auto Night Mode feature was introduced to enhance the user experience of the Apple Watch Ultra 2 and its first-gen counterpart, making them more intuitive. The feature dims the Wayfinder and Modular Ultra watch faces when the ambient light sensor determines that light levels around a wearer are low.
The primary goal is to safeguard the wearer’s eyes and reduce eye fatigue caused by exposure to bright lights. This change is also aligned with the growing concern in the public regarding blue light exposure and its impact on the eyes. Additionally, it addresses the issue of extending the Apple Watch Ultra’s battery life by effectively reducing screen brightness.
I’d love to hear your thoughts on this change. Are you a fan of the Auto Night Mode feature, or do you miss the manual switching via the digital crown? You can also explore other new features in the 10th watchOS version here.