To install Windows 11 24H2 on a MacBook without TPM, you need to first install Windows 10 using Boot Camp Assistant, then upgrade to Windows 11 through a workaround that bypasses TPM, Secure Boot, and RAM checks. Since Macs lack TPM chips and Boot Camp blocks Windows 11, you’ll use Rufus to create a custom USB installer with TPM checks disabled. In this article, we’ll explain the process step-by-step.
Apple hardware is known for its durability — owning a 13-year-old Mac myself, I can attest that. However, software support, while longer than most competitors, doesn’t usually follow the device’s whole life cycle. Some people decide to use other platforms other than macOS for that reason. Many users may consider installing Windows 11 on their Macs, but without the mandatory TPM chip, is that even possible? Good news: it is, but requires a bit of work.
Is It Possible To Install Windows 11 24H2 on a Mac Without TPM?
Through the official means, no. Boot Camp, even on still-supported Macs, will outright fail to install Windows 11, precisely because Macs lack a TPM chip. However, it’s still doable by installing Windows 10 first, then moving to Windows 11 24H2 after bypassing the TPM 2.0 requirements.
Understanding TPM Requirements for Windows 11
A TPM (Trusted Platform Module) is a security chip used by the OS to store sensitive information. It houses passwords, encryption keys for protected files, and so on.
Microsoft states it’s mandatory to have the TPM 2.0, a recent version of this chip, to install Windows 11. Most computers from the past 7 years or so feature one, and, even those that don’t, could bypass that limitation.
However, Microsoft has become stricter about that recently, and, anyway, no Mac has a TPM chip. With Windows 10 nearing the end of its support, upgrading is crucial to have the latest features and security updates.
Is TPM 2.0 the Same as a Secure Enclave, T1 or T2 Chip?
If you know a little about Apple’s hardware (or watch the company’s keynotes), you may consider the TPM concept familiar. That’s because its function is the same as the Secure Enclave in Macs.
Secure Enclave is present, in different versions, inside T1 and T2 security chips, and in any Apple Silicon Mac. However, no Mac Secure Enclave is compatible with the TPM specifications, and, therefore, it isn’t supported by Windows 11.
Preparing Your Mac To Install Windows 11 Without TPM
Now, for the installation itself. Follow the steps below carefully, and, in the end, you’ll have a working Mac with Windows 11 24H2. The procedure, as described here, was performed in a mid-2012 13-inch MacBook Pro. I’ll talk a bit more about that in the conclusion.
What You’ll Need
Make sure you take note of the list below. Without all the items, you won’t be able to go all the way through with the installation.
- A Mac with an Intel processor (Apple Silicon Macs can only use Windows with Virtual Machines inside macOS)
- Windows 10 and Windows 11 ISO image files (which can be downloaded directly from Microsoft by clicking the OS names). It’s useful to have an ISO of a Linux distro (I recommend Linux Mint, but use whichever you prefer), too. To be extra-safe, I also suggest you have an installer of the same macOS version you’re currently running.
- At least one USB stick with 16GB or more (preferably, two)
- Enough available storage for both macOS and Windows (I recommend a bare minimum of 100GB per OS, preferably 200-250GB)
- Optional (but strongly recommended): a separate computer, preferably another Mac, to download large files and search solutions for error messages.
- Time and patience. You may need to restart the procedure, check additional notes, perform unexpected steps, or even troubleshoot issues yourself. When researching for this guide, I found some quirks and error messages that you may need to deal with. I tried to cover as many of them as possible, but some may have flown under my radar.
Warning About Data Loss
Some of the steps involve performing delicate operations with your Mac’s storage, which can result in data loss. Make sure you have a backup, and avoid doing this procedure on work computers.
Preparing Your Mac
Downloading the ISO images will likely take some time, since the files amount to over 11GB. Therefore, I suggest you leave the downloads going in another computer, while performing the preparation steps below in your Mac.
1. If You Use OpenCore Legacy Patcher (OCLP), Read This First

OCLP is a patcher that allows older Macs to run more recent macOS versions. It involves modifying the EFI and the system partitions, which may interfere with Boot Camp and Windows installations.
If you use OCLP on your Mac, make sure both the OCLP app and EFI partition are up-to-date. It’s a good idea to backup the EFI partition as well, just in case. Also, you may need to perform different boot procedures, depending on how old your Mac is. Lastly, unless you’re spoofing another Mac’s SMBIOS, it’s advised that you don’t start Windows from OpenCore. Instead, hold the left Option key during boot, and select your Windows drive from the boot picker.
2. Perform a Time Machine Backup
As I said a few paragraphs before, this procedure requires messing up with drive partitions. That can potentially cause data loss, so make sure you have a Time Machine backup at hand. This way, if things go south, you’ll be able to restore your Mac to a working state using Recovery Mode.
Also, you may need to make changes to your Mac’s internal storage prior to starting Boot Camp Assistant. That’s because it doesn’t allow you to install Windows anywhere other than the macOS startup volume. If you have another internal drive, an external HDD or SSD, or even additional partitions, Boot Camp ignores them.
If you need to remove paritions from your Mac’s primary disk, I recommend you do that drive in Recovery mode. It’s possible to change your boot disk’s partitions from inside macOS, but doing that introduces unnecessary risk to the procedure. In fact, while writing this guide, I had to perform data recovery myself twice after failed partitioning attempts inside macOS.
3. Disable FileVault
While not officially required, disabling FileVault is useful for any Boot Camp installation. With the disk encryption enabled, you may get some errors during the partitioning process. With FileVault disabled, the partitioning may also work slightly faster than with it enabled.
4. Install Windows 10 Using Boot Camp Assistant
With all the above sorted out, it’s time to begin our Windows installation. However, you’ll firstly install Windows 10, not Windows 11.
Do the following:
Time needed: 40 minutes
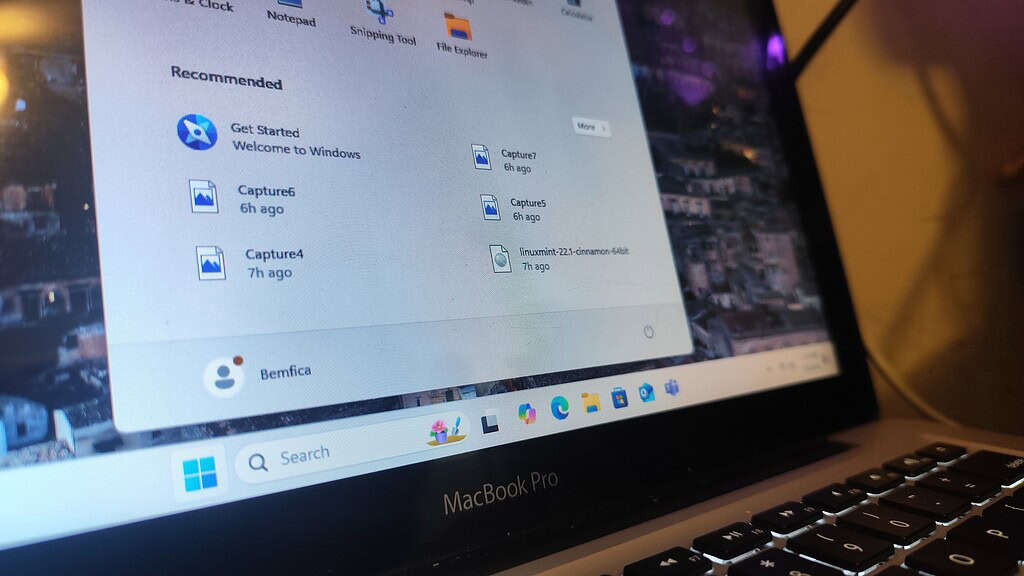
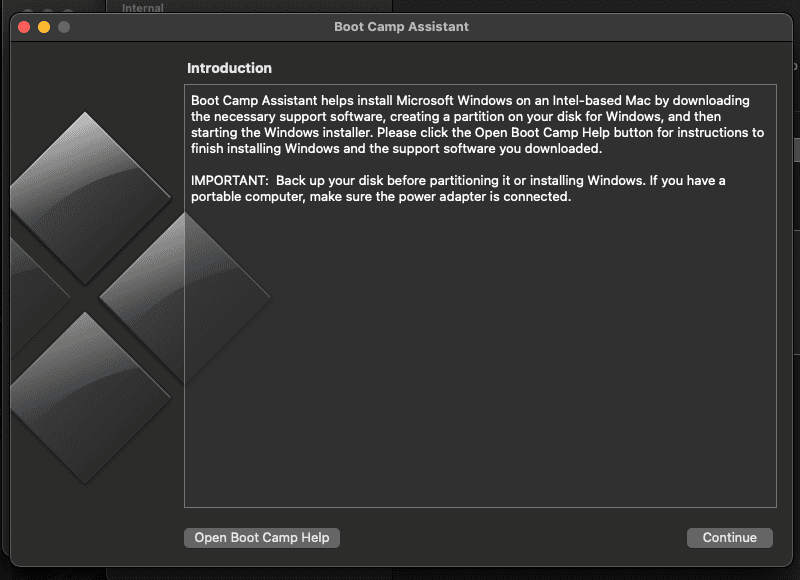
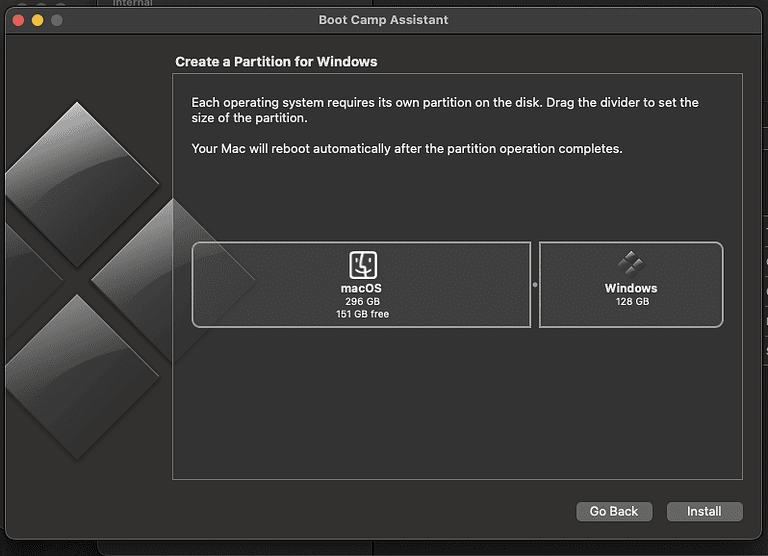
- Open the assistant in Utilities > Boot Camp Assistant.
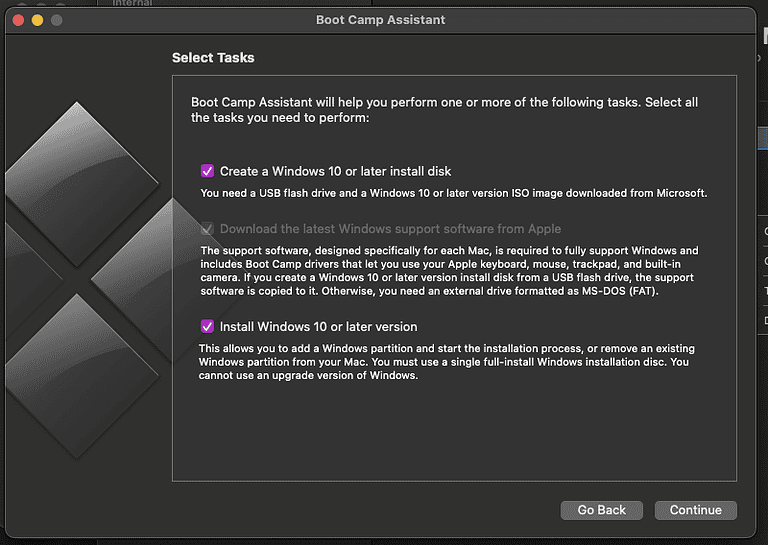
- In the second screen, keep all the checkboxes selected.

- In the third screen, locate the Windows 10 ISO file you downloaded, and the USB drive.

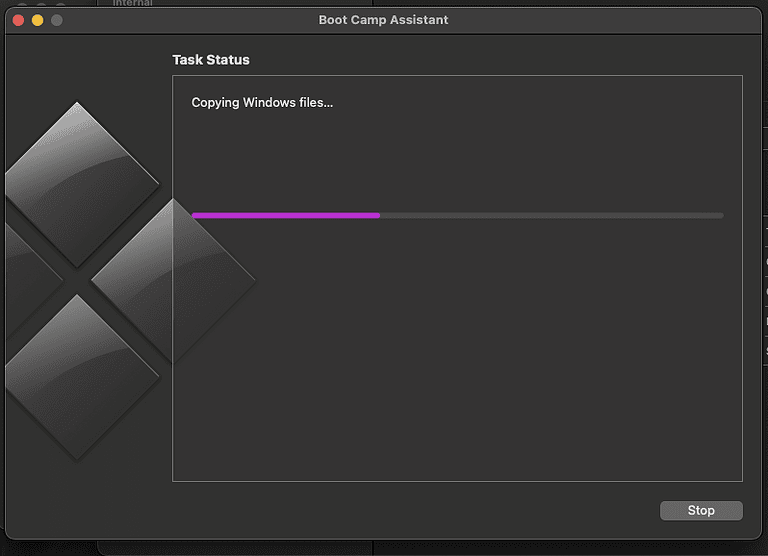
- After that, Boot Camp Assistant will start creating your Windows installation disk. This should take some time, especially because the assistant downloads additional files, like drivers and Apple software.
- Then, you’ll be asked to partition your drive between the Windows and macOS installation. Divide it as you see fit and click Install.
- When the procedure is finished, your Mac will restart. It should boot straight into the Windows installation. If it does, let the installer go all the way through until it asks for your input. If not, check the steps below.

 NOTE
NOTE
5. Reboot to the Windows Installer
If step #4 above doesn’t completely install Windows automatically, you’ll need to perform the rest of the procedure yourself. Here’s how to do that:
- Restart your Mac while holding the left Option key.

- For 2013 or newer Macs: choose the EFI Boot icon with a USB symbol (looks like a trident) on it. For 2012 or older Macs: choose the Windows icon with a USB symbol on it.
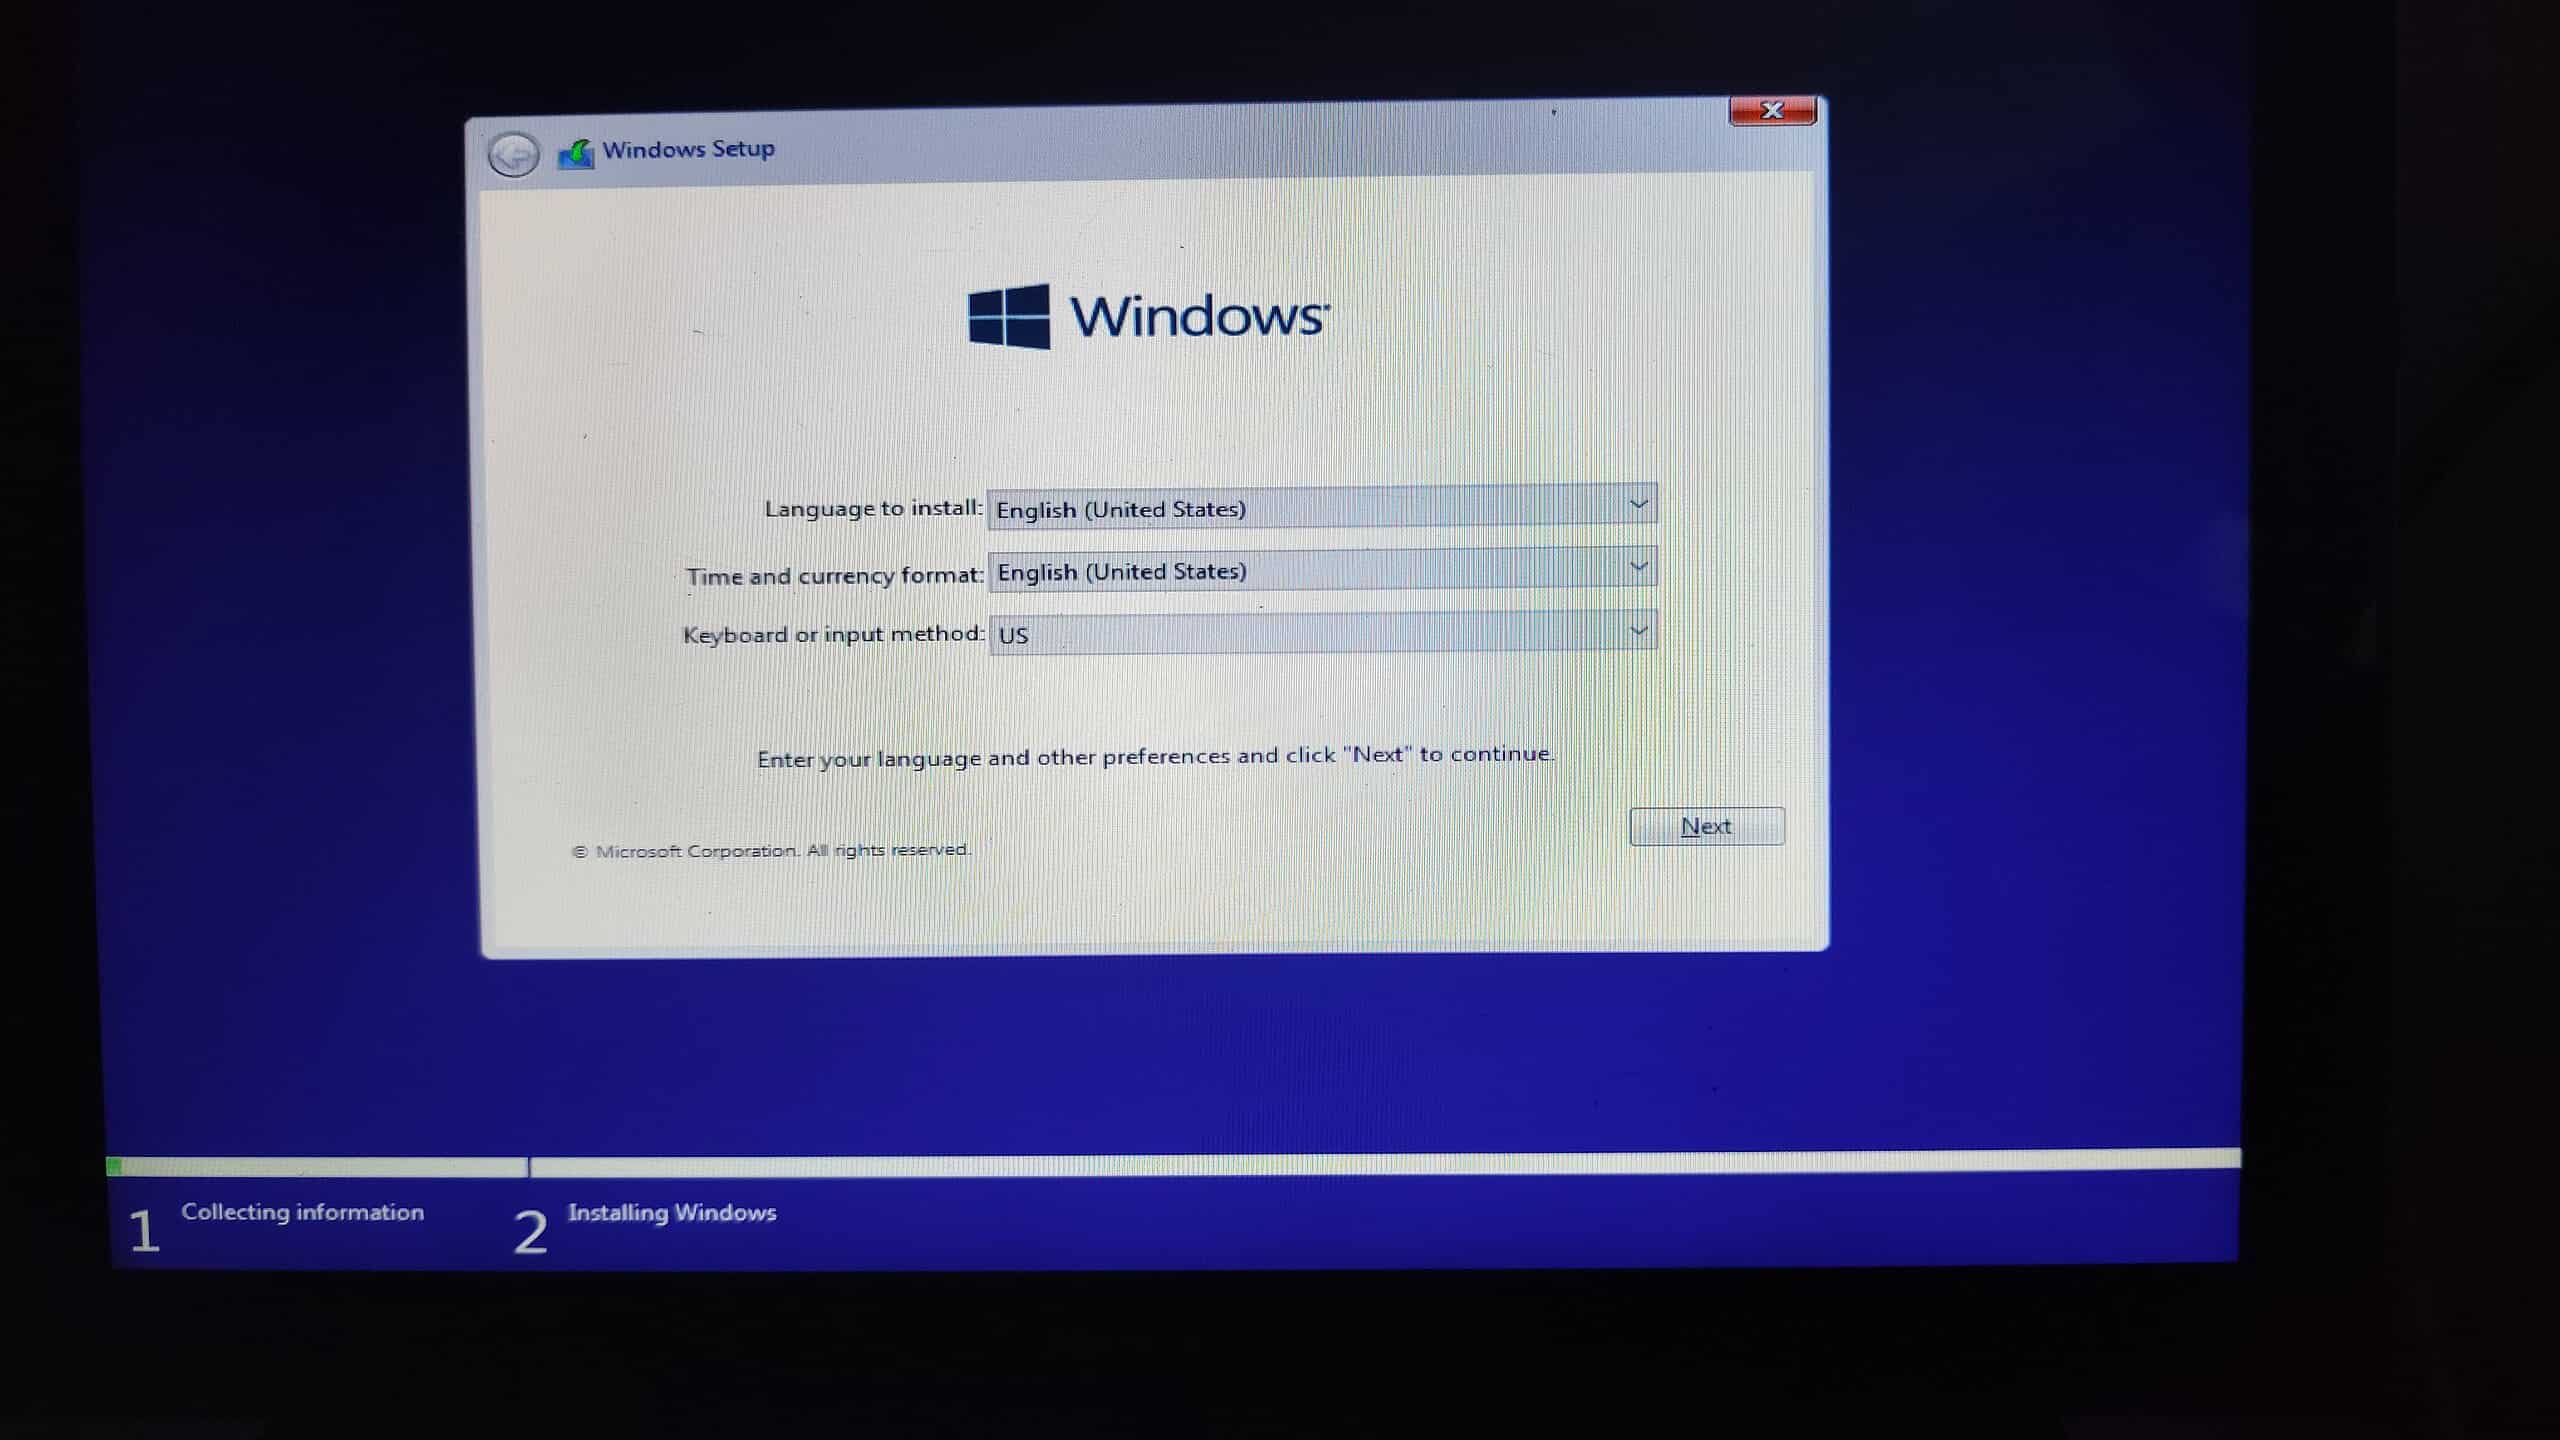
- After opening the Windows installation disk, follow the on-screen instructions to select Windows version, language, and so on.
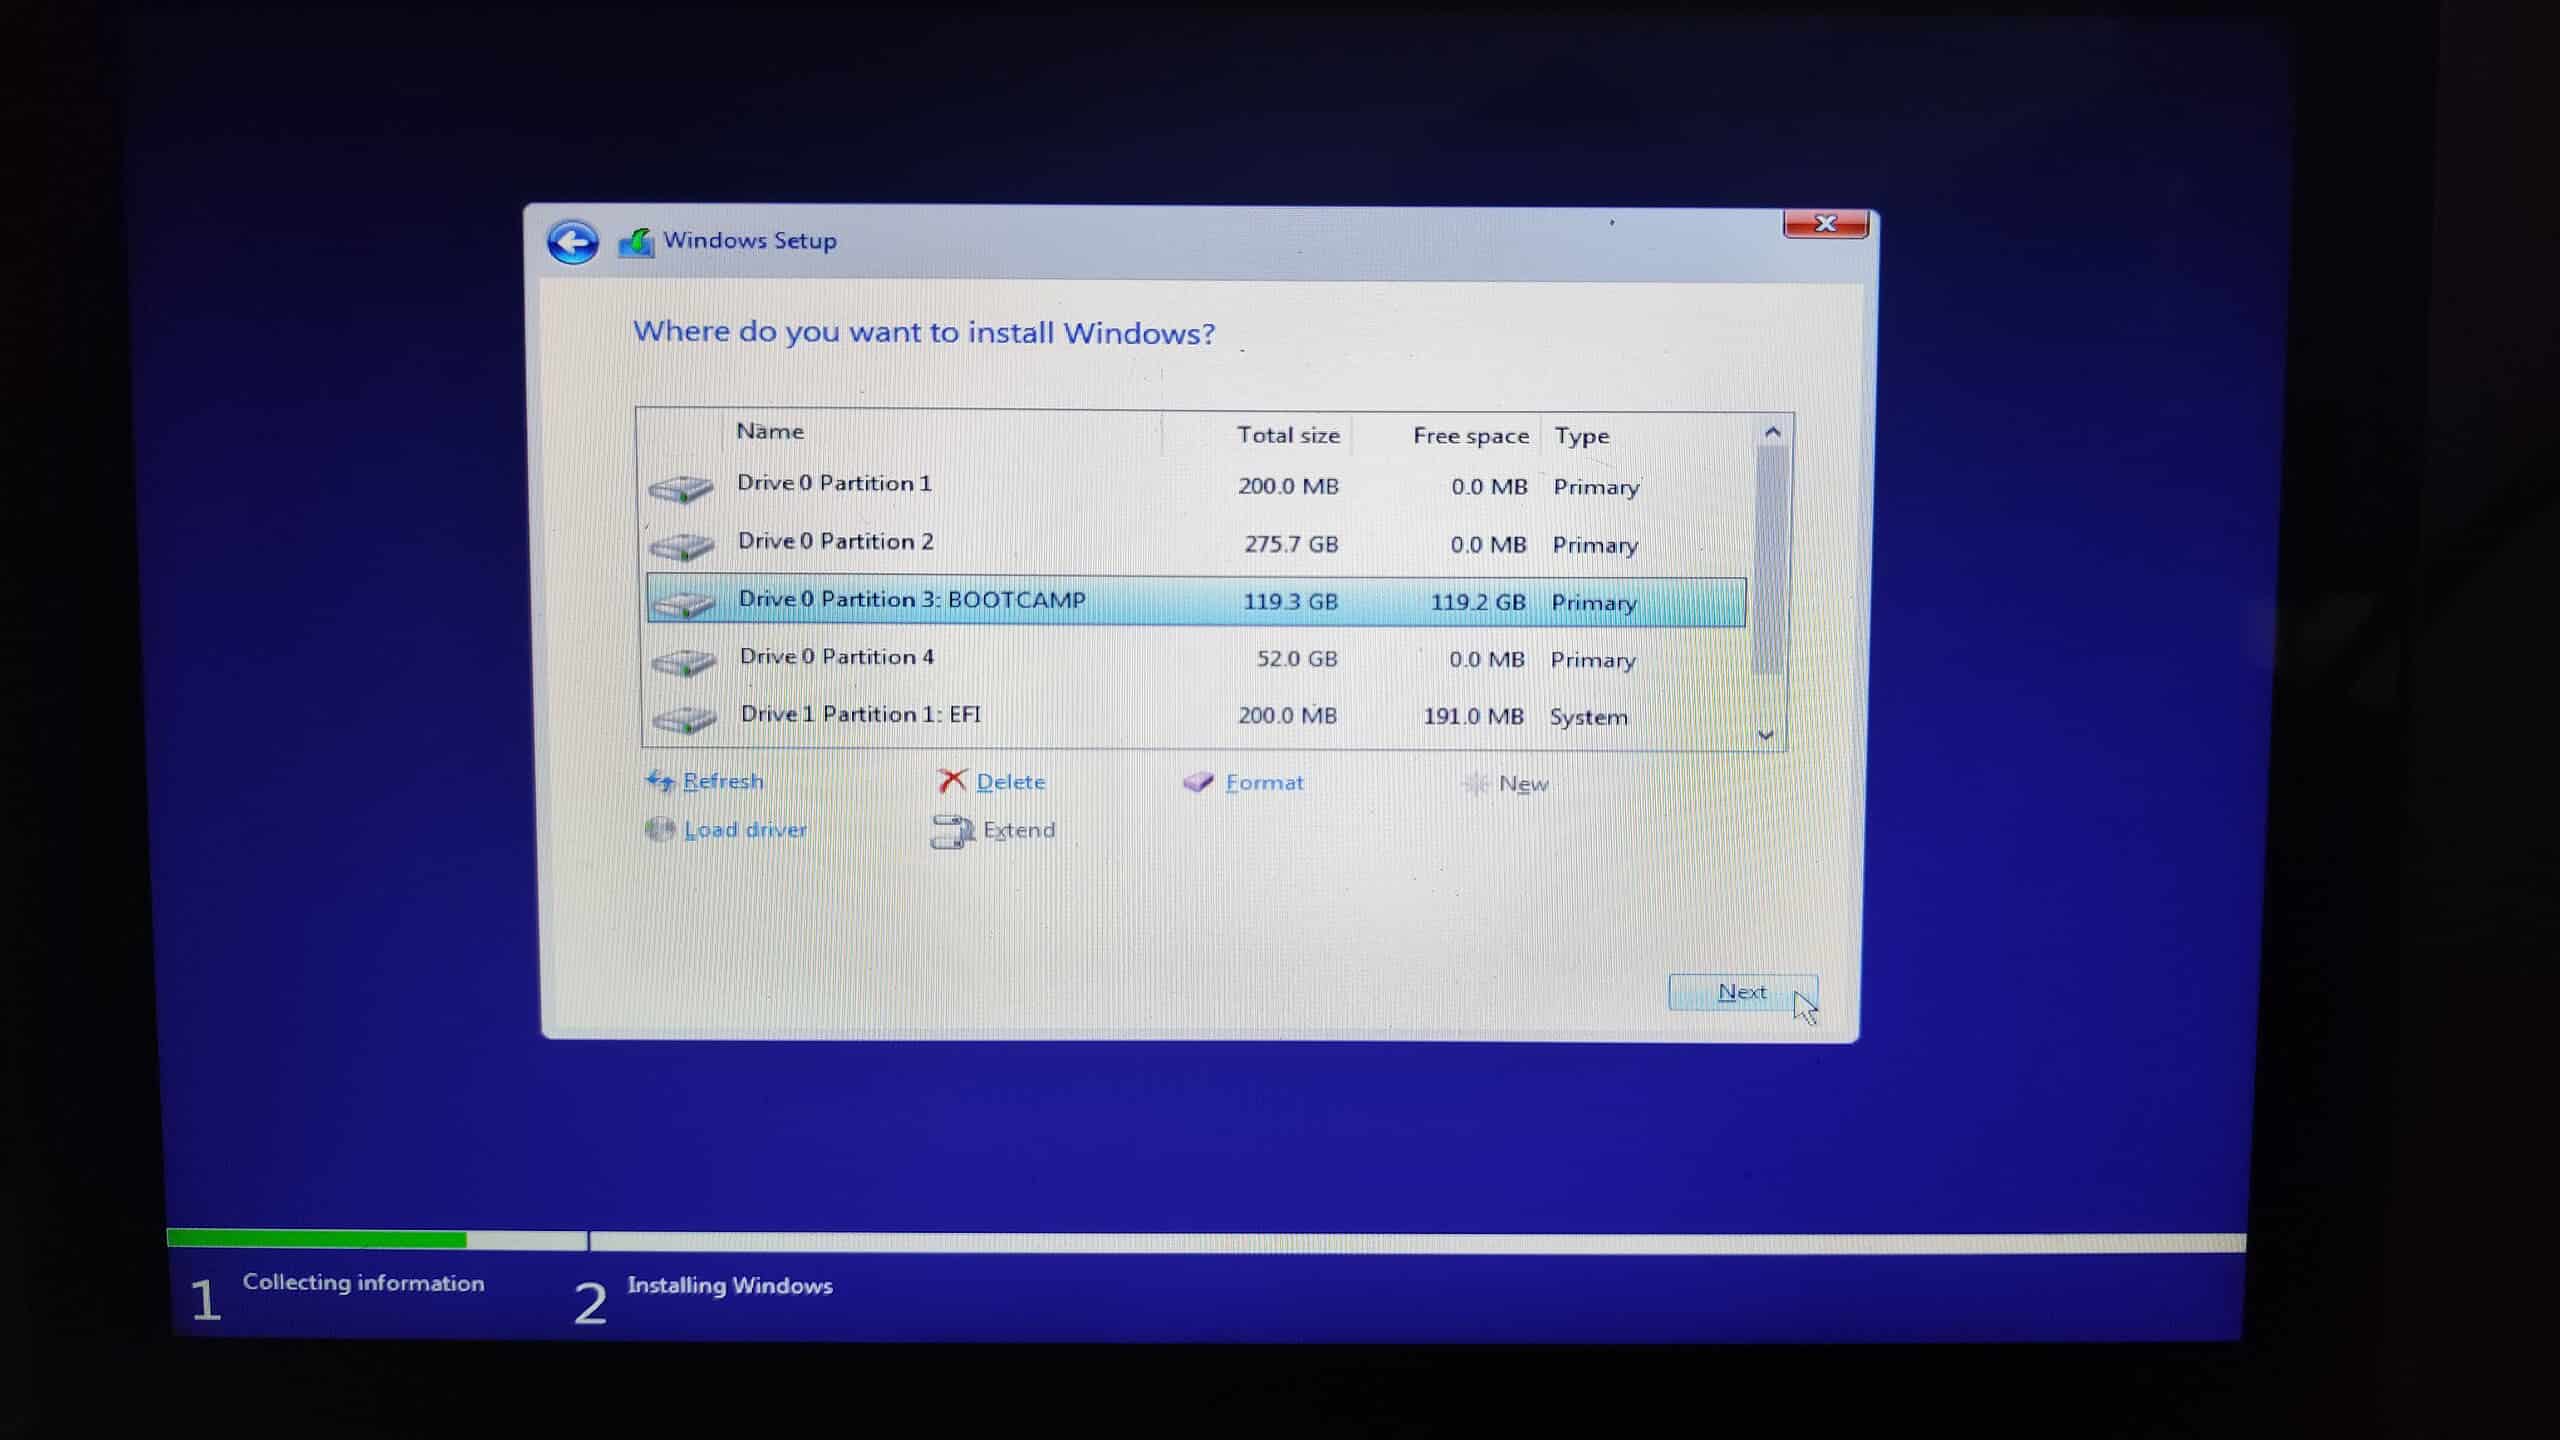
- Make sure you’re installing Windows to the correct partition. It should be named BOOTCAMP, and you’ll be able to discern it from your macOS partition by the size difference. It may require formatting before installing Windows, just click Format and you’re good to go. In some more recent Macs, this step is done automatically.

Installing Windows 11 in Boot Camp: Should I Use MBR or GPT?
Now, you need to consider a few things before we move on.
- A common error message, in this part, says you can’t install EFI/GPT Windows versions in MBR disks. If you get that, you have two options. The easiest one is to restart and select the MBR installer (labeled Windows) in the boot picker. In some situations, however, users really need to install Windows in EFI mode. If this is your case, but you have a 2011-2012 Mac, this guide by Mr. Macintosh describes a workaround.
- It’s important to mention that 2011-2012 models only offer partial UEFI support, and are unstable when installed that way. You may face frequent Blue Screens of Death (BSODs), driver issues (commonly regarding sound), and so on. You may also need to convert your disk to a “Hybrid MBR” partition table using a terminal program called Gdisk. Hybrid MBRs are themselves not very trustable, so I strongly advise against using this method.
- Going for a MBR installation has its own drawbacks, too. Firstly, you’ll have slower boot times, though this shouldn’t be that noticeable. Secondly, you won’t be able to (easily) install another OS after Windows, making triple-boot setups much more complex. It’s also less secure, both because MBR itself is less secure than GPT, and because MBR-only systems are older. That means that, for the most part, their hardware is subject to security flaws, and up-to-date software isn’t common. Windows 11 itself is one example: while we’ll go through a workaround for that, it doesn’t support MBR natively.
- Owners of slightly more recent Macs may benefit from the video linked above as well. 2013-2014 models support EFI/GPT, but, by default, run Boot Camp in MBR/BIOS mode. Macs from 2015 onwards run Boot Camp in EFI/GPT mode by default, and require no adaptations.
Steps To Follow in Windows 10
Windows 10 itself is just a pit-stop required for you to be able to install Windows 11. Therefore, you don’t need to waste time setting everything up and personalizing the OS right now. Simply jump through the initial setup.
6. Use Boot Camp Assistant To Install Drivers
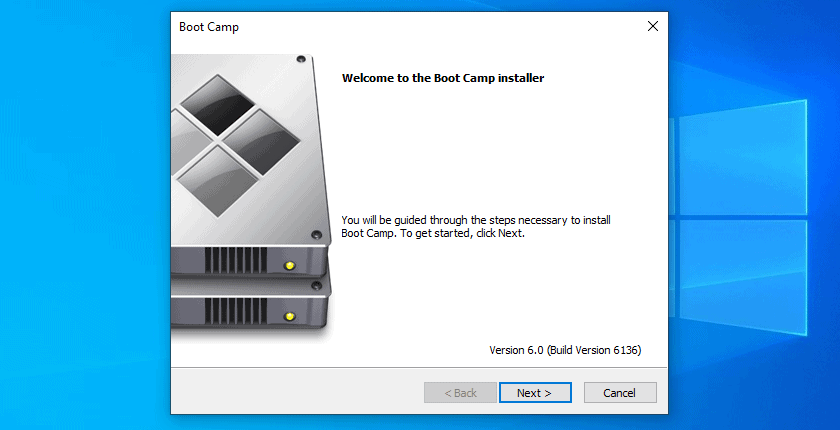
After the Windows 10 installation procedure, Boot Camp Assistant — the Windows version — asks if you want to install Windows drivers. These are required for your Mac to work optimally. Many critical hardware, like GPUs and networking, will perform poorly without these drivers.
In some Macs, you’ll need to install the drivers while still in Windows 10. In these models, neither wired nor wireless internet connections work by default. Without that, you won’t be able to follow the rest of the guide.
Installing the Boot Camp drivers is a pretty much straightforward process. The assistant will pop up when your Windows installation first boots, after the initial setup. Just follow the on-screen instructions, and reboot your Mac after it finishes installing the drivers.
7. Keep the Drivers on your USB Stick (Optional)
For other models, you’ll get basic connectivity working in Windows out-of-the-box. If this is your case, you have the option of keeping driver installation files in the Boot Camp USB stick. You’ll only need to install them, to use your Mac decently, after upgrading. Have in mind, however, that, in this case, you’ll need an additional USB stick to install Windows 11.
8. Download Rufus and Set It Up Correctly
To install Windows 11, we’ll need a program called Rufus. Rufus is a thorough ISO flashing app, which offers customization for dozens of Windows and Linux USB installers. Here’s how to do that:
- Download Rufus from the program’s website. Make sure you’re on the latest version.
- Open Rufus and select, under Device the USB stick you’ll use for the Windows 11 installer. Under Boot selection, click SELECT and open the Windows 11 ISO.

- If your Mac is a 2015 or newer model, leave Partition scheme as GPT and Target system as UEFI (non-CSM). If you have a 2011-2012 Mac, select MBR and BIOS (or UEFI-CSM), respectively.
- Click Show advanced drive properties and enable the Add fixes for old BIOses checkbox. The other boxes may remain unchecked.

- Click START. A dialog will appear, allowing you to customize the Windows installation. The only box that needs to be checked is the one about removing RAM, Secure Boot, and TPM 2.0 requirements. While you can check the other boxes if you want to use these options, they’re not mandatory.


9. Install Windows 11
Finally, we’ll upgrade the Windows 10 installation to Windows 11. To do that, follow the steps below.
- With the Windows 11 USB still connected, open its folder in File Explorer and run the Setup.exe file. Follow the on-screen instructions, and your Windows 11 installation will go through.

- If you see a warning saying your computer doesn’t meet the upgrade requirements. While the warning may make you worry about installing Windows 11 on your Mac without TPM, you can safely ignore it. Just click Accept and proceed with the installation.

- By default, Windows should choose to upgrade without wiping your disk. You can click the blue text below the checklist to change this, if your installer tries to perform a clean install. After you’re done, click Install.

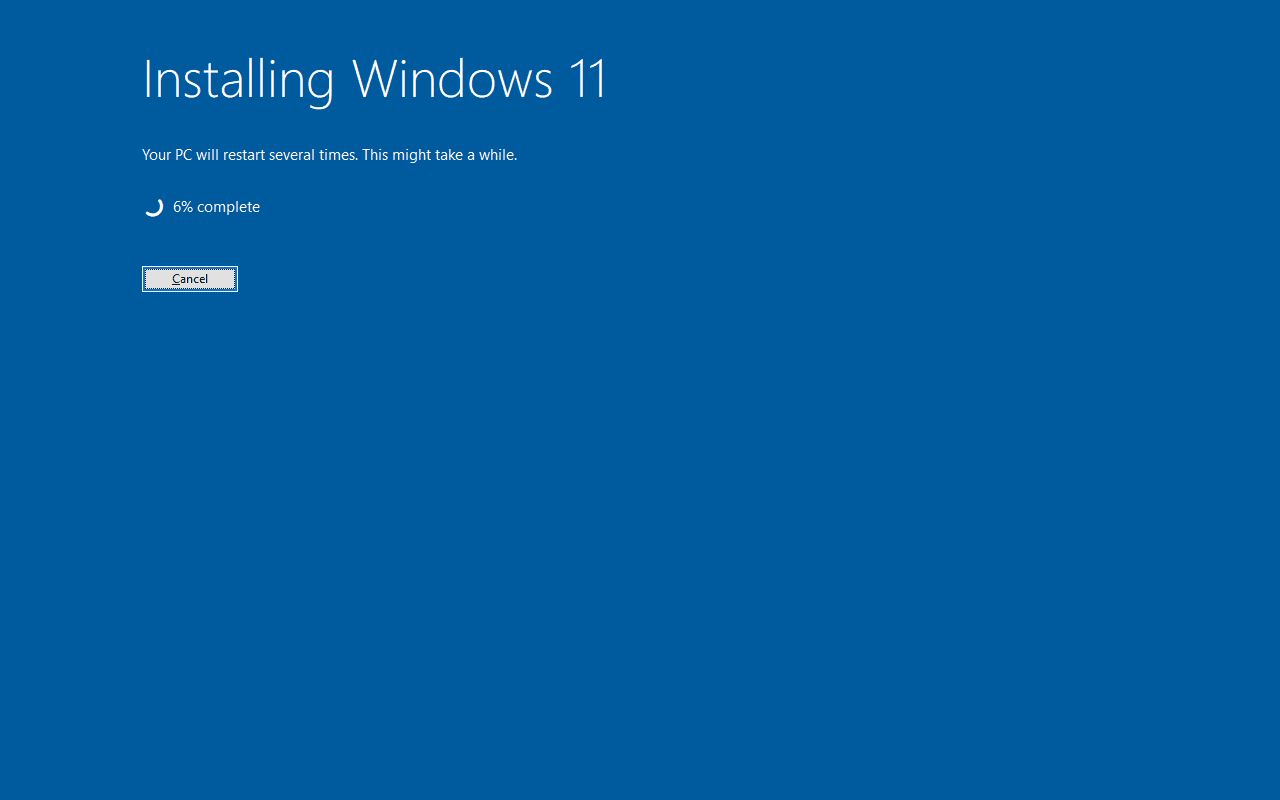
- The Windows 11 installation will begin. You should see a blue screen saying Installing Windows 11, and a percentage counter.

- Your Mac should restart a few times during the installation. When that happens, remember to hold the left Option key and select the Windows disk (not the USB stick). Otherwise, you’ll either reboot to macOS or to the Windows installer. If that happens, just restart your Mac and select the correct disk.


Clean Install vs Upgrading
It’s better to start the installer from inside Windows 10, instead of rebooting and then opening the installer. Doing so may require you to perform a clean install, completely wiping Windows 10. If you have done any customization, in this case, you’ll lose them. If you installed the Boot Camp drivers, you’ll need to do that again.
Which criteria are used to force a clean install? Your guess is as good as mine — it always seemed like a lottery to me. Some points, however, are certain to require a full reinstallation:
- Different Windows versions: if you installed Windows 10 Pro, you’ll only be able to update to Windows 11 Pro. The same is valid for Home, Enterprise, and other variants. You can upgrade from Home to Pro before updating, but this requires purchasing an additional license.
- Different system languages: you can’t, e.g., upgrade from a Spanish Windows installation using a US English disk. Most Windows versions allow you to download language packs, so this may be a workaround.
- 32 vs. 64 bits: Windows 11 doesn’t have a 32-bit version. Even before that, you couldn’t, e.g., update from a 32-bit Windows 8.1 using a 64-bit Windows 10 disk. If you downloaded the 32-bit version of Windows 10, just grab a 64-bit ISO in Microsoft’s website. Reboot to macOS, create the 64-bit installer using Boot Camp Assistant, and perform the Windows 10 installation steps again.
10. If You Didn’t Do That in Step #5, Install Boot Camp Drivers
As I stated previously, you don’t need to install the drivers while still in Windows 10. If you decided to postpone this step, however, you’ll need to do that now. Things like function keys, trackpad gestures, and the screen’s lighting sensors, require these drivers.
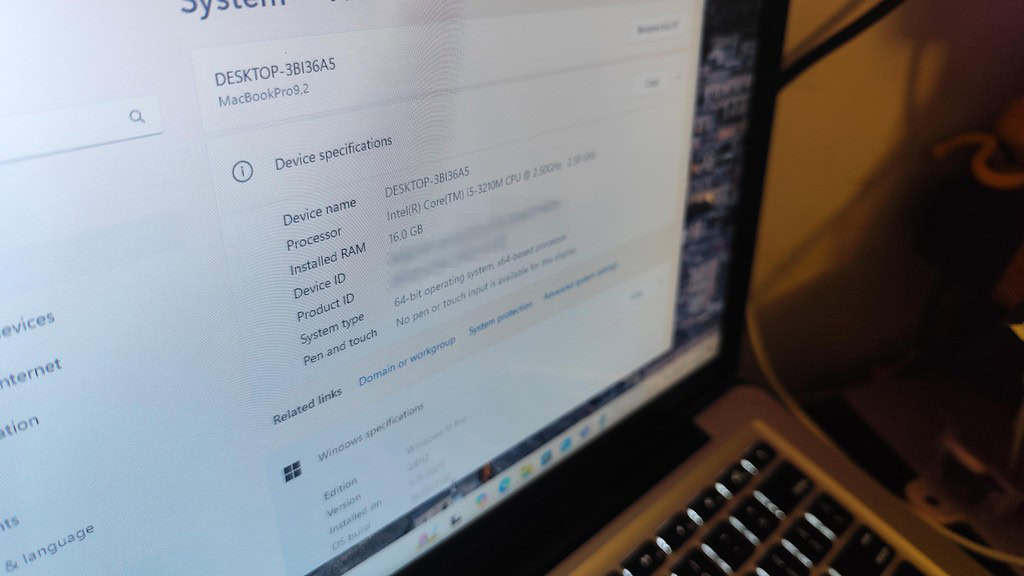
Managed to follow everything to the letter? Congratulations! You now have a Mac with a fully working Windows 11 installation — without needing a TPM chip!
Now, since you’re running officially unsupported hardware, make sure to avoid installing Windows updates as soon as they become available. New versions may break something and make your Windows installation unbootable.