When restoring data on a new Mac or a fresh macOS install, your computer may end up rebooting endlessly. This happens for a number of reasons, but all of them are fixable. You can reinstall macOS, manually transfer files, exclude system settings during migration, or clone your old macOS installation to a new volume.
These problems can be tricky and overwhelming, especially if you’re not used to troubleshooting macOS. To minimize risks and avoid data loss, I’ll walk you through each possible cause and guide you step-by-step through the most effective solutions.
Why Is Migration Assistant Stuck?
The bad news is that there are multiple possible causes for a Migration Assistant boot loop. The main ones are corrupt Time Machine backups, bugs in Migration Assistant, and root patches (in older Macs using OCLP).
Each of them presents themselves with slightly different symptoms. The good news is that there are fixes and workarounds for all scenarios.
How long should a Migration Assistant Take?

In general, you can expect Migration Assistant to take from about 30 minutes to over two hours or more. The exact duration varies widely because of a few factors, like how much data you’re restoring.
The drive type (HDD or SSD, SATA or PCIe) and whether you’re restoring from internal or external disks also matter. For the most part, the ETA informed by the Migration Assistant a few minutes after the transfer starts is usually accurate.
How Do I Get Out of Reboot Loop on Mac?
If your reboot loop is caused by a botched Migration Assistant transfer, there are a few ways to fix it. Each of them fixes the issue based on a different root cause. Check below:
1. Corrupt Time Machine backup
When finishing a Time Machine backup, macOS checks the copied files to ensure their integrity. However, factors like a failing disk may cause your backup to become corrupt after it is stored.
If this is your case, you have two options. If you still have access to the Mac (or startup disk, if migrating on the same computer), things are easier. You can simply perform the backup again, or try to restore directly from the startup disk.
If you don’t have access to the macOS installation that created the backup, the situation is a bit more complex. You can partially fix the situation with the steps below.
Time needed: 6 hours
- Reinstall macOS from scratch, but, instead of restoring, select the option to configure your Mac as new in the initial setup.
- During the setup, create an account with the same name and username as the ones on the previous macOS installation.

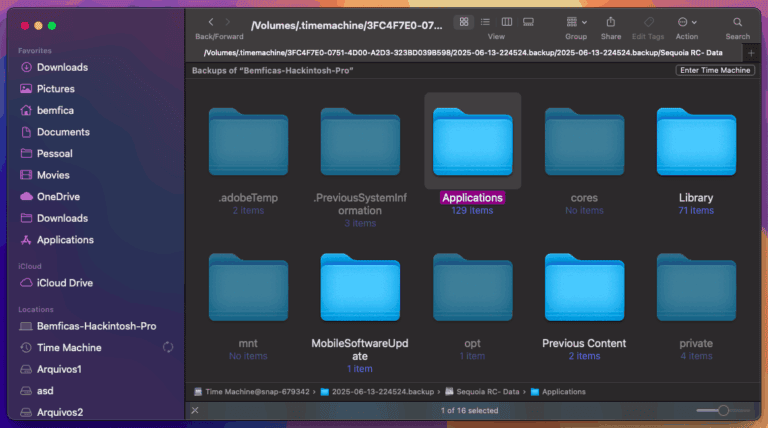
- After finishing the initial setup, connect your Time Machine disk. Inside it, you will see lots of folders with the Time Machine icon.
- Each folder is named with the date and time the backup happened. Open the two more recent ones in separate tabs.
- Each one will appear as if you were seeing your Mac’s start folder. This is not your Home folder, but the one listing internal and external disks, the Network icon, and so on.
- Navigate, in the more recent backup, to your user folder. It should be under /Users/[yourusername]. Select everything inside that folder and copy this content to the user folder in your new Mac or macOS installation.
- You will be prompted several times about replacing, keeping both, or skipping (or merging, if a folder) files and folders. Check the Apply to All button and click Skip or Merge. You must not replace anything, since the newer macOS version will need the newer versions of the files to work properly.
- Perform steps #6 and #7 for the /Applications folder in that backup as well
- If you receive a message about corrupt files hindering the copy, skip them. After copying everything else, go to the second most recent Time Machine backup and copy the files that were corrupt. If they’re also corrupt in the second most recent backup, go to the third most recent, and so on.


 NOTE
NOTE
2. Migration Assistant Bug
In many cases, the app itself is the cause of the issue. This scenario may have multiple sub-causes, making Migration Assistant suffer reboot loops at different points. And, for each one, there’s a different fix to try.
Reinstall macOS (Again) Without Deleting Your Data
The first thing to try is simply installing macOS again, over your boot-looping installation, without wiping the disk. For some users, this does the trick. For others, however, this merely recreates the user accounts, without transferring files, settings, or apps from the previous installation.
Copy Everything Manually

If the above method fails, there’s a solution that’s somewhat time-consuming but works well enough: copy all the content by hand. To do that, follow steps #6 and onwards of the Corrupt Time Machine Backup section above.
Uncheck System & Network in Migration Assistant
In some cases, though, copying manually doesn’t work. Frequent issues with that method include corrupt apps and storage space being occupied without the files appearing in their folders. If this is your case, try performing the migration again, on a clean installation, without checking the System & Network item.
This is very inconvenient since you’ll need to configure all your macOS preferences again. It beats, however, having to re-install all your apps and find which folders are transferring correctly and which aren’t.
Clone Your Old macOS Installation to a New Drive, Then Update
This is the method I find more efficient. I didn’t list it first, however, because it takes a considerable amount of time and requires some technical knowledge.
You’ll only be able to try this method if you have the following items available:
- A USB disk of 32GB or larger, to use as a macOS bootable installer.
- Either more than half of your Mac’s storage is free, or another SSD is larger than your currently used storage space.
- Enough time is available to troubleshoot the method. It usually works on the first try, but your mileage may vary.
Here’s what you need to do:
- Create your macOS installation media. The up-to-date instructions on how to do that can be found on this Apple Support page.
- Boot your Mac using the USB installer and open Disk Utility.
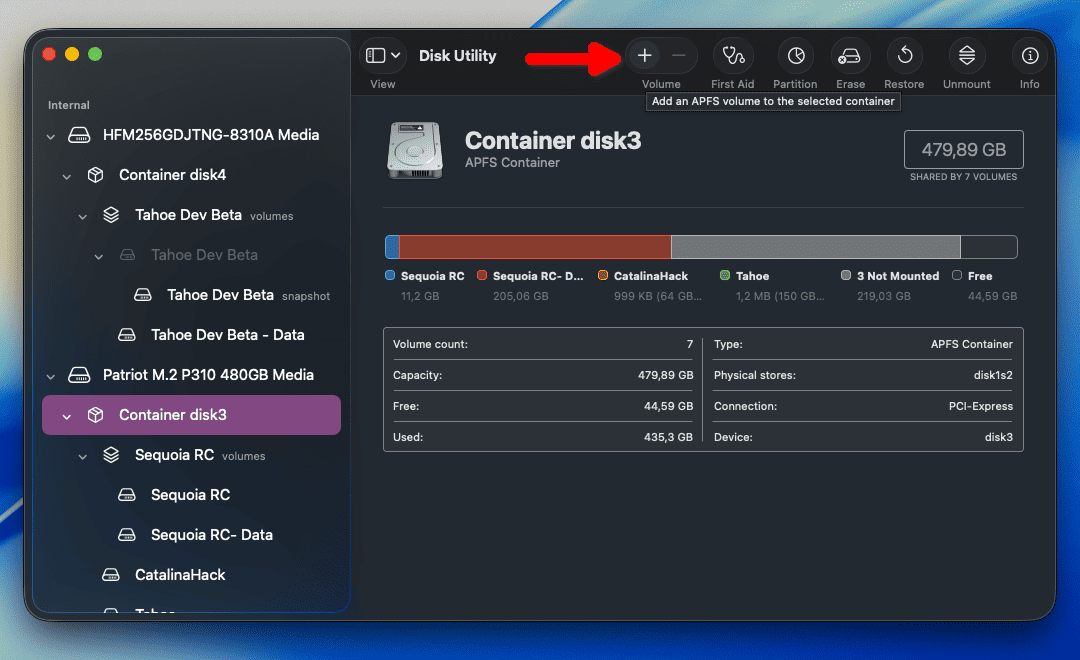
- Press Command + 2 to show all storage devices.
- If you’re cloning your macOS installation to the same disk, you’ll need to create a new APFS volume first. In this case, follow steps #5 and #6 below and skip #7. If you use a different physical disk, there’s no need to do that, so ignore steps #5 and #6.

- Select the Container Disk in your internal storage and click the + button over Volumes on the top menu.
- There’s no need to give the new volume a name since it will be erased in a minute. Click on Size Options… and give the volume a Reserve Size value bigger than your currently used storage. After creating the new volume, click on it and select Restore on the top menu.
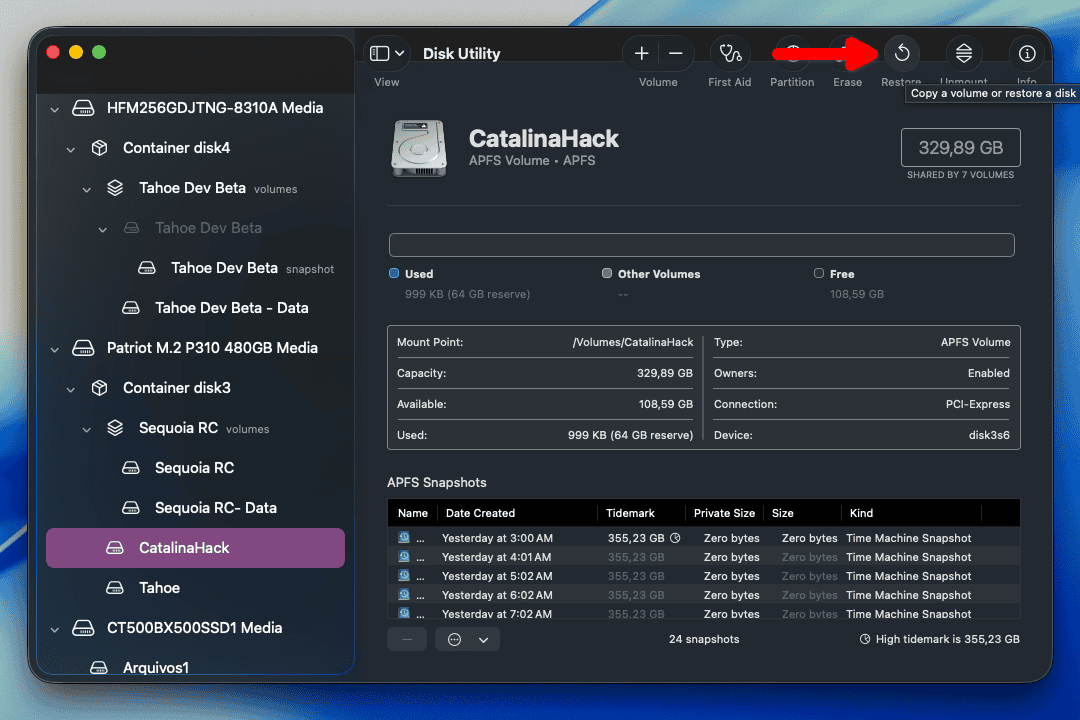
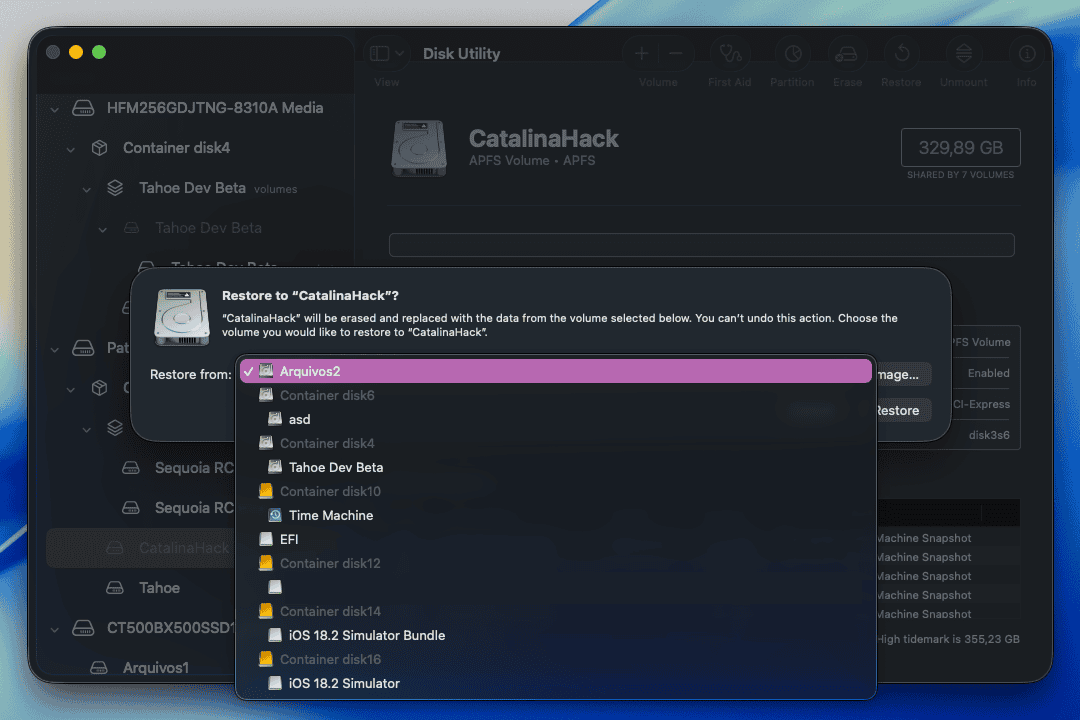
- Select the disk you will clone your macOS installation to and click Restore on the top menu.

- On the dialog that opens, select your current installation disk from the drop-down menu. On macOS Catalina or newer, select the “Data” volume of your installation, and the system will be copied alongside it.
- Click the Restore button and wait for the procedure to finish. Depending on your storage size and how much of it is occupied, this can take from minutes to several hours.
- After restoring, rename the newly restored volume. You can use any name, we just need to distinguish this volume from the original installation. To do that, select the volume and click its name between the drive icon and the storage size indicator. Type the new name and click anywhere else.
- Close Disk Utility and you’ll be back in the installer’s initial screen. Click on Install macOS and select the newly restored disk.
- Your macOS installation should proceed normally as if it were an in-place upgrade — because, technically, it is. Therefore, after the installation is finished (your Mac should reboot about four times), you’ll be greeted by the updated system. There will be no need to use Migration Assistant since all your apps and files will be available already.


 NOTE
NOTE
You won’t be able to restore Container Disks in any case. For this guide, however, simply restoring the “Data” volume should have the same effect.
3. Migration Assistant Stuck in Reboot Loop Using OCLP
One last, very specific case, is for OCLP users. OCLP stands for OpenCore Legacy Patcher and is a tool that allows older Macs to run recent macOS versions.
For these users, the solution is quite simple, but it requires a complete re-installation. Follow the steps below:
- Wipe the disk where you installed the new macOS version.
- Install that version again.
- Set up the installation as a new Mac.
- OCLP installers include the OCLP app with macOS. In most cases, it will pop up right after the initial setup. The app will ask if you want to move your USB installer’s EFI folder to the internal disk. It will also offer to update root patches. Accept the former, refuse the latter.
- After that, use the OCLP app to remove all root patches from your Mac. It will likely lose important features like graphical acceleration, sound, and networking. Don’t worry, this is only temporary.
- After removing the root patches and rebooting, launch Migration Assistant. Proceed normally, restarting your Mac when required.
- If everything is transferred correctly to the new installation, open the OCLP app and re-apply the root patches.
Can I leave the Migration Assistant on Overnight?
In most cases, there’s no risk in doing that. If things go well, you’ll find your Mac ready to be used the next morning. If you end up having a Migration Assistant reboot loop, it will simply have restarted several times already.
However, if you leave Migration Assistant overnight, and it still doesn’t finish transferring the data, it’s best to restart it. Chances are that this was a transitory bug, but the issue is likely a corrupt backup or startup disk.
In this case, use Disk Utility’s Info button to check the drive’s S.M.A.R.T. status. S.M.A.R.T. is a standard involving a number of checks to make sure an HDD or SSD is working correctly. If a drive fails S.M.A.R.T. tests, it’s faulty, and you should get a replacement ASAP.
Migration Assistant stuck on a boot loop is surely a way to start new macOS installations on the wrong foot. The bad news is that there are multiple reasons something like that can happen. The good news is that, for each of them, there are workarounds and fixes you can try.