
A lot of essential smartphone features rely on audio input. Whether you’re making calls, recording videos, or asking Siri to open an app on your iPhone, you’ll have trouble if your microphone is not working. Sadly, this might be the case on iOS 17 releases up to iOS 17.5. I noticed audio issues after updating my iPhone. At first, my voice wasn’t getting through calls, then my audio recordings started sounding muffled.
Although the obvious culprit could be hardware defects, note that software update bugs can also introduce the same audio issues. It’s best to try these troubleshooting steps before calling for repairs.
How To Fix Microphone Not Working Issue on iOS 17/17.5
1. Test Your Microphone Functionality
Time needed: 2 minutes
Before we move to the potential fixes, let’s perform a quick test to isolate the problem. This simple step helps determine whether the issue lies with your iPhone’s hardware or software. Here’s how to test your audio input:
- Open the Voice Memos app on your iPhone.
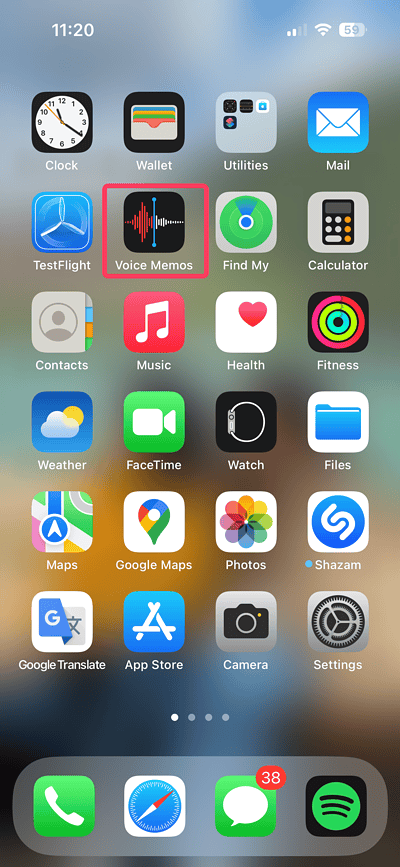
- Tap the red record button and speak into the microphone at the bottom of your phone for a few seconds.

- Tap the button again to stop recording.
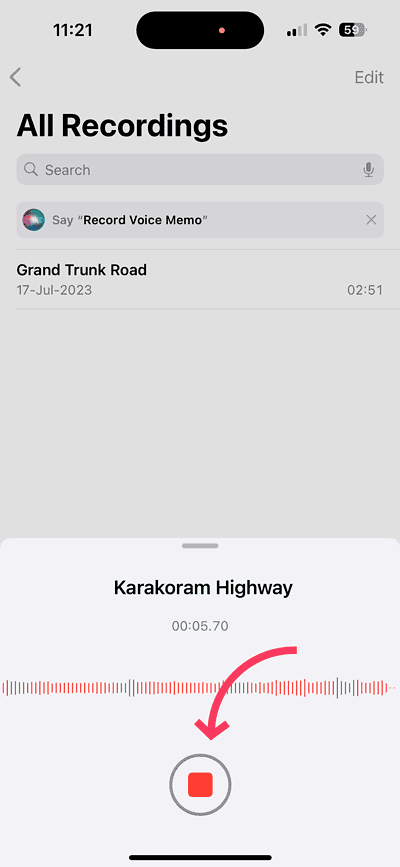
- Play back the recording. If your voice sounds clear and crisp, your primary microphone is functioning properly.


Now, to check your iPhone’s front microphone:
- Open the Camera app.
- Switch to the front-facing camera by tapping the icon with two arrows circling each other.
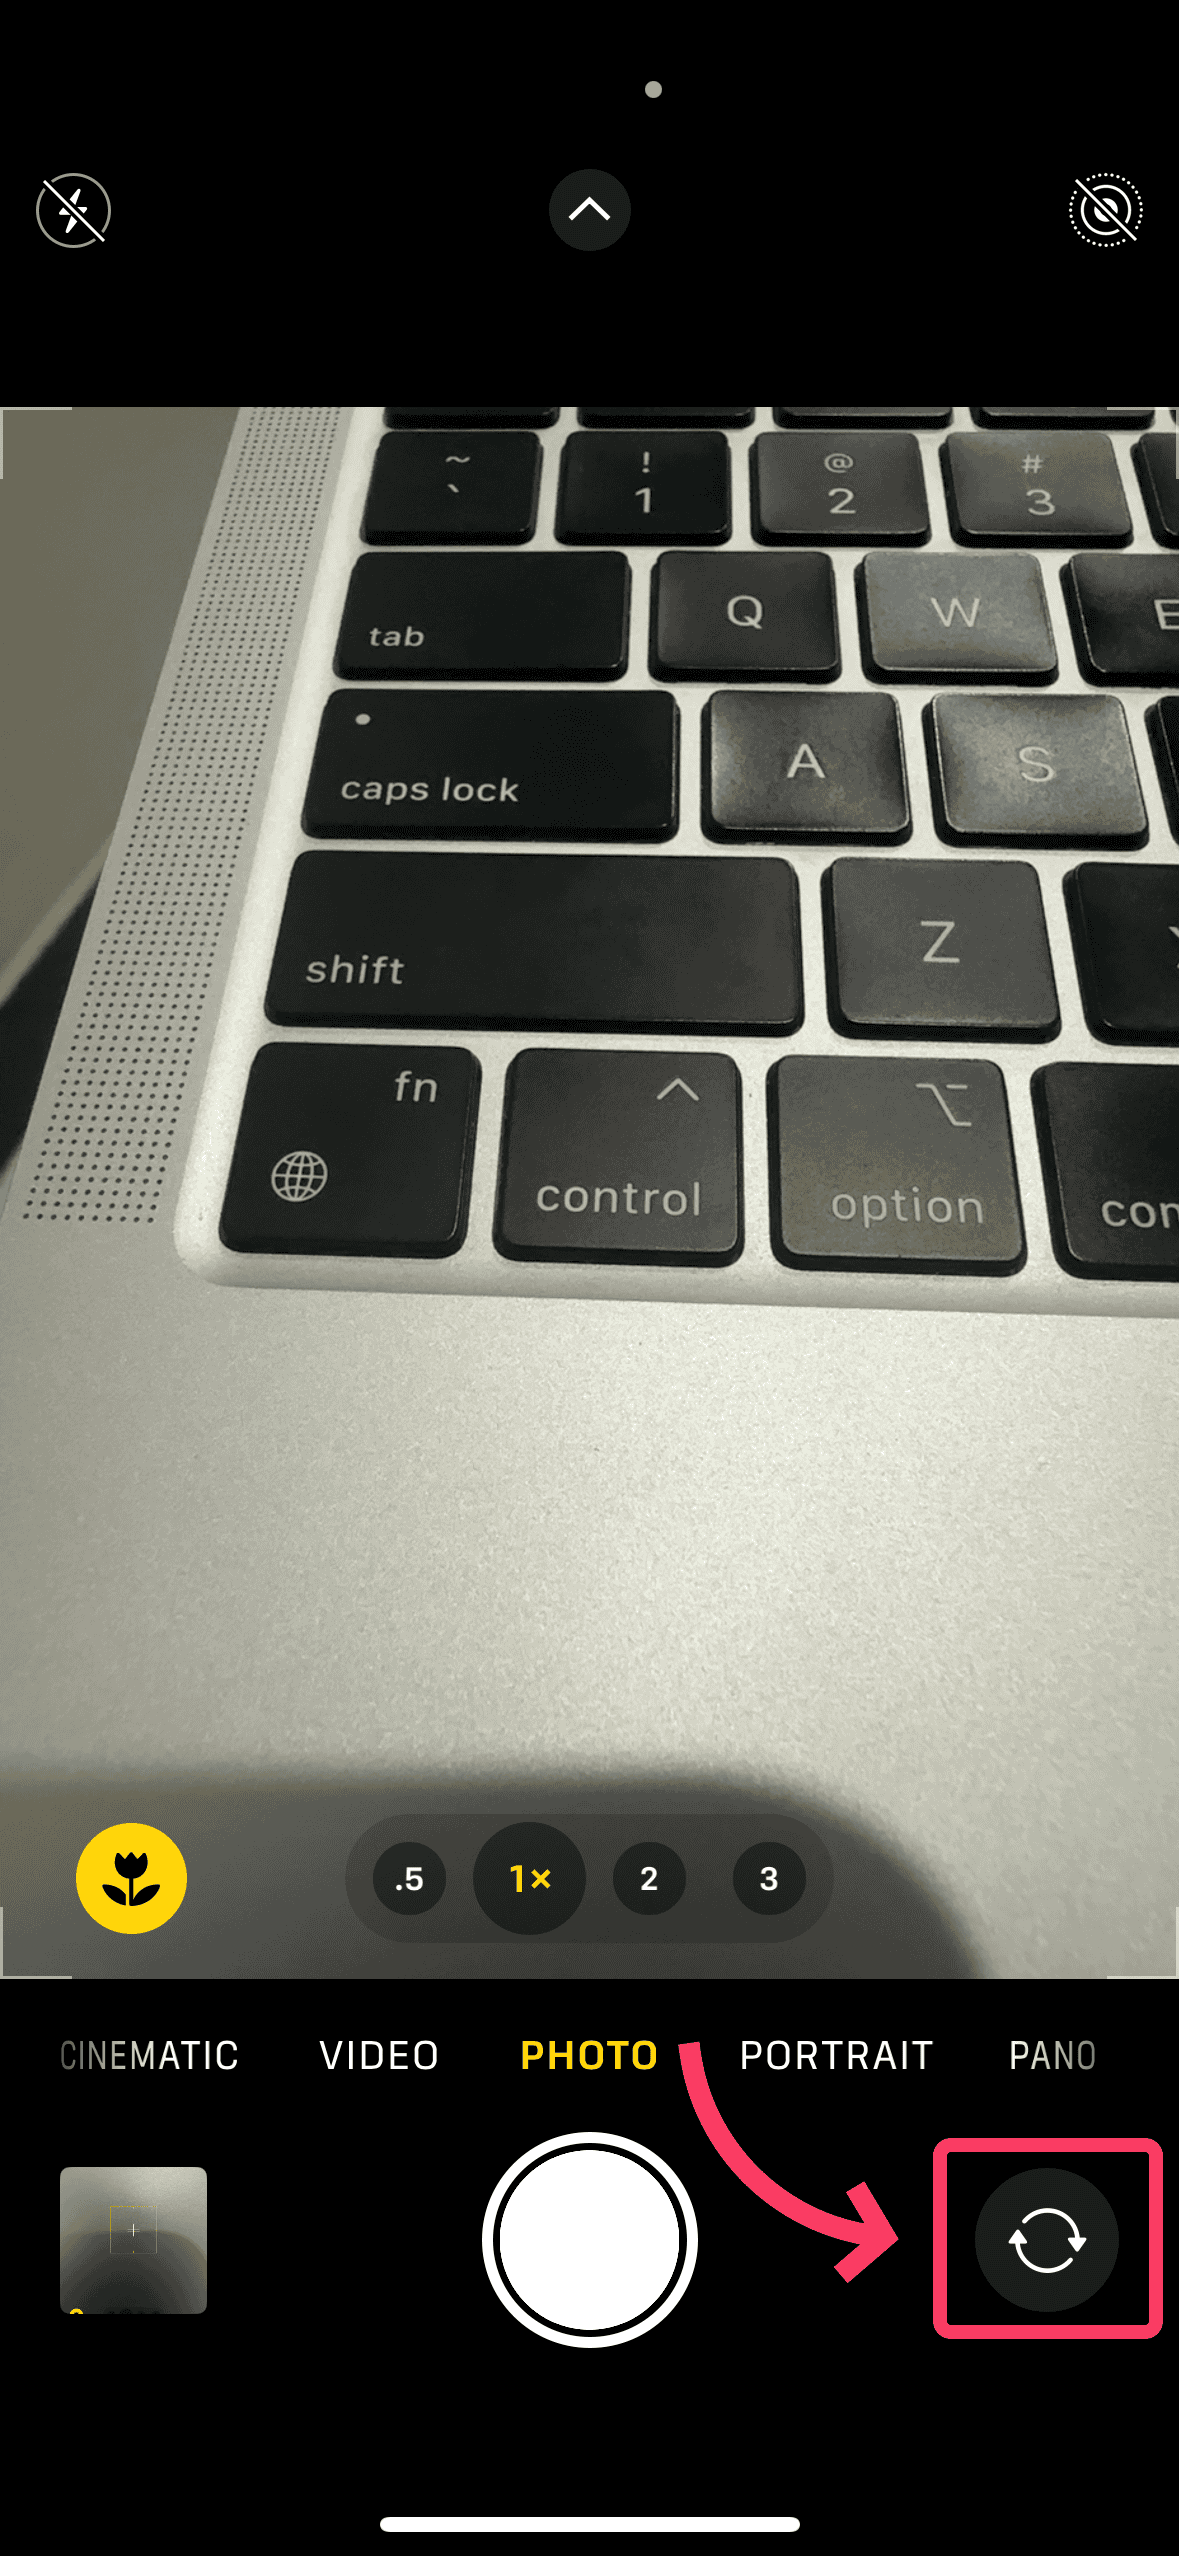
- Record a short video while speaking into the top speaker area of your iPhone (where the front microphone is usually located).
- Play the video. If you hear no sound or muffled audio during playback, there might be an issue with the front microphone.

These steps can pinpoint whether the problem affects both microphones or not.
2. Clean the Microphone
A dirty microphone can become clogged with dust and pocket lint, among other debris. Dirt buildup makes it hard for your voice to pass through clearly, so you have to clean your iPhone gently.
- As a safety precaution, turn off your iPhone to prevent accidental shortage.
- For cleaning, you’ll need a soft, dry brush (like a clean paintbrush) or a non-abrasive cloth. Avoid using sharp objects or compressed air, as these can damage the delicate microphone mesh.
- Carefully brush the microphone holes (located at the bottom of the iPhone and sometimes near the front speaker) to dislodge any debris.
- Once you’ve cleaned your iPhone, hold your iPhone up to a light and look closely at the microphone holes. If you see any remaining debris, consult a professional for further cleaning to avoid damaging the microphone.
 Tip
Tip
3. Grant Necessary App Permissions
Certain apps require explicit permission to access your iPhone’s microphone. If an app you need the microphone for isn’t working properly, it might not have the necessary access granted.
Here’s how to check and adjust microphone permissions:
- Open the Settings app on your iPhone.
- Scroll down and tap on Privacy & Security.
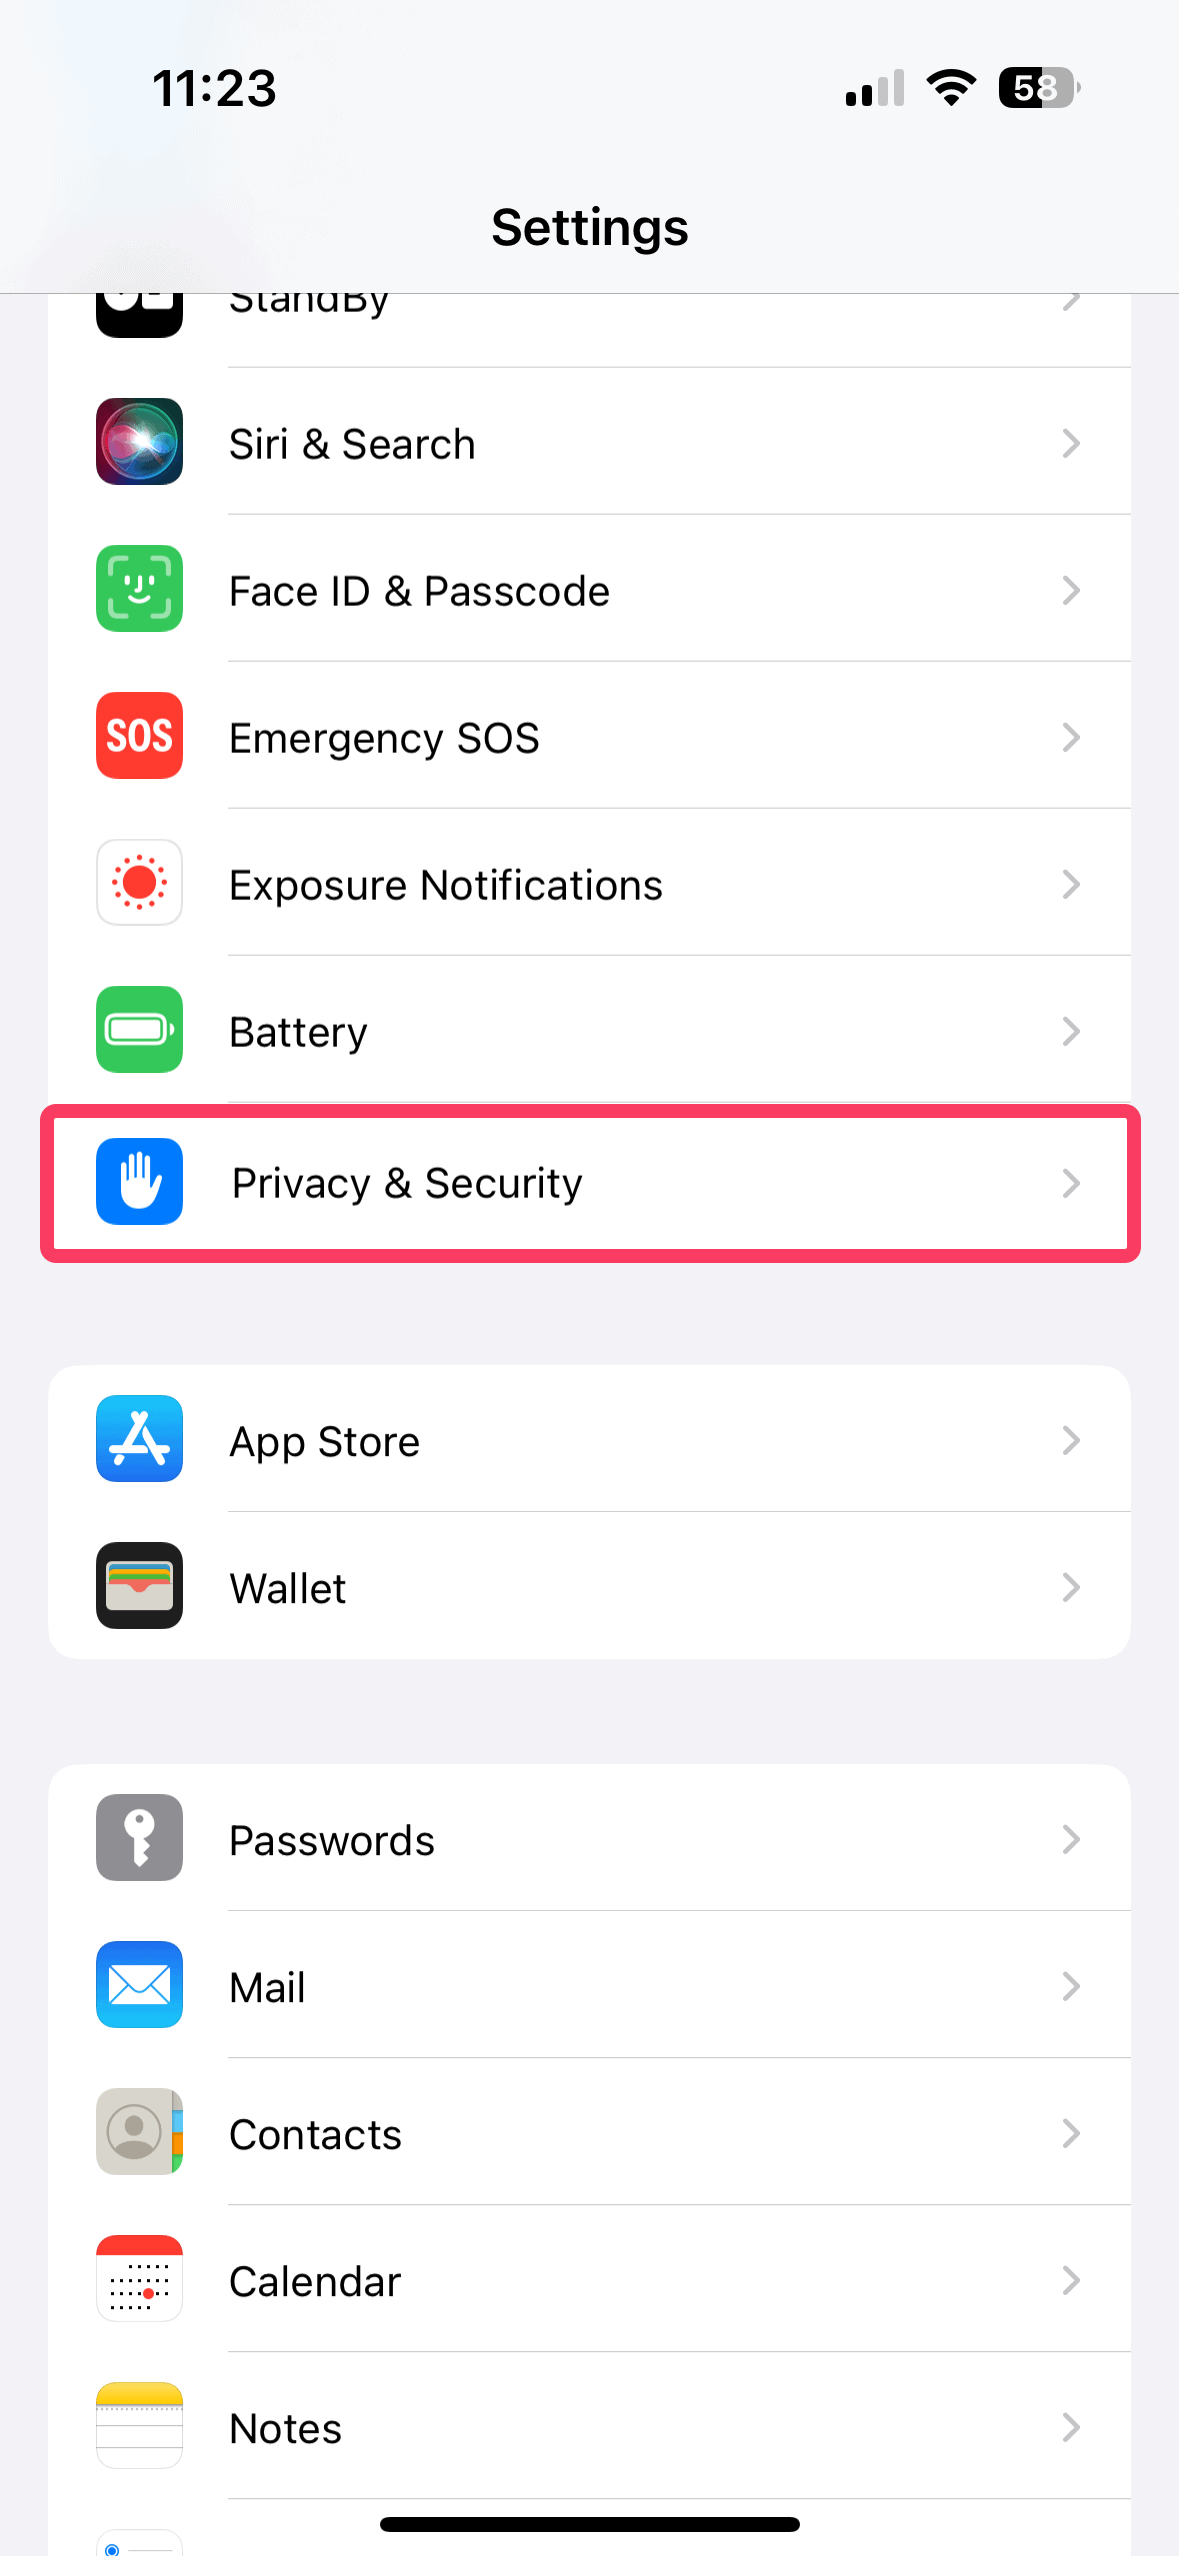
- Tap on Microphone.
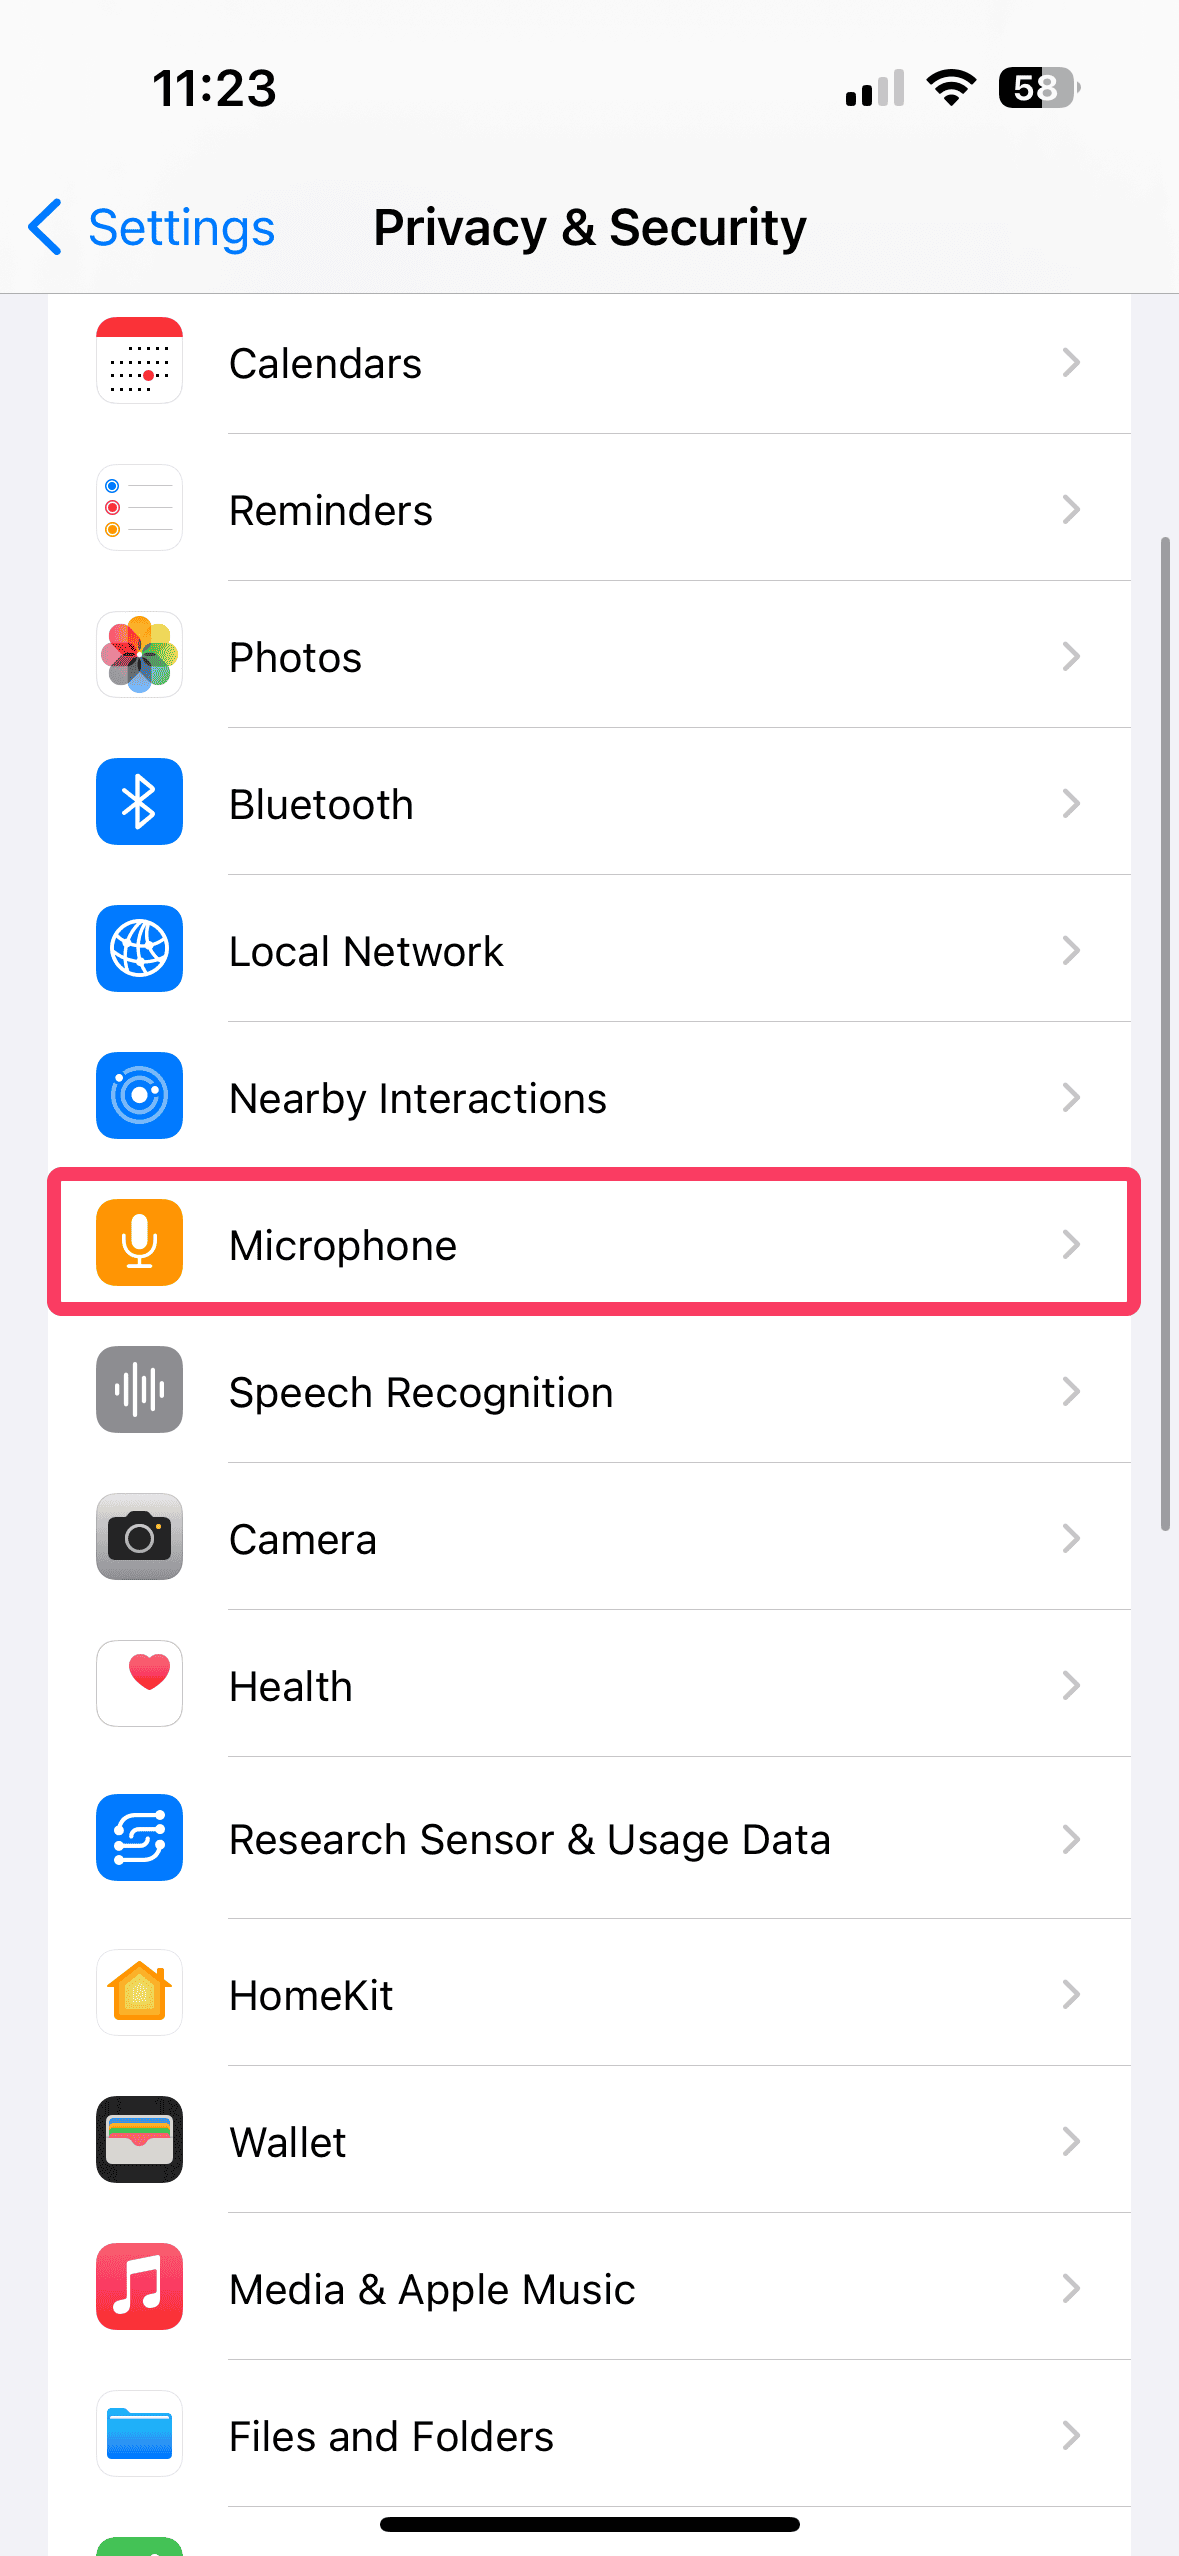
- You’ll see a list of apps that have requested microphone access. Find the app you’re having trouble with.
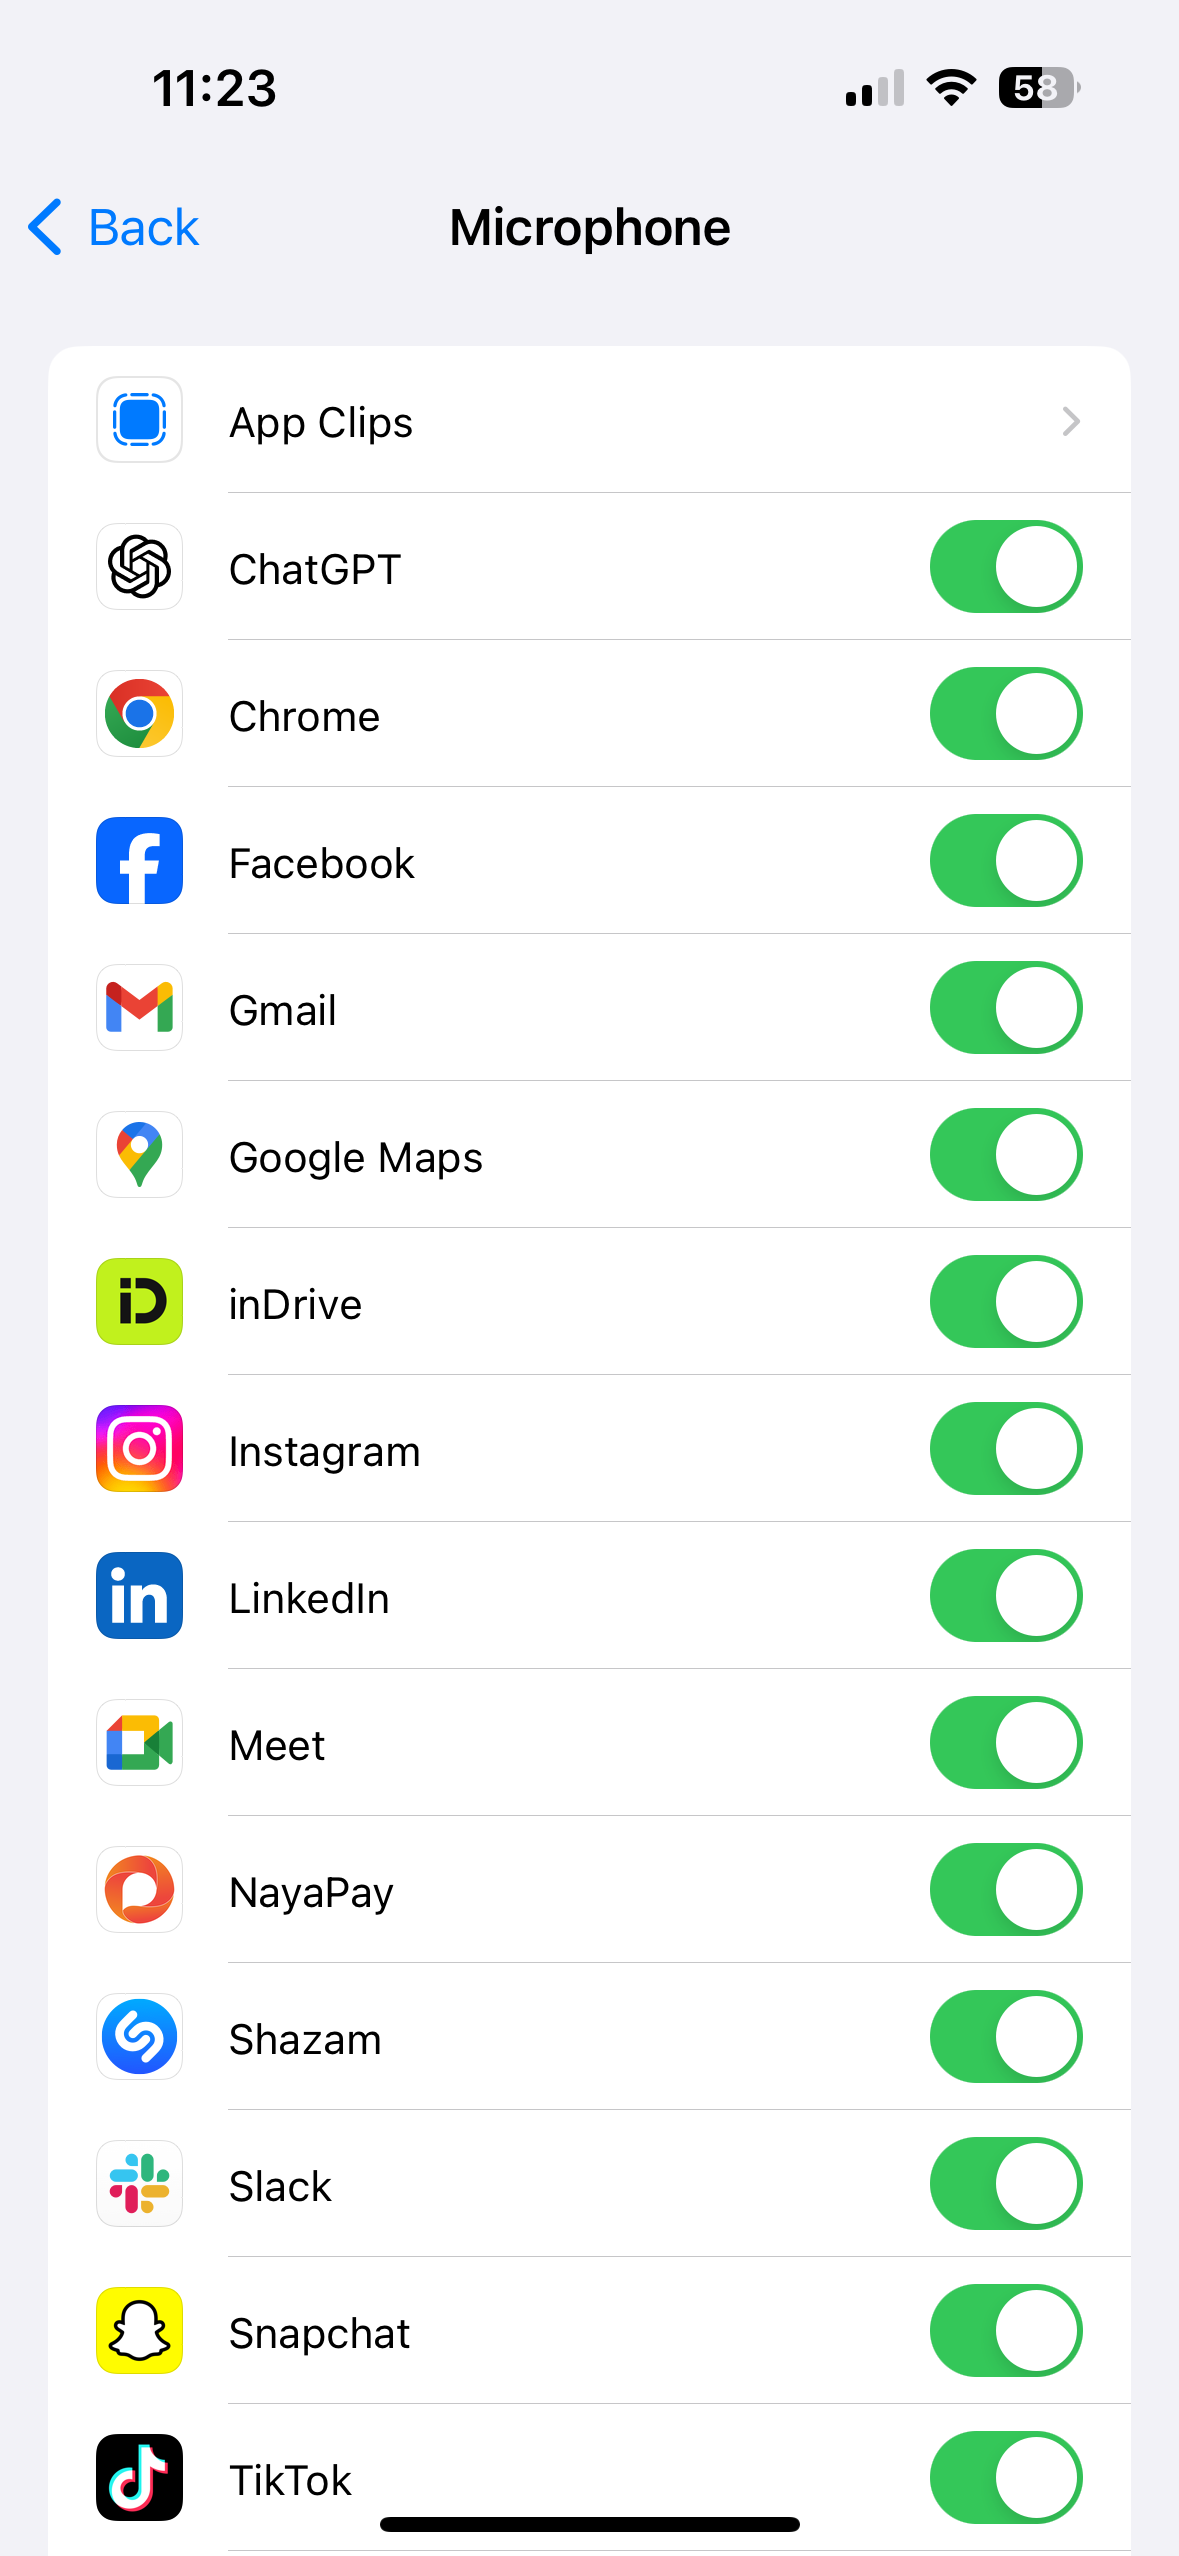
- Ensure the toggle switch next to the app’s name is turned on (green). If it’s off (gray), tap it to grant microphone access.


4. Reboot Your iPhone
A simple restart can often resolve temporary glitches that might be causing your microphone issues. Restarting your iPhone clears its memory and can sometimes fix software hiccups that might be interfering with the microphone’s functionality.
Here’s how to restart your iPhone, depending on the model you have:
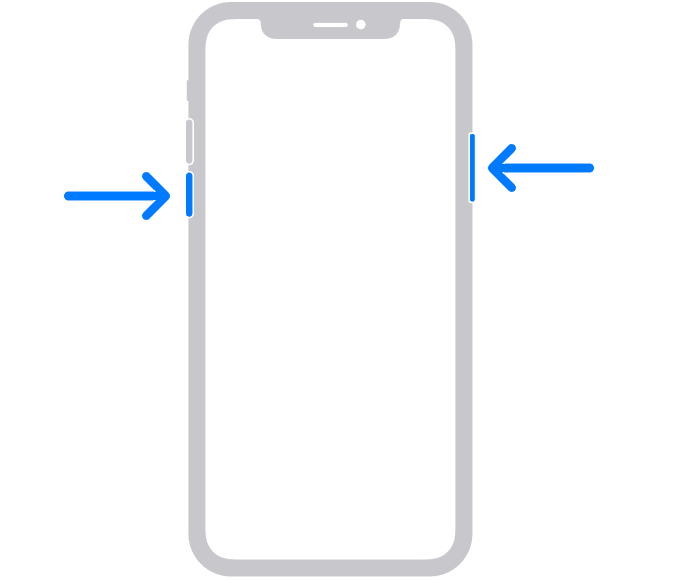
- Press and hold the volume down button and the side button simultaneously.
- Hold both buttons for a few seconds until the Power Off slider appears on the screen.
- Slide the “slide to power off” slider to the right.
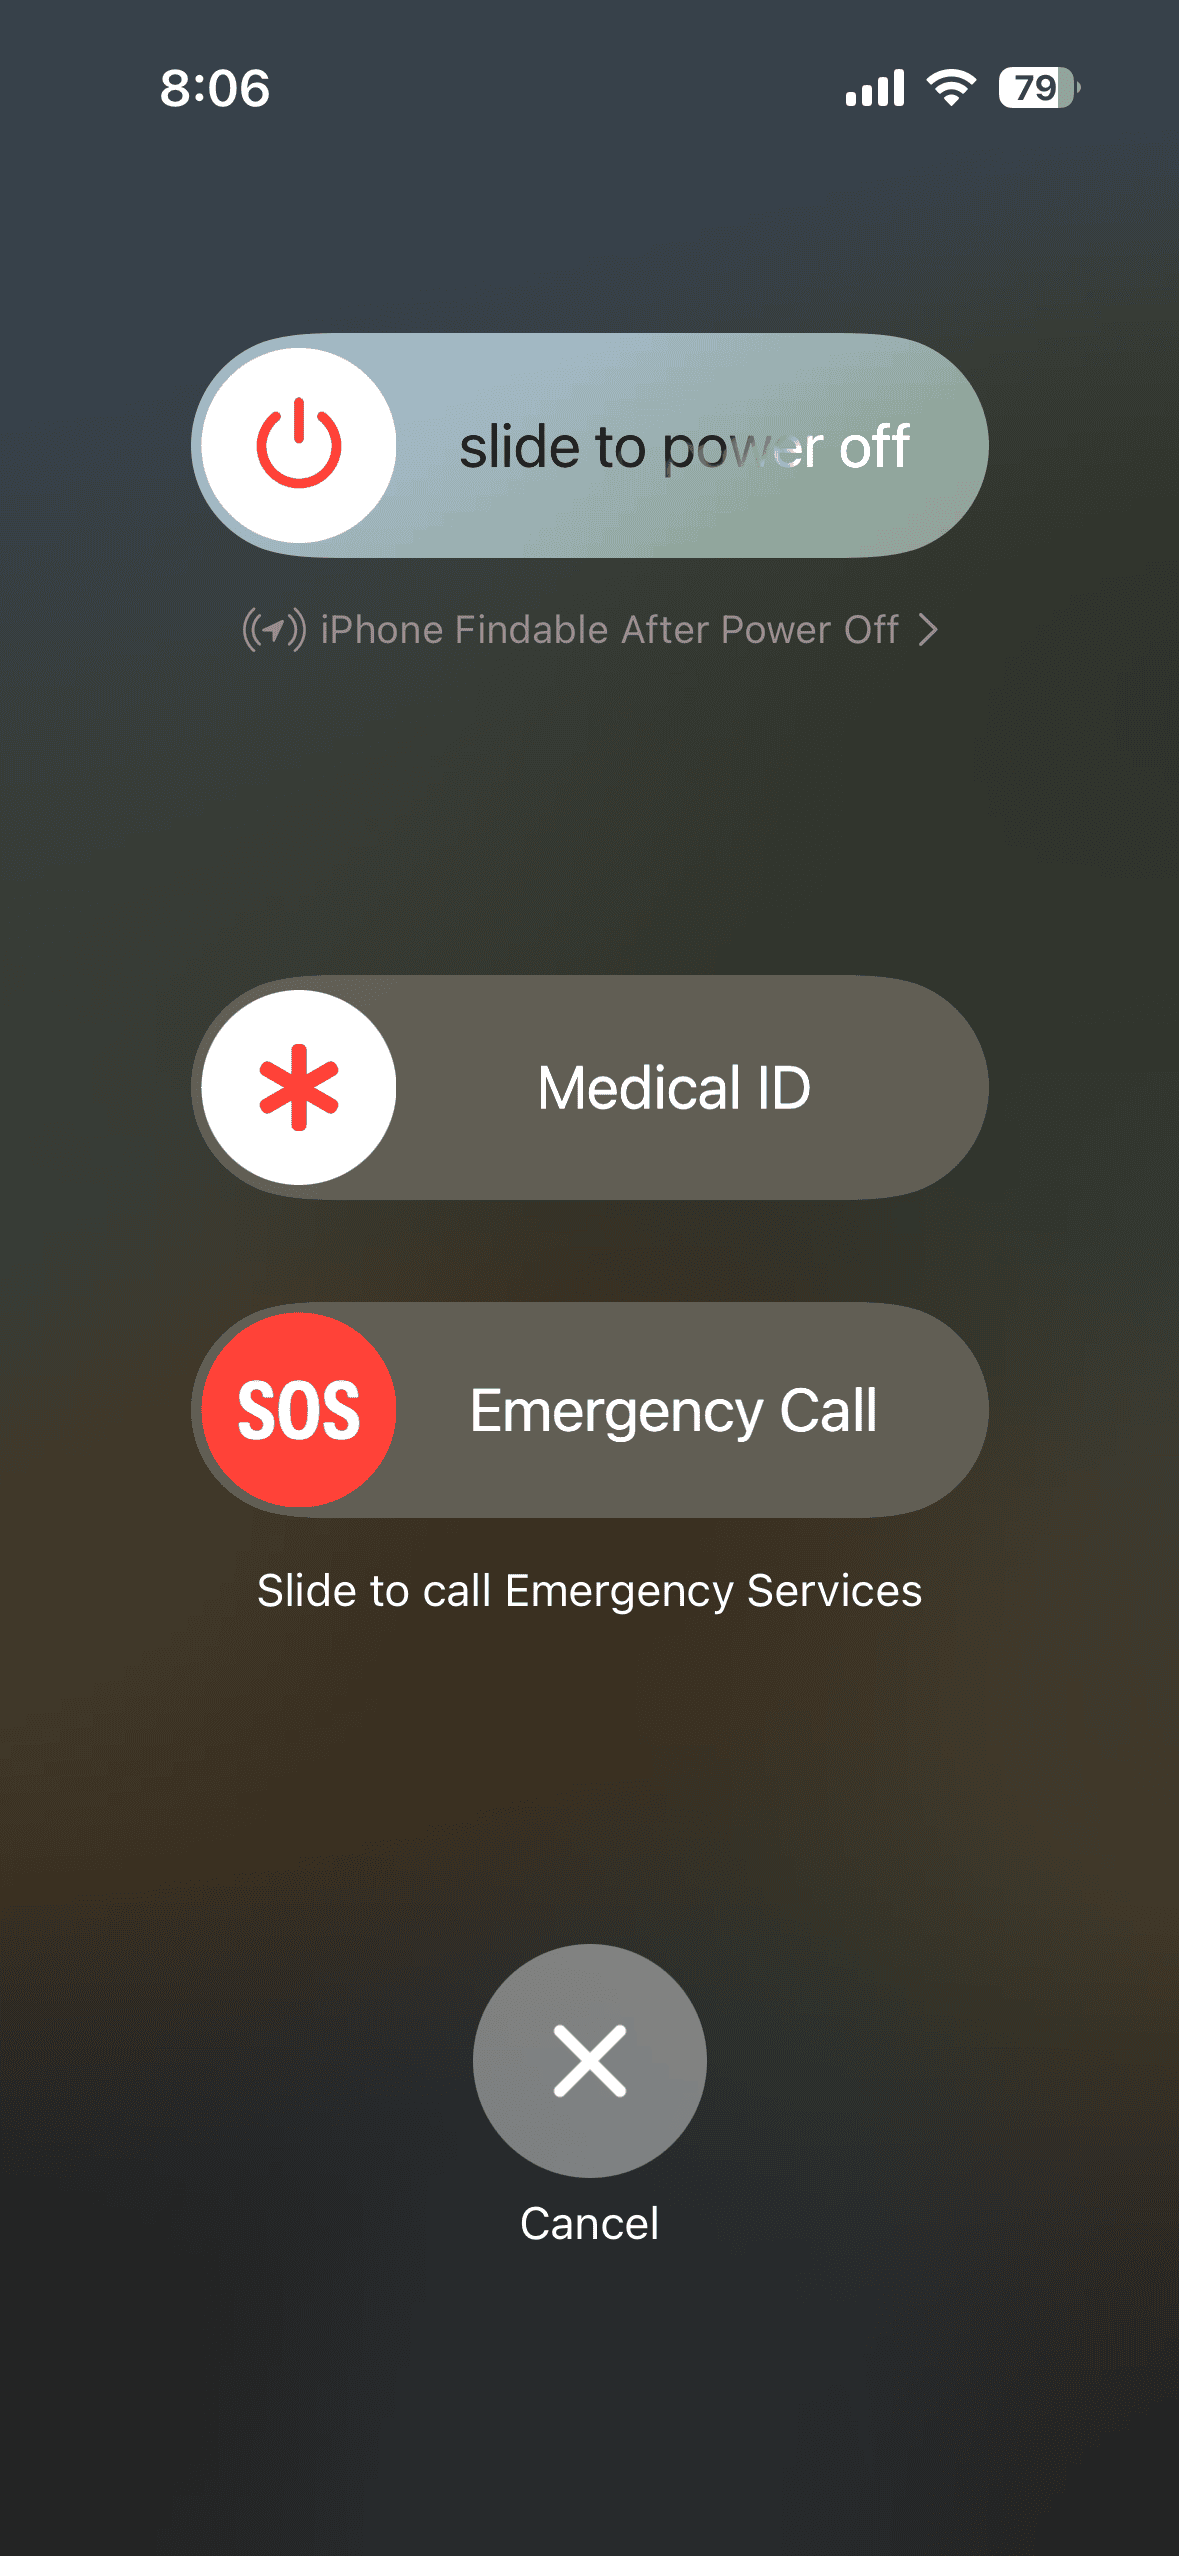
- Wait for your iPhone to shut down completely.
- After a few seconds, restart your iPhone by holding down the side button.
- Release the side button when the Apple logo appears on the screen.


5. Unplug All Accessories and Disconnect Bluetooth Devices
If your Bluetooth accessories are connected to your iPhone, it may default to the external microphone for audio input, potentially causing issues with your built-in mic. Remove your wireless headphones, earphones, external microphones, plus any wired devices connected to your iPhone’s Lightning port.
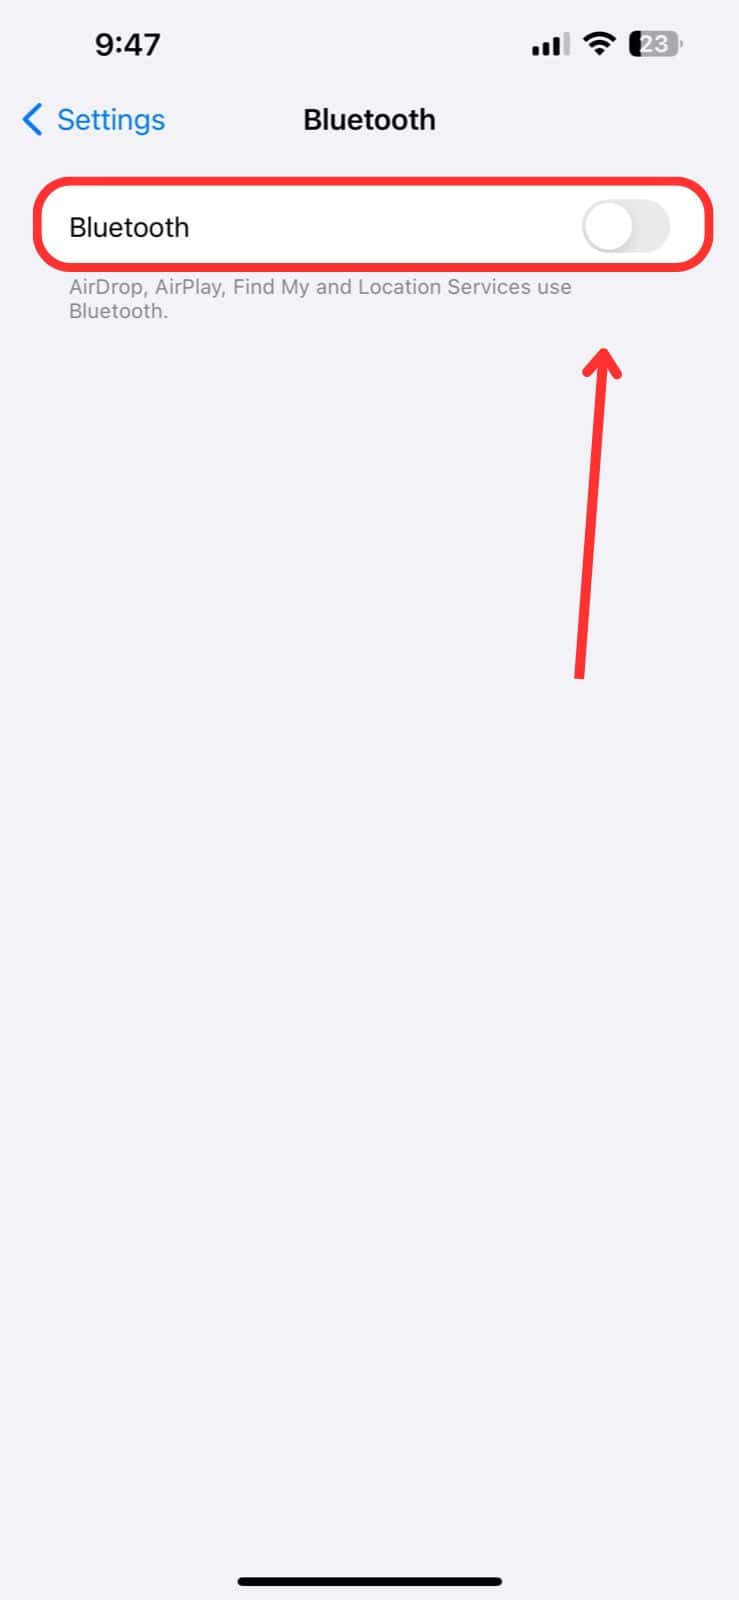
- Go to Settings > Bluetooth.
- Turn off the toggle switch to disable Bluetooth connectivity.

If the microphone starts working after disconnecting these devices, the issue might lie with a specific accessory or Bluetooth connection. Try reconnecting them one by one to pinpoint the culprit.
6. Disable Noise Cancellation
Noise Cancellation is a feature available on iPhone 12 and earlier models that reduces background noise during calls. While helpful in noisy environments, it could also interfere with microphone clarity. Here’s how to turn it off:
- Go to Settings > Accessibility on your iPhone.
- Tap on Audio & Visual.
- Toggle the switch next to Phone Noise Cancellation to the off position (white).
7. Use an External Microphone
If you’ve gone through the previous steps and your iPhone’s microphone still isn’t working, try using an external microphone as a temporary solution. This can help you determine if the issue lies with the built-in microphone or a wider audio problem with your iPhone.
Here’s what you’ll need:
- Headphones with a built-in microphone (most wired headphones have one)
- An appropriate adapter depending on your iPhone model (Lightning to 3.5mm jack adapter for older iPhones or a USB-C to TRRS adapter for newer models)
 NOTE
NOTE
8. Close and Reopen the Communication Apps
Suppose you are on a call, shooting a video, or recording a voice memo on your iPhone, and your microphone works perfectly. However, it stops working when you open a communication app like FaceTime, Google Meet, or WhatsApp. In this case, the issue is not with your iPhone’s microphone but likely due to a bug or glitch in the app.
Here’s a simple step that can potentially resolve the problem:
- Swipe up from the bottom of the screen and pause in the middle of the screen to open the App Carousel.
- Swipe right or left to find the app that you want to close.
- Swipe up on the app’s preview to close the app.
- Wait a few seconds, and then open the app again.

After doing these steps, test your microphone within the app again to see if the issue persists.
9. Update to the Latest iOS
Sometimes, the fix is more straightforward than you think. Make sure you’re using the latest version of the software. This gives you the latest features and can include fixes for these little bugs.
Here’s how to check for iOS updates:
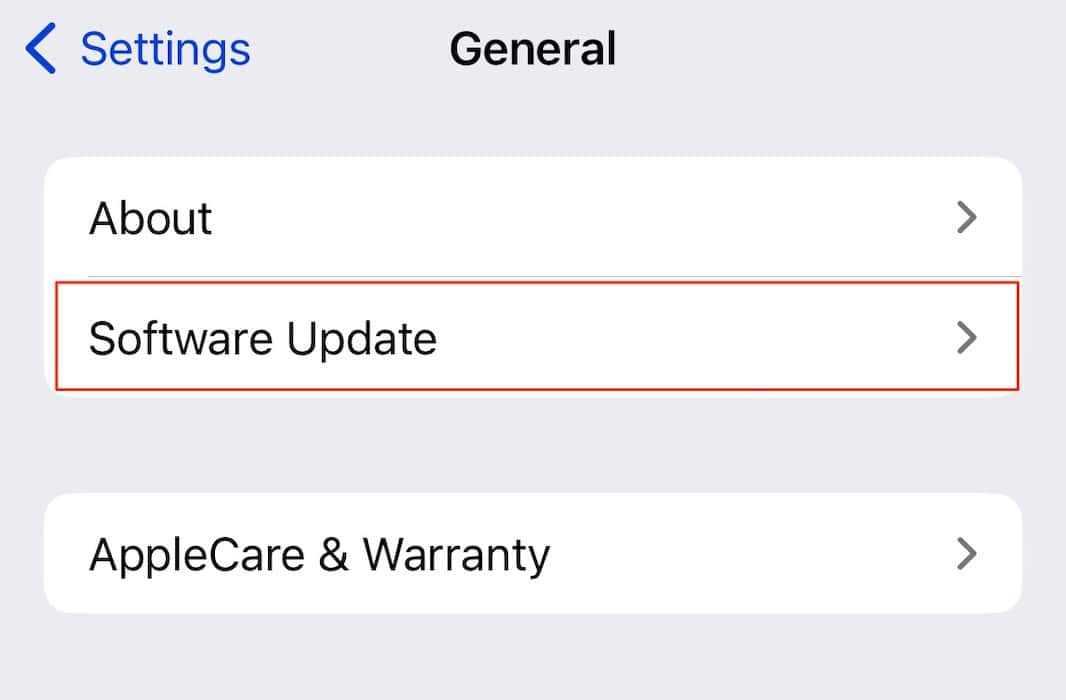
- Go to Settings > General.
- Tap on Software Update.
- Your iPhone will check for available updates. If an update is found, you’ll see the details on the screen.
- If you see an update, tap Download and Install (or Install Now if the update has already been downloaded).
- Enter your passcode if prompted.

Once the update is complete, test your microphone again to see if the issue is resolved.
10. Reset All Settings
If none of the previous steps work, resetting all your iPhone’s settings might be necessary. This will reset all your customizations, including wallpapers, ringtones, Wi-Fi passwords, and Bluetooth connections. However, it won’t erase any of your personal data, like photos, contacts, or messages.
NOTE
Here’s how to reset all settings on your iPhone:
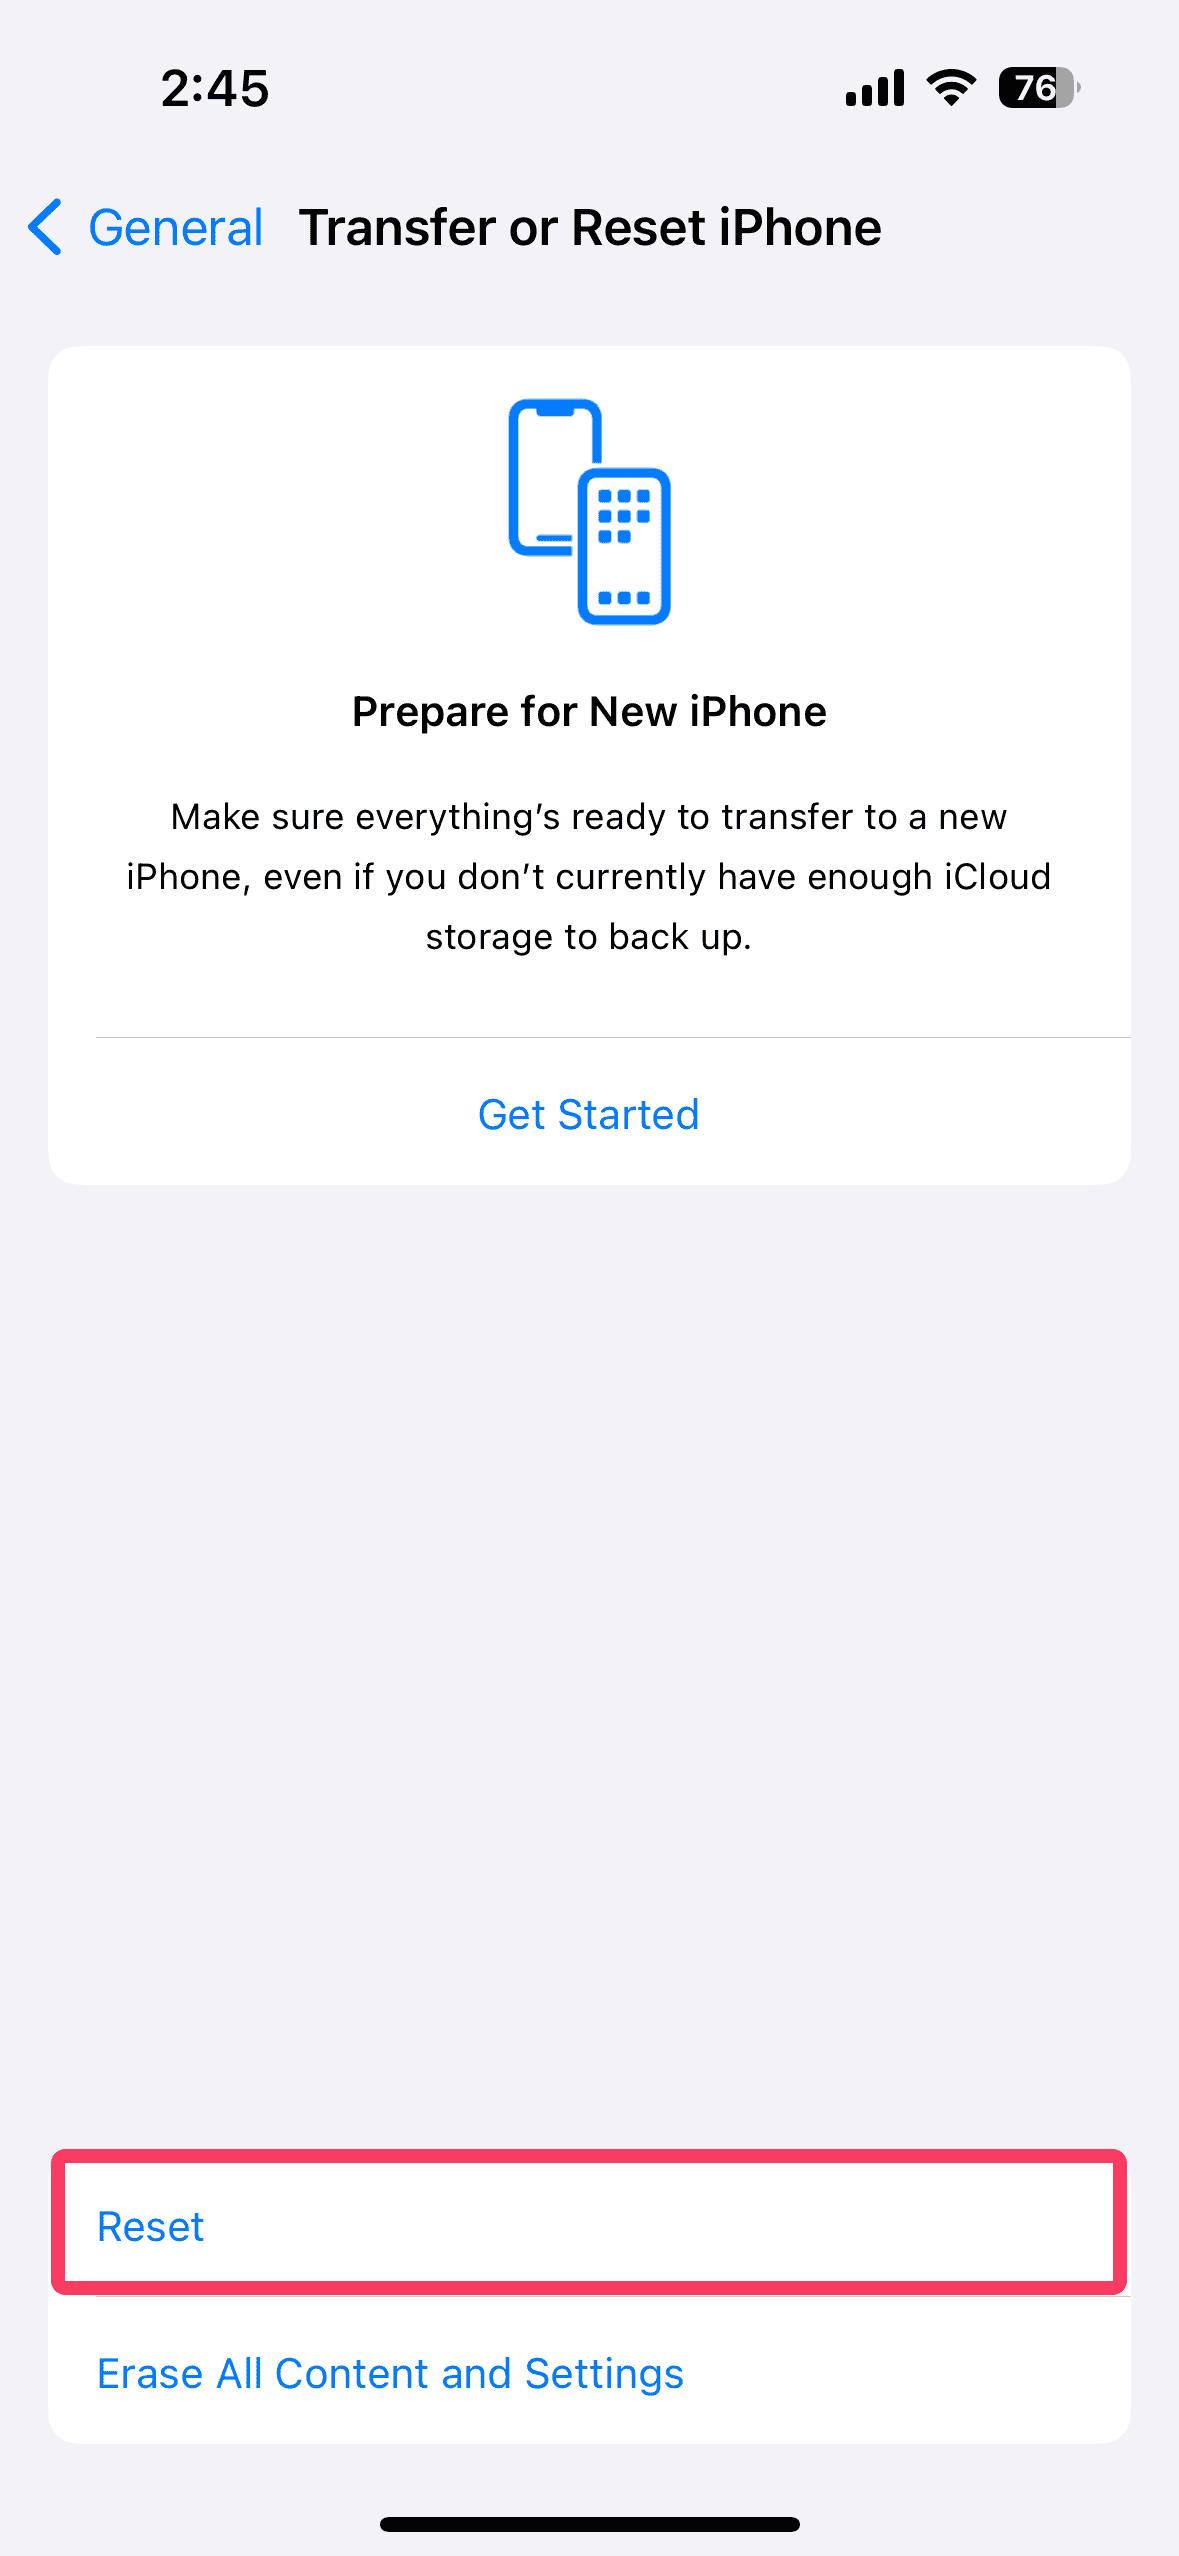
- Open the Settings app on your iPhone.
- Tap on General.
- Scroll down and tap on Transfer or Reset iPhone.

- Tap on Reset.
- Select Reset All Settings. You might be prompted to enter your passcode for confirmation.
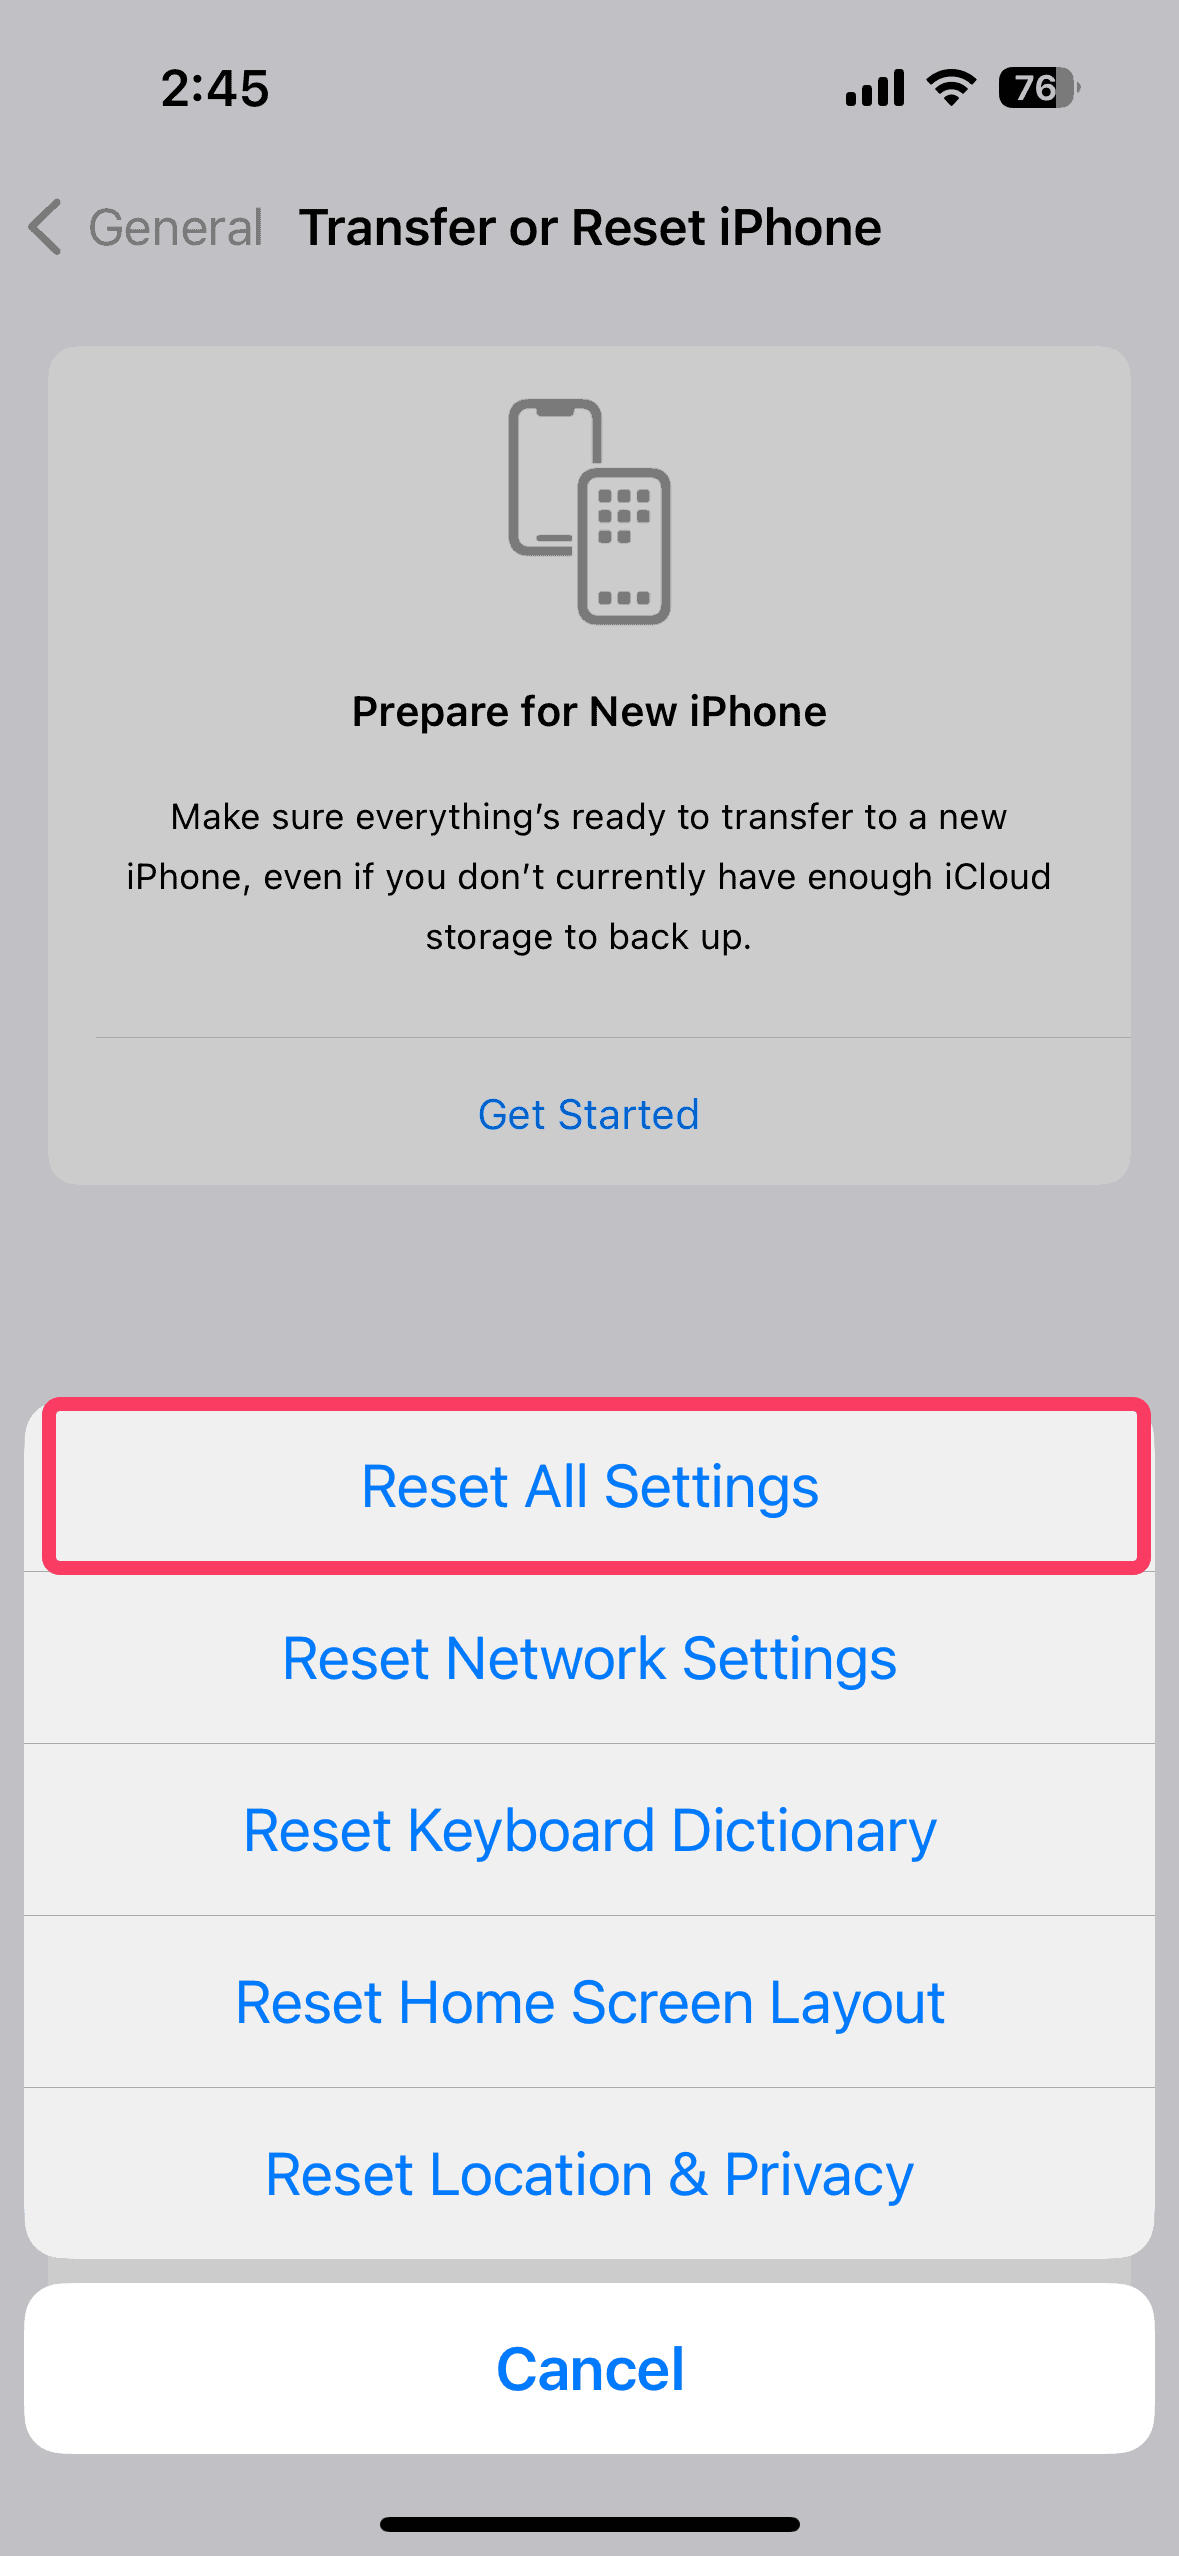
- Tap Reset All Settings again to confirm.


11. Reach out to Apple Support
If resetting all settings doesn’t resolve the issue, it’s possible the problem is hardware-related. In that case, consider contacting Apple Support or an authorized service provider for further assistance. They have the expertise and resources to diagnose the problem and recommend the most appropriate solution, which will most likely involve repairs or hardware replacements.

![How to Clear Cache on iPhone [Safari & Apps]](https://www.macobserver.com/wp-content/uploads/2025/08/how-to-clear-cache-on-iPhone.webp)
![[Review] INIU SnapGo Air 10,000mAh Power Bank: A Slim Battery Built for Everyday Carry](https://www.macobserver.com/wp-content/uploads/2026/07/Best-Magsafe-Power-Banks-iPhone-2026-Featured.webp)
