
The grocery list often becomes the bone of contention with my partner. No matter what, I end up forgetting things on the list. iOS 17’s new Reminders App is bundled with an inbuilt grocery list feature. It is an absolute breeze to use, and the best part is that you can share the list with anyone. The Reminder app automatically sorts all the items into categories. For instance, food items such as Pesto is automatically clubbed under Sauces and Condiments, while Sourdough bread is added under the Breads and cereal category.
How to Create and use Grocery List on Reminder App
I have often noticed that we tend to purchase a lot of unnecessary items in the absence of a grocery list. Even the shop aisles are designed to encourage frivolous purchases. Reminder App grocery list ensures that you stay focused to the list and save money while shopping. Let us take a closer look at how to set up Grocery List on the iOS 17 Reminders app.
1. Create a New Grocery List on Reminders app
Thankfully, it is easy to create a new grocery list in Reminders app. Just add the items, and the Reminders App will automatically convert it into a list. The best part is that you can share it with your partner or friends. The list is updated in real-time. Thus the chances of you and your friend buying the same item from the list is eliminated.
Time needed: 2 minutes
Follow the steps below to create a new grocery list in Reminders app
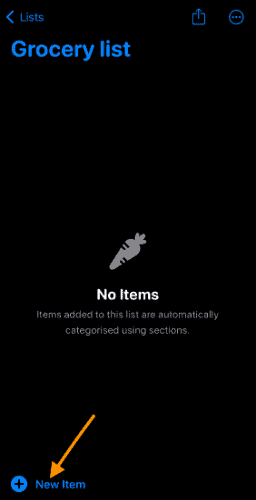
- Open the Reminders app and select Add List from the bottom right corner.
- You should now see the list menu. Enter the List name. Under List Type, Select Shopping. If you don’t enable this option, then the new list will be standard.
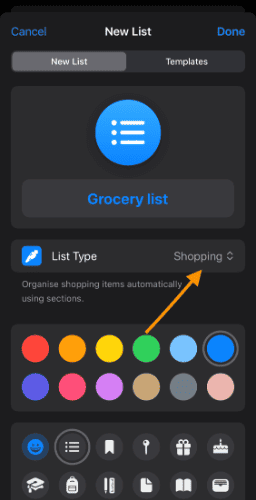
- Reminders lets you colour code list and choose a unique icon for every list.
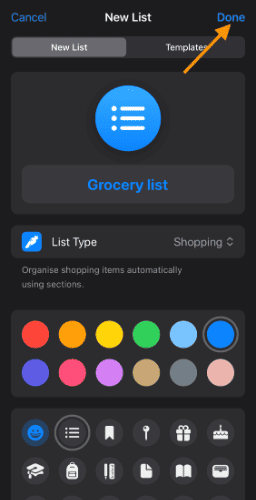
- Once completed, tap on Done to finalize the changes.


2. Add Grocery Items to the Reminders app
Kudos, you have finally created your first grocery list. Now, you can add items to the new list.
1. Tap the New Item button on the bottom left.

2. Add item name. Furthermore, you can add quantity under the Special Notes tab. Or you can use it for size or any specific instructions.

3. Not all items are equal. Tap on I icon to add priority. The reminder app prioritizes high-priority items with three exclamatory marks. Furthermore, the app will alert you about such items with an increased frequency.

3. Assign a Category or Create a Custom Category
We have already seen how you can assign a category for each item. But what if the desired category is not there? Well, in this case, the Reminder app lets you add a custom category. That said, I have noticed that the app segregates items accurately. In other words, you will probably have to add limited categories.
1. Open the item for which you want to create a custom category. Tap the “I” button.
2. Scroll down and select Sections. You can either select preset categories or create a new one.

3. Tap New Column with Selection. Enter the name for the new category. Once done, press enter.

Now, you can select the custom category for any item. I have noticed the app learns which items you add to the custom category. After some time, the item will automatically be added to the custom category.
4. Enable iCloud for Reminders
One of the biggest advantages is that you can share the list with others. More often than not, you will have to visit multiple places for grocery shopping. In such cases, you can divide the list with your friend or partner. Follow the steps below to enable iCloud for Reminders-
1. Open Settings App on your iPhone. Tap on your name.

2. Select iCloud from the options.

3. Scroll down and select Show All from the iCloud menu. Once done, you should be able to see all the apps.

4. Locate Reminders and enable the Toggle.

Kudos, you have shared the list on iCloud.
5. Choose Default Layout
We all know there is no one-size-fits-all when it comes to UI layout. Thankfully, you can choose from different layouts. The default option is to view them as lists. However, it is sometimes painful to scroll back and forth on the list. Meanwhile, the View as Columns option offers a Trello card-like look. You can simply swipe right or left to view the list. All the items are segregated based on their categories. Follow the steps below to change/choose the default layout-
1. Tap the three dots icon on the top right corner.

2. Select View as Columns.

6. Share Your Grocery List With Your Family and Friends
Previously, you have enabled iCloud for Reminders. It ensures that the list is uploaded to iCloud in real-time. You can create or access the list on Mac, iPad, and other devices synced to your iCloud account. All you need to do is open the list and tap the Share button. Invite others using different modes such as WhatsApp, Email, etc.

Best Utilitarian Features on iOS 17
In the recent past, Apple has been focussing on Utilitarian features for iOS. The latest iteration arrives with Screen Distance, Journal app, Grocery List on Reminders app, Contact Posters, and much more. These features help us a lot during the daily course of usage. The Reminder app’s grocery list feature has helped me get all the items at once while collaborating with my partner. Which is your favorite iOS 17 feature? Let us know in the comments below.


