
Personalized Contact Poster is easily one of the best iOS 17 feature. It draws inspiration from the very popular iOS 16 Lock Screen customizations. Many people loved the Lock Screen customizations and Apple has also added them to iPadOS 17. In this article, we’ll help you create iPhone Contact Posters for yourself and your contacts.
How to Create a Contact Poster For Yourself on iOS 17
With the introduction of Contact Posters on iOS 17, you can create Contact Posters for anyone. When you create and save your Contact Poster, it will be displayed on your friends’ devices every time you call them (given that they’re on iOS 17).
Don’t miss the best of The Mac Observer
Set us as a preferred source and our Apple reporting ranks higher in your Google Search results and Discover feed — one tap, no account changes.
Also, when you update to iOS 17 and open the Phone app, you’ll be prompted with a pop-up that reads Update Your Name and Photo.
Time needed: 3 minutes
Here’s how to create your Contact Poster on iOS 17.
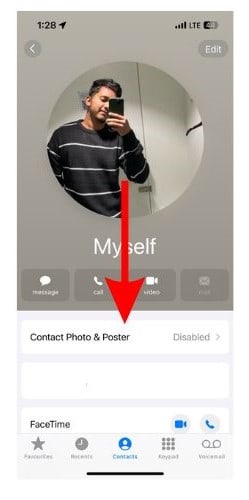
- Open the Contacts app and tap the “My Card” icon at the top.

- Tap the Contact Photo & Poster button.
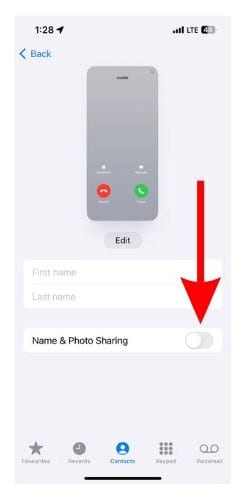
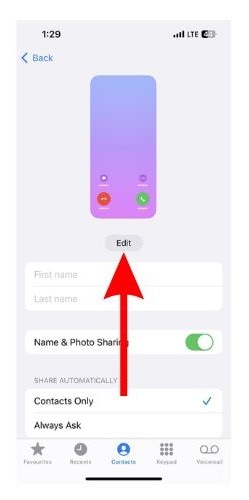
- On the next screen, enable the Name & Photo Sharing toggle.
- Next, tap the Edit button.
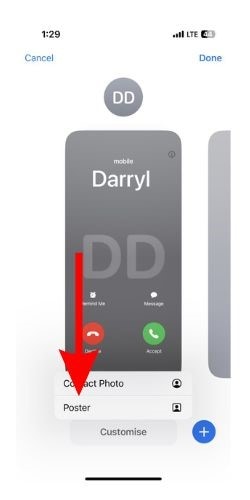
- Now, tap the Customize button and select the Poster option.
- On the Choose Your Poster screen you can select from four options, Camera, Photos, Memoji, and Monogram.
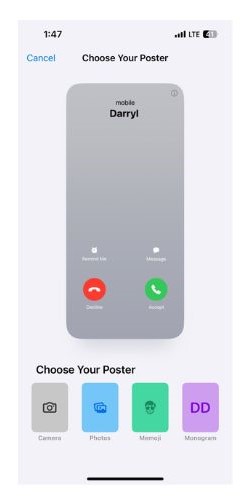
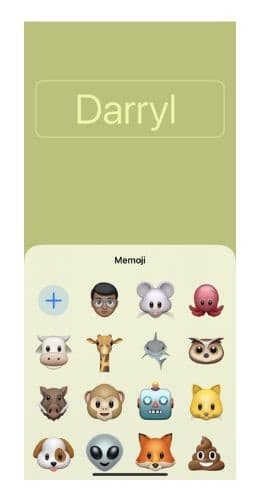
- We’ve used the Memoji option to demonstrate the process, but you can select from any of the listed options. Now, select the Memoji and customize it according to your liking.
- Next, tap the contact’s name located above the poster to edit it.
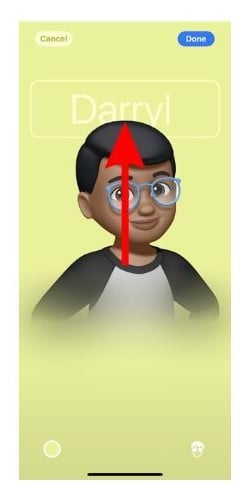
- Once you’ve made all the desired changes, tap the Done button at the top right corner.

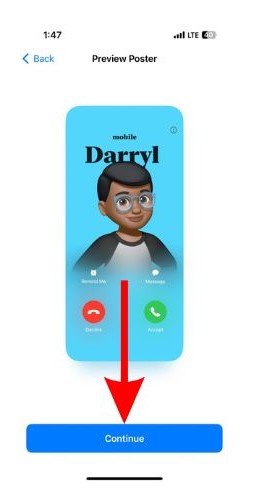
- Tap Continue on the next screen.
- Crop the selected image, memoji, etc., choose the background, and then tap Done/Update.


You’ve successfully set up your personal Contact Poster.
How to Create Contact Posters for Your Contacts on iOS 17
If your friends haven’t set up their Contact Posters, you can create Contact Posters for them. These will only be visible to you since you will be creating and customizing them based on your choices. That said, here’s how to create Contact Poster for your contacts on iOS 17.
1. Open the Contacts or Phone app on your iPhone and search for the contact you want to create a poster for and tap on it.
2. Next, tap the Edit button on the top right corner and tap Add Photo or Edit button below the contact photo.
3. If you haven’t added a contact photo yet, select from the options (Camera, Photos, Memoji, and Monogram) available on the next screen.
4. We selected the Photos option and added a photo from the Library. Once you’ve added a photo, tap the Next button at the top right corner.
5. On the next page, tap the Customize Poster option, and you’ll land on the Choose your Poster screen.
6. Again, select from any of the four options, make the required changes on the next screen, and tap Done.
7. If the Contact Poster is as desired, tap the Continue button.
8. Finally, tap the Done button at the top right to save the changes.

What Are Your Thoughts About Contact Posters?
Personally, I’m loving how Apple is slowly and steadily bringing in new customization features to iOS. They’re taking their time to polish such features before releasing them. I hope this article helps you create and customize Contact Posters on your iPhone. If you have any doubts regarding this, please let us know in the comments below.


Discussion