
If you get the error message saying “no camera available on MacBook Pro,” the first thing you need to do is check whether your Mac is running on the latest macOS. Ensuring that your Mac is running on the latest macOS will prevent common issues from happening including problems with its internal cameras. That should quickly fix the issue. But if it doesn’t, continue reading for more troubleshooting tips to fix the “no camera available on MacBook Pro” issue.
How Do I Make My Mac Camera Available?
By default, your MacBook’s built-in camera or built-in webcam should always be available whenever you want to use it for video calls. But in case you still don’t know how to turn on the camera on a Mac, the process is simple and yet tricky. You can check if your MacBook’s camera is working by simply launching any app that uses a camera. Apple has pre-installed the Photo Booth app and you can use that to find out if your MacBook’s camera is working or not. You can also open FaceTime to check it.
How Can You Fix the No Camera Available Issue on Your MacBook Pro?
Although it’s a rare occurrence, you might still encounter the error message saying that there is “no camera available on MacBook Pro.” If that happens, the easiest way of fixing the error is by checking whether there are available software updates. Make sure to update your Mac to the latest available version of macOS to fix or avoid the issue.
If after updating macOS you still encounter the issue. You can try doing any of the specific solutions outlined below.
1. Restart Your Mac
Yes, a simple restart of your Mac could quickly common bugs and errors including the “no camera available on MacBook Pro.” Whether you believe it or not, there’s no harm in restarting your laptop and seeing whether it could fix the issue at hand. After all, it only takes a few minutes of your time so why not do it, right?
2. Quit Other Applications
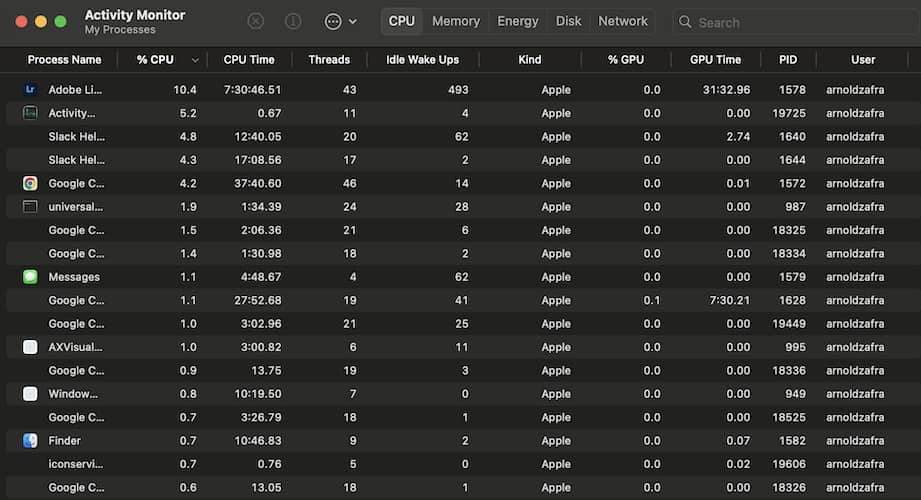
One of the possible reasons why you’re getting the error “no camera available on MacBook Pro” is that other apps may be using the built-in camera. If that’s the case, you need to quit the applications to make the MacBook camera work again. If you don’t know which app is using the camera and you don’t close apps that are running, you can check the Activity Monitor.
Follow the steps below to check which app is using your MacBook’s camera.
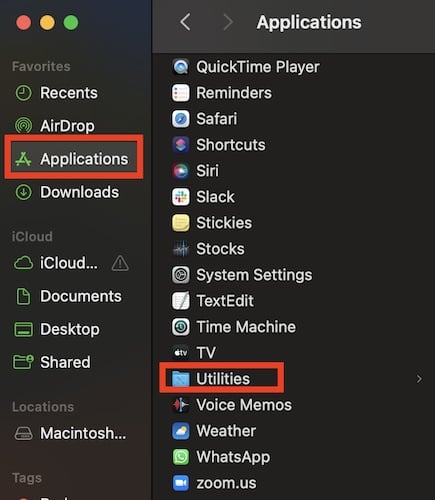
- Launch the Finder app.
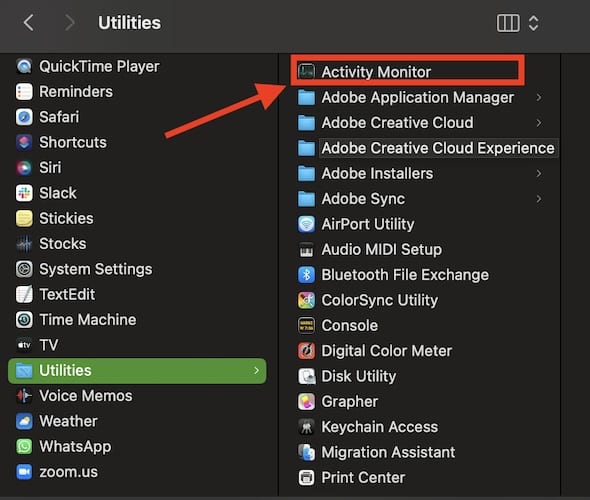
- Click the Applications folder > Utilities.
- Click Activity Monitor.
- Check whether there is a video chat app running and quit it.


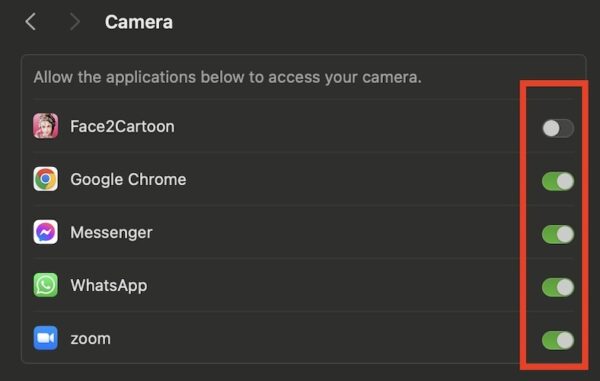
3. Check App Permission to Use Your Mac’s Camera
Another step that you can do is to check whether the app that you are using has permission to use your MacBook;’s built-in camera.. Permissions for webcam use apply to apps that have an issue and display the no-camera available on MacBook message.
Time needed: 1 minute
Follow the steps below to check whether the app has permission to use your MacBook’s camera.
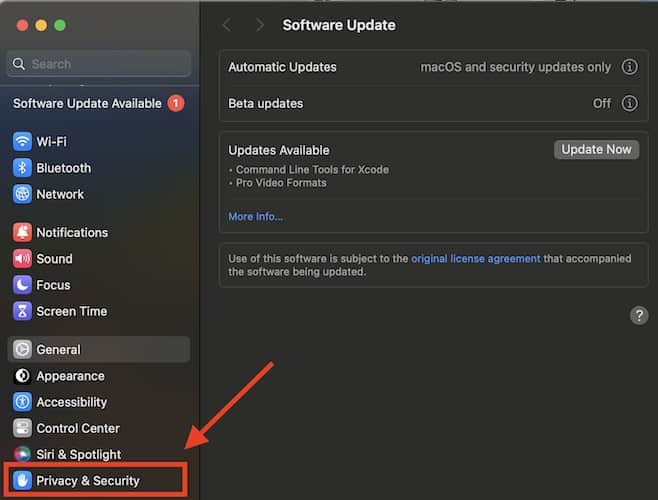
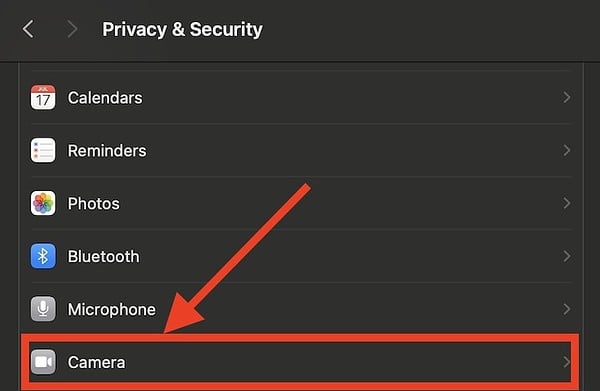
- Go to System Settings via the Apple Menu bar.
- Click Security & Privacy.
- Click Camera.
- Verify if the switch next to the app is toggled on, if not click the switch.


4. Force Quit AppleCameraAssistant and VDCAssistant
The next troubleshooting step is a bit technical and requires using the Mac Terminal command. In case you’re not aware, AppleCameraAssistant and VDCAssistant are two processes that support your MacBook’s built-in camera.
1. Shut down any app that uses your MacBook’s camera.
2. Open Terminal on your Mac (Spotlight Search: Terminal). 
3. Type sudo killall AppleCameraAssistant then hit Enter.
4. Type sudo killall VDCAssistant and hit Enter.
Then try using the camera and see if it is working again. Note that you can use sudo killall AppleCameraAssistant; sudo killall VDCAssistant on a single command line. The result will still be the same.
If not the above-mentioned step does not solve the issue at hand, your last resort is to reset the NVRAM of your Mac. Remember that resetting NVRAM will clear any settings you’ve modified. So, do this step only as a last resort.
To reset the NVRAM of Apple Silicon Mac, simply shut it down, then wait for a few seconds before turning it on again.
To reet the NVRAM of Intel-based Mac, follow the below steps.
1. Shut down your Mac.
2. Press the power button and hold down Command + Option + P + R.
3. Hold down the keys for about 10 seconds, then release and let your Mac continue to start up.
Conclusion
If you’re a heavy user of video calling apps such as Facetime, Facebook Messenger, WhatsApp, and others, you might encounter a message saying that there is “no camera available on MacBook Pro.” Or even no camera available on your MacBook Air. If that happens you already know how to troubleshoot the issue. Simply follow any of the steps mentioned above and make your Mac’s internal webcam work again. Hopefully, the issue that you will encounter is not in any way caused by hardware fault. If that happens, you will have to bring your MacBook to the nearest Apple Service Center for proper diagnosis of its hardware components.
Also, remember that the steps mentioned above may not always work if you’re using an external USB webcam. You might want to check other methods for solving issues with that.
Feel free to let us know in the comment of other steps that you may have done before and made your laptop’s camera work again.


I am trying to fix a problem (blank photos) with an external webcam on my new Mac Mini M4 that was running Mac OS Sequoia. I tried most of your suggestions. For suggestion #4 when I tried “sudo killall AppleCameraAssistant”, I saw an error message saying that there were no matching processes. At first I thought that this might be the reason for the problem and that manually starting AppleCameraAssistant might at least yield more information. But, I couldn’t find AppleCameraAssistant anywhere on the file system. I asked Google’s AI if AppleCameraAssistant still exists on MacOS Sequoia. The response was, “Yes.” Google’s AI went on to explain the importance of AppleCameraAssistant for photo-taking applications on MacOS. I then asked Google’s AI for the full pathname of AppleCameraAssistant on MacOS Sequoia. The pathname it returned was /System/Library/Frameworks/CoreMediaIO.framework/Versions/A/Resources/AppleCamera.plugin/Contents/Resources/AppleCameraAssistant. I did an ls of that pathname and — nothing. AppleCameraAssistant really doesn’t exist on my brand new Mac Mini M4. Google’s AI suggested that I reinstall MacOS, so I did that — still, no AppleCameraAssistant. I even upgraded to MacOS Tahoe — again, no AppleCameraAssistant.
My questions for you are: On what versions of MacOS have you successfully done “sudo killall AppleCameraAssistant”? And, if you have access to a Mac running Sequoia or Tahoe does AppleCameraAssistant exist there? I need to know if Google’s AI is leading me down a rabbit hole or if AppleCameraAssistant does still exist on these latest versions of MacOS.