
Apple first announced Journal during the WWDC in June. However, the Journal app didn’t drop along with the release of iOS 17. Instead, it will arrive on iOS 17.2 and is currently available in the beta. I have used Journal for a while and the experience has been rewarding. Keep reading to learn how to use the Journal app on iPhone.
How to Use the Journal App on iPhone
Journaling – documenting your thoughts is an activity that can help keep you grounded. Apple’s Journal App seeks to do this along with some cool features to give you the best journaling experience. You can create an entry, and add a myriad of other media, like voice notes, so it’s not just about writing. Additionally, you can create a journaling schedule to enable consistency. Here’s how to do each of these using the Journal app.
Create a New Journal Entry
Before making your first entry, the Journal app allows you to turn on Journaling suggestions, which lets you automatically add details from your daily life, like places visited, calls made or messages sent, and photos or videos taken. You can fine-tune what gets included by customizing workouts, contacts, and more options. Also, you can decide whether or not you want to receive notifications from the suggestions.
Time needed: 2 minutes
After selecting your suggestions and deciding whether you want to receive notifications, creating a new journal entry is your first step towards making the most of your digital diary. Here’s how it works:
- Open the Journal app on your iPhone.
- Tap the big “+” at the bottom center of your screen.
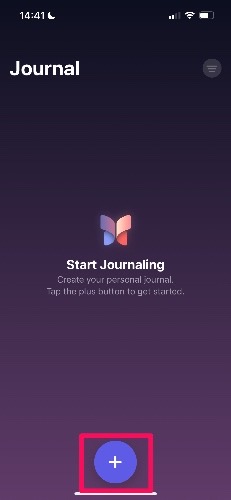
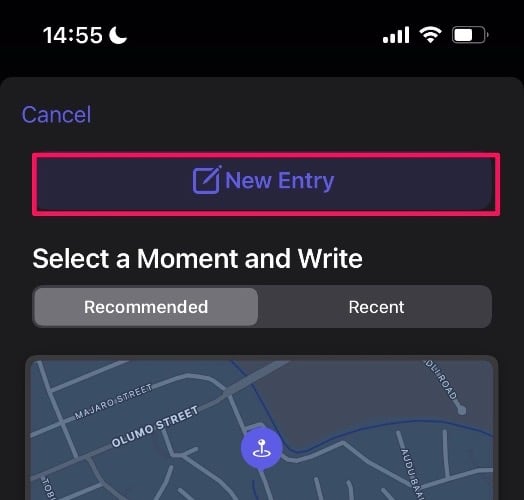
- Tap “New Entry” and start your journaling journey.

Choose a Prompt From “Recommended” or “Recent” for Journaling Inspiration
When you’re ready to start a new entry in the Journal app, you have a choice: create something entirely from scratch or get a bit of inspiration from the app’s prompts. In the “Recommended” section, you might find prompts related to your daily activities like reflecting on a podcast you listened to, a workout you completed, a memorable location you visited, or even interactions with your contacts. These prompts are designed to make journaling more engaging and reflective.
Here’s how you can use these prompts to spark your self reflection journey:
1. Launch the Journal app on your iPhone.
2. Tap the big “+” button located at the bottom center of your screen.

3. At the top of the screen, you’ll find tabs labeled “Recommended” and “Recent.” Scroll through these sections to see a variety of prompts that the app offers.

Add Other Media Like Voice Notes, Photos, and Location
Enhancing your daily entries in the iOS 17.2 Journal app with different types of media can make them more vivid and memorable. Adding these elements is straightforward, whether it’s a photo from a special moment, a voice note capturing your thoughts, or a significant location. You can download Journal from the App Store.
Follow this simple step-by-step guide to enhance your entries with these personal touches:
1. Open the Journal app and create a new entry.
2. Once you’re on the new entry screen, look above the on-screen keyboard. You’ll find a row of icons representing different media types.

3. To insert a photo, tap the Photo icon.

4. If you want to add a voice memo, tap the Audio icon.

5. To add a location, tap the Location icon.

Add Inputs Like Music and Workouts From Other Apps
The Journal app offers an interactive way to reflect on your daily activities, including the music and podcasts you listen to or your workout sessions. Here’s how you can add these experiences to your journal entries:
Music & Podcasts Entry
1. Open the music or podcast app and play your preferred song or podcast episode.
2. On the music/podcast player screen, tap the three-dot button next to the song or episode’s name, and then select the “Share Song” or “Share Episode” option.

3. In the sharing options, swipe to find and tap the Journal app icon. This will automatically open a new entry in the app.

Workout Entry
1. Open the Fitness app on your iPhone and go to your workout history.
2. Select the workout you want to write about and tap the share button at the top right corner.

3. In the sharing screen, swipe to find the Journal app icon and tap it. This will open a new entry page where you can jot down your thoughts about the workout.

How to Change the Entry Date on Journal
Sometimes, you might want to jot down memories from a previous day or log a journal entry for a future date. Journal makes it easy to customize the date of your entries so they accurately reflect when the events or thoughts occurred. Here’s how you can adjust the date of a journal entry:
1. Open the Journal app and either create a new entry by tapping the “+” button or select an existing entry to edit.
2. Once you’re on the entry screen, tap the three-dot menu icon in the top-right corner.

3. In the menu, tap on the option labeled ‘Custom Date’. A date selection screen should then appear.

4. Use the calendar interface to pick the new date for your entry.

5. After selecting the new date, tap ‘Done’ to apply the changes.
Edit and Delete Entries
As you continue to use the Journal app, you might find the need to modify or remove existing entries. Whether it’s correcting a typo, updating your thoughts, or deleting an entry you no longer wish to keep, the process is straightforward. Here’s how you can edit or delete entries in your Journal:
To Edit an Entry
1. Open the Journal app on your iPhone and browse through your entries.
2. Tap on the one you want to edit or delete. This will open the entry in view mode.
3. To edit an entry, swipe left on the entry. You will then see an edit button which is represented by a pencil icon.

4. Tap on the icon to make changes to your entry. You can then add or remove text, change the date, or modify other media attached to the entry.
5. Once you have made your changes, tap ‘Save’ to update the entry.
To Delete Journal Entry
1. If you decide to delete an entry, swipe left on the entry from the main screen to reveal the delete button that is represented by a trash can icon.

2. Tap the icon and confirm your choice when prompted.
How Do I Create a Journaling Schedule on Journal app?
Creating a journaling habit can be arduous. With this app, you can create a schedule to foster a consistent self reflection schedule. Here’s how to do that:
1. Open Settings on your iPhone and navigate down to Journal.

2. Scroll down to Journaling Schedule and toggle it on.

3. Select the days you want to write about, and the app will notify you on the selected days.

Conclusion
The app is a personal space to capture and reflect on your life’s moments. Its seamless integration with iOS and intuitive features make journaling an enjoyable and meaningful practice. For those eager to explore this app, you enroll into iOS 17 Beta program.
Apart from the Journal app, Apple’s Beta Software Program also has a ton of features, like the translate option for the Action button, which is only available on the iPhone 15 Pro models. Don’t forget to leave a comment if there’s anything you want us to cover!


