If you’ve recently upgraded to macOS Ventura, you might run into problems with Xcode not working. There are a couple of reasons why this might be. I’ll walk you through how to fix this so you can once again run Xcode on your Mac.
Earlier Versions of Xcode Incompatible With macOS Ventura
The most common culprit behind Xcode not working under macOS Ventura is outdated software. Just because you have the latest operating system updates doesn’t mean Xcode got updated, too.
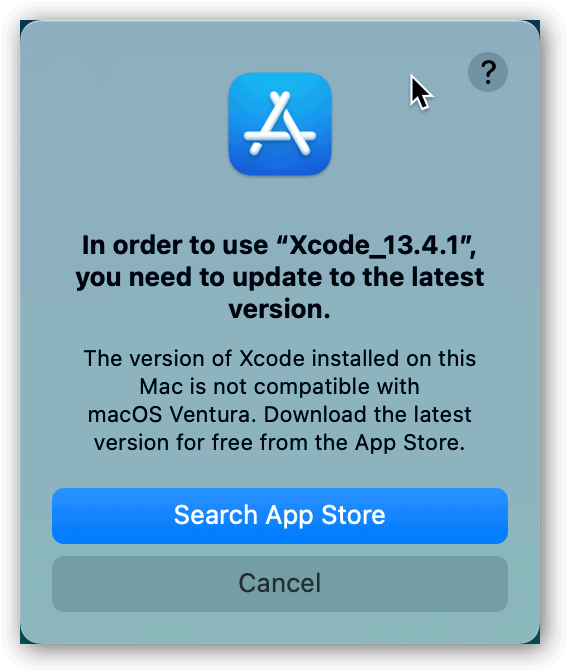
When this happens, you’ll get an error message telling you that you need to update to the latest version.
Since Xcode 13.4.1 isn’t compatible with macOS Ventura, trying to run it generates an error message.
If everything was working fine prior to upgrading to Ventura, you probably have some version of Xcode 13 still installed, like 13.4.1. That version isn’t compatible with macOS Ventura, which requires Xcode 14 or newer.
Two Options to Fix Xcode Not Working on macOS Ventura
There are two ways you can fix this issue. One is to update the developer tools software, and the other is to “trick” macOS into thinking the older version is actually the most recent.
Update Xcode From the Mac App Store
The preferred method is to update your Xcode installation to the most recent version. This is, in fact, the only resolution that Apple’s liable to recognize or support.
You can update Xcode to the latest version through the Mac App Store.
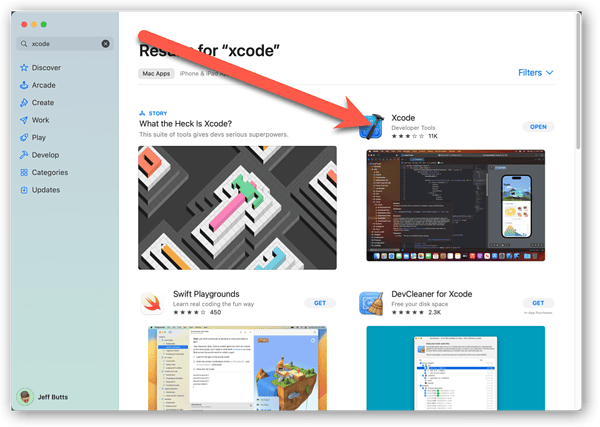
Open the App Store app on your Mac
In the search box, type Xcode.
From the search results, click on Xcode, as shown below.
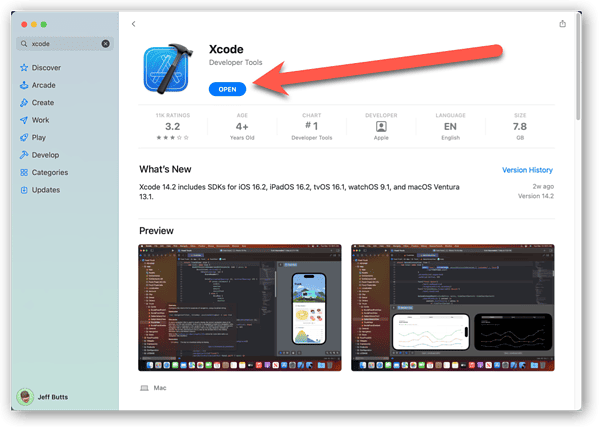
If you don’t have the most recent version of Xcode, the blue “Open” button shown should say “Update” instead.
Click the “Update” button.
Once finished, you should be able to run Xcode once again.
Fooling macOS Into Thinking the Older Version Is Updated
The next method is definitely a hack, if you will. If you have an Xcode project that absolutely depends on using Xcode 13, you can follow these steps.
Bear this in mind: you likely will be completely unable to submit any builds created this way to the App Store for review.
That being said, here’s how you can fool Ventura into thinking Xcode 13 is really the most recent version.
Open Applications > Utilities > Terminal.
Now, we’re going to create a script that will modify the build number of the Xcode app. Type nano xcode14.sh and press Return.
Copy the entire script (found on StackOverflow). I’ve included it below these instructions for easy reference.
Paste the script into your Terminal window.
Press Control-X to quit nano, then Y to save changes. Next, press Return to confirm.
Still in Terminal, run the script as such: sh xcode14.sh.
The output above will reflect the change in build numbers for Xcode, and Xcode 13 will open as it did prior to updating to macOS Ventura.
Once that’s done, you’ll be able to run Xcode 13 on macOS Ventura without any difficulty. You won’t even have to run the script again, as macOS Ventura will continue to see the old version as compatible.
This is the script you should copy and paste in steps 3 and 4 above:
#!/bin/sh

set -euo pipefail

# Set the paths to your Old/New Xcodes
OLD_XCODE="/Applications/Xcode_13.4.1.app" #Old version of Xcode
NEW_XCODE="/Applications/Xcode.app" # To get build number

# Get New Xcode build number
OLD_XCODE_BUILD=$(/usr/libexec/PlistBuddy -c "Print CFBundleVersion" \
${OLD_XCODE}/Contents/Info.plist)
NEW_XCODE_BUILD=$(/usr/libexec/PlistBuddy -c "Print CFBundleVersion" \
${NEW_XCODE}/Contents/Info.plist)

echo The Old Xcode build version is $OLD_XCODE_BUILD
echo The New Xcode build version is $NEW_XCODE_BUILD

# Change Old Xcode build version to New Xcode
/usr/libexec/PlistBuddy -c "Set :CFBundleVersion ${NEW_XCODE_BUILD}" \
${OLD_XCODE}/Contents/Info.plist

# Open Old Xcode (system will check build version and cache it)
open $OLD_XCODE

# Revert Old's Xcode's build version
/usr/libexec/PlistBuddy -c "Set :CFBundleVersion ${OLD_XCODE_BUILD}" \
${OLD_XCODE}/Contents/Info.plist