
I recently encountered a situation where my Boot Camp Assistant displayed the message “Your disk could not be partitioned” during my attempts to partition the disk for Windows. In my quest to find solutions, I uncovered various approaches that proved effective in resolving this issue. Now, I’m excited to share these insights with you. Join me as we explore practical solutions to successfully address the aforementioned problem during your Boot Camp setup.
How Can I Fix ‘Your Disk Could Not Be Partitioned’ on My Mac?
If you’re trying to install Windows on your Mac using Boot Camp but encounter the error “Your disk could not be partitioned,” there are a few solutions you can try first:
- Back up Your Data: Backing up your data is a critical step before attempting any disk-related operations, such as partitioning with Boot Camp. You should also use a reliable backup tool like Acronis Backup to have a comprehensive backup of your entire system or, at the very least, your important files.
- Check for Updates: Updating your macOS is a fundamental troubleshooting step that can often resolve compatibility issues, including those related to Boot Camp. So, make sure your Mac is running the latest version of macOS. Go to the Apple menu > System Preferences > Software Update
- Check for Third-Party Disk Utilities: Third-party disk utilities refer to software applications that you may have installed on your Mac to manage disk space. They might alter disk settings in a way that conflicts with Boot Camp’s requirements. So, disable or uninstall these utilities temporarily.
- Turn off Optimize Mac Storage: Enabling this feature in iCloud settings can interfere with Boot Camp’s disk partitioning process. To turn it off, Go to Apple menu > System Settings > Apple ID > iCloud > Optimize Mac Storage.
If none of the initial steps resolve the “Your disk could not be partitioned” error, proceed with the following solutions:
How Can I Fix ‘Your Disk Could Not Be Partitioned’ on My Mac?
1. Repair Your Disk Using Disk Utility
To repair your disk using Disk Utility, you’ll need to first restart your Mac in Recovery Mode. To restart your Mac in Recovery Mode, follow these steps:
- Turn off your Mac.
- Next, press and hold the Command+R.
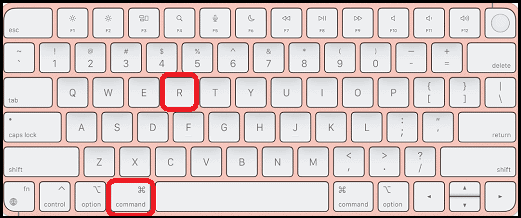
- Release the keys when you see the Apple logo or a spinning globe.

Once your Mac is in recovery mode, do the following:
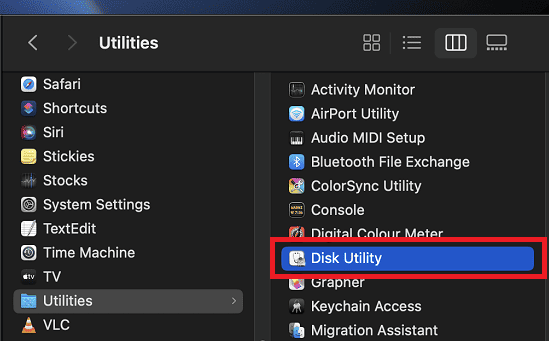
- Open Disk Utility.
- Inside Disk Utility, select View. From the menu bar, select Show All Devices.
- You should see your storage devices organized in this hierarchy: Startup Disk > Containers > Volumes.
- Select the last volume of your startup disk (Macintosh HD -Data).
- Click First Aid > Run.
- Wait for Disk Utility to finish repairing your disk, then repeat the process for the next volume above it until the entire startup disk is repaired.
If Disk Utility found no error, this indicates that the error is not caused by your Mac’s hard drive. Skip the next fix and proceed to fix 3. However, if Disk Utility finds an error, but is unable to repair your startup disk, then try the next fix.
2. Run the Fsck Command in Single User Mode To Fix Disk Error
If Disk Utility doesn’t fix the problem, you can try running the fsck command in Single User Mode. This is a more powerful tool that can fix more serious errors. The fsck (file system check) command is capable of inspecting your Mac’s file system for consistency and executing any required repairs.
To run the fsck command in Single User Mode, you’ll need to restart your Mac in Single User Mode. Kindly note that the method for accessing Single User Mode varies depending on the type of Mac you have.
Here are the instructions for different Mac models:
2.1. For Intel Macs with the T2 chip
- Shut down your Mac.
- Turn it back on and hold down the Command+R keys until you see the Apple logo.
- If prompted, enter your password.
- Click on Disk Utility and then select Continue.
- Choose your startup disk from the left sidebar and click Mount.
- Exit Disk Utility.
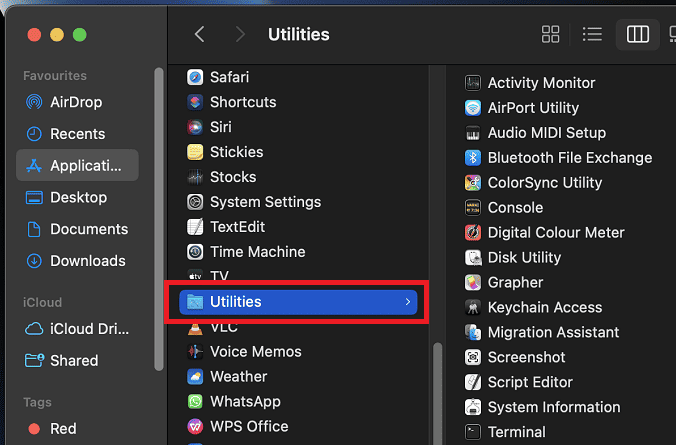
- Go to Utilities in the top menu bar and select Terminal.
2.2. For Apple Silicon Macs
- Turn off your Mac.
- Press and hold the power button until you see Loading startup options.
- Click on Options and then select Continue.
- Choose your account and click Next.
- Enter your password if prompted and click Continue.
- Go to Utilities in the top menu bar and select Terminal.
2.3. For Intel Macs without the T2 chip
- Turn off your Mac.
- Power on your Mac and press and hold Command+S.
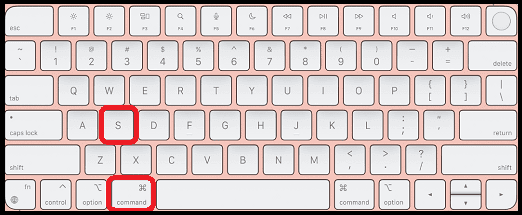
- Release the keys when you see a screen with lots of text on a black background. Wait for the text to stop scrolling.

Now that you are in Single User Mode, follow the steps below:
- Type the following command and press Enter:
/sbin/fsck -fy - Wait for the fsck command to finish running. Once your drive has been repaired, type this command and press enter to restart your Mac: reboot
Now that your drive has been repaired, you can try installing Windows again. Proceed to the next fix if the error persists.
3. Create a FAT Partition
If you’re still getting the error, you can try creating a FAT partition manually. This is essentially what Boot Camp does when it partitions your disk for Windows. To create a FAT partition manually do the following:
- Open Disk Utility from Applications > Utilities.
- Select your startup disk from the left sidebar.
- Click the Partition tab.
- Click the ( + ) button below the pie chart.
- Enter a name for the partition in the Name field.
- In the Format pop-up menu, choose MS-DOS (FAT) for compatibility with Windows.
- In the box next to Size, enter the size you want for the partition.
- Click Apply.
4. Remove Unallocated Free Space
If you see a section of the chart labeled “Free space”, you can remove it to make more space available for Boot Camp:
Time needed: 1 minute
To remove unallocated free space:
- Select the Utilities folder under Applications.
- Open Disk Utility.
- Select the section labeled Erase in Disk Utility.
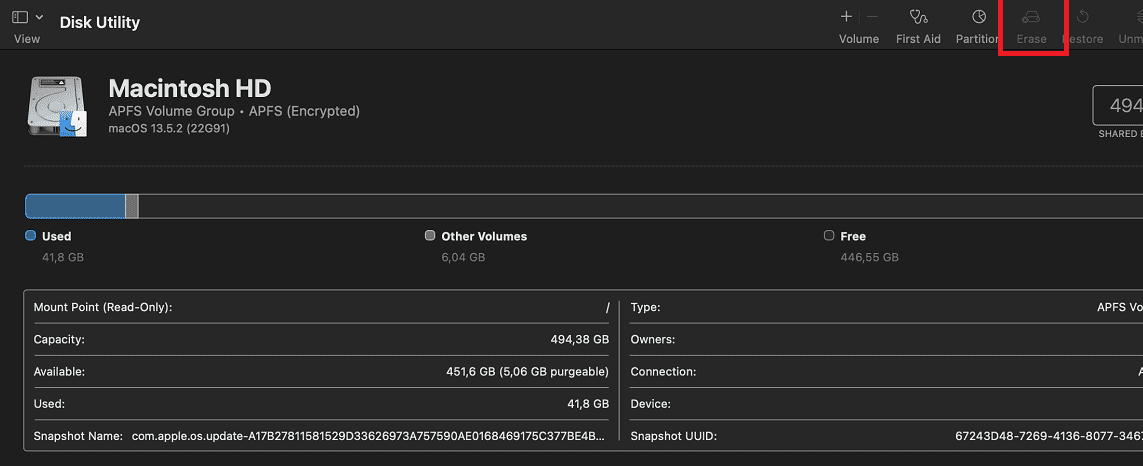
- Select the total space you want to erase and choose Erase Free Space.


Attempt the process again using Boot Camp Assistant to check if the problem persists.
5. Delete Your Local Snapshots
If you have Time Machine enabled, it’s likely making snapshots that prevent you from partitioning your Mac. You can turn off the automatic backup of Time Machine and delete the local snapshots to fix it. To delete local snapshots and turn off the automatic backup of Time Machine do the following:
- Navigate to the Apple menu and click on System Preferences. Then, choose Time Machine.
- Disable the option labeled Back Up Automatically.
- Next, Open Terminal.
- Type the following command and press Enter:
for d in $(tmutil listlocalsnapshotdates | grep "-"); do sudo tmutil deletelocalsnapshots $d; done - Type your account password and press Enter.
If you have numerous local snapshots, the process may require a few minutes to complete. After all the local snapshots have been successfully removed, proceed to run Boot Camp and verify if the error persists.
6. Turn Off File Vault
If you’re using File Vault, you may need to turn it off before using Boot Camp. This is because File Vault can sometimes interfere with Boot Camp. To turn off File Vault:
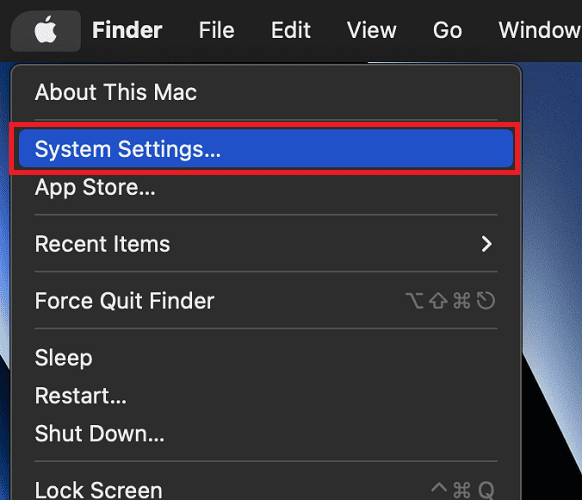
- Open System Settings in the Apple menu.
- Click Privacy & Security.
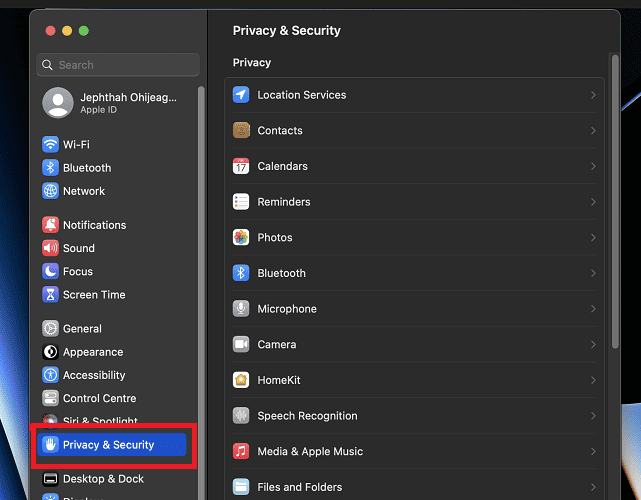
- Navigate to the FileVault section and select Turn Off.


Why Does a Partition Fail on My MacBook?
Creating a Windows partition with Boot Camp Assistant can cause failures for various reasons. These common culprits include macOS version compatibility, issues related to File Vault, the presence of Time Machine snapshots, inadequate available space, and disk errors.
- Disk Errors: If your disk is corrupted or contains errors, you might run into issues with Boot Camp Assistant’s partitioning. You can take action by using Disk Utility to check for and fix these errors.
- Insufficient Free Space: For Boot Camp Assistant to work smoothly, it requires a minimum of 64GB of free space on your disk. If your disk lacks the necessary free space, you’ll need to clear some room before proceeding.
- Time Machine Snapshots: If Time Machine is active, it may be generating snapshots of your disk that hinder Boot Camp Assistant’s partitioning. You can consider disabling Time Machine temporarily or deleting older snapshots.
- File Vault: File Vault, when enabled, encrypts your entire disk, which can occasionally disrupt Boot Camp Assistant’s partitioning process. Temporarily disabling File Vault or backing up your data and erasing the disk are potential solutions.
- macOS Version: If you’re operating on an older macOS version, it’s possible that software bugs are triggering the partitioning error. To address this, you can try updating to the latest macOS version.
By following these steps, you can address the “Your disk could not be partitioned” error and proceed with your Windows partition installation using Boot Camp Assistant.
Conclusion
I trust that this article has provided you with the solutions needed to address the “Your disk could not be partitioned. An error occurred while partitioning the disk” issue. If you find yourself in need of more assistance or have additional questions about the topics covered in this article, please feel free to reach out by using the comment section below. Still struggling to get Windows on your Mac? Why not check out Nick deCourville’s article to explore various ways to get Windows on your Mac?


