
Those looking to get Windows on their Mac, your day has finally arrived. There’s a lot of advantages to having both Windows and macOS running on your device. This is especially true if you are looking to run Windows-exclusive programs and features. However, you may need to determine the right program to get Windows on your machine, which is where I come in.
Taking all of this in, I’m going to look at some of the more popular options for when it comes to getting Windows on a Mac device. Primarily, it’s going to boil down to what processor you’re running. Also, keep in mind that this list is far from extensive when it comes to options. There’s a lot of programs available when it comes to Windows on a Mac. I’ve simply chosen the more popular options.
How do I Install Windows on a Mac?
When it comes to installing Windows on a Mac, one of the first things you need to determine is whether or not you’re sporting Apple Silicon or an Intel-based processor. What you are using will be a major factor in getting the Microsoft operating system on your Mac machine.
Fortunately, all you need to do is navigate to the Menu Bar and go to Apple > About This Mac. You will see your processor information right at the top of the page.

If you are running an M1 or M2 Mac, our very own Jeff Butts has written a fantastic guide on determining which of the two most popular options is best for these machines: UTM or Parallels. I would highly encourage giving this a read if you’re interested in running Windows on your Mac. There are plenty of other options out there as well, though I am going to focus exclusively on these two.
Benefits of Parallels
Concerning Parallels, it’s important to remember that Microsoft no longer supports Windows 10 ARM, which means Microsoft no longer supports Windows 10 operating on an M-series Mac. You will need to use Windows 11. Also, make sure that you have the available space for the installation of Windows, which I’d suggest around 60 GB of free space. You can find Parallels here.
How to Install Windows Through Parallels
One of the nice things about Parallels is that it will help provide you an installation copy of Windows. Naturally, you will still need your own Microsoft Windows license. All you need to do to get a copy of Windows in Parallels is navigate to the Parallels icon in the Menu Bar and go to New > Get Windows 11 from Microsoft > Install Windows.

If you’re using an M-based Mac, this will also complete the process for getting Windows on your machine. After this, you’ll only need to accept the EULA and activate Windows. To do this, all you need to do is go to Windows Settings > System > Activation and select Troubleshoot. Then click
I changed hardware on this device recently, and then sign into your Windows account. Lastly, just make sure to choose This is the device I’m using right now and then select Activate. From here, you’re good to go!
Get Windows on Mac Using UTM
If you’re looking to run Windows through UTM, follow these steps. Remember that you will need a copy of Windows, which you can find Windows 11 here directly from Microsoft.
Time needed: 45 minutes
To install Windows using UTM, follow these steps.
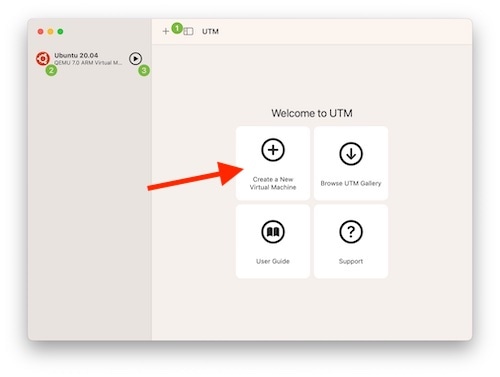
- Install and open the UTM app.
- Click the + icon, which opens the VM creation wizard.
- You will have the option to select Virtualize or Emulate. Consult the article I recommended above to choose what is best for you.
- From here, select Windows.
- Then, choose your boot image. If you do not have one, UTM will make a suggestion on where to find it. Hit Next.
- From here, you can choose the amount of RAM and CPU cores you want to permit to UTM. The default will likely be fine. Hit Next.
- You can then select a directory to mount your version of Windows. You can also skip this step and select the directory later. Select Next.
- You will then be presented with a summary of your decisions. Hit Save to continue.

Really, that’s all there is to it! Thanks to UTM, you’re now running Windows on your Mac. You might also be interested in how to download and install CrossOver 23 on macOS and play any game you want.
Get Windows on Mac Using BootCamp Assistant
Of course, if you’re using an Intel-based machine. I would honestly recommend using the BootCamp Assistant that comes with macOS. For this, Apple recommends 64 GB of available space, as well as a USB flash drive. Note that you’ll only be able to install Windows 10 through these methods.
However, the following devices do not need a USB drive to install Windows: MacBook 2015 or later, MacBook Air 2017 or later, MacBook Pro 2015 or later, iMac 2015 or later, any iMac Pro and MacPro 2013 or later.
To install Windows 10 on an Intel-based Mac, follow these steps:
- Open BootCamp assistant. You will find this in the Utilities folder within your Applications folder. You will be presented with onscreen instructions. You will then potentially be asked to inset the USB key, as well as choose your partition size.
- You will then format the Bootcamp partition. BootCamp Assistant will then finish, and your device will restart to the Windows installer. If you are asked where to install Windows, choose your BOOTCAMP partition and select Format. However, this will likely be done automatically.
- From here, ensure that there no unnecessary external devices connected to your machine. Select Next and follow the onscreen instructions to install Windows.
- Once it’s complete, your Mac will startup in Windows. It will then open a Welcome to the Boot Camp installer window. You will then have some more onscreen instructions. Finally, you will then need to restart.
Once you install Windows, you will be able to switch between the two operating systems by pressing and holding the Option key upon startup to switch between the two.
You Can Have it All: Windows and macOS All in One
Some people like having the best of both worlds. Fortunately, getting them can be incredibly easy. Once you’ve installed Windows on your Mac, you can enjoy both of them without the need for another device. All you really need to remember is what type of processor you’re running. However, I personally think that having an Intel-based machine opting to install Windows 10 through BootCamp is going to be the easiest route.
With that in mind, you’re able to enjoy both Microsoft Windows and macOS directly from your device. Having both can be extraordinarily useful, especially if you need to use both for work or school. There’s a lot of different ways that you can get Windows running on your Mac, though this article covers the more popular options. Parallels, UTM and BootCamp are relatively straightforward, so feel free to download Windows and give this a try.


