
While technically doable, installing the macOS Tahoe update on a Hackintosh has some caveats. For starters, you’ll need to follow the usual Hackintosh upgrade steps, like checking for Kext updates or new OpenCore versions. You’ll also need to keep an eye on features that aren’t working yet, known issues, and general instability. Check below for details of the process and some tips.
Notes on Hackintosh macOS Updates (Not Limited to Tahoe)

Firstly, you have to remember that upgrading Hackintoshes isn’t as straightforward as installing a new macOS version on regular Macs. There are lots of additional steps, some optional, some mandatory.
For starters, you must always update all kernel extensions (Kexts) and OpenCore itself. Without that, you’re almost 100% guaranteed to find yourself having frequent kernel panics, or even unable to boot macOS entirely.
Some additional steps, like changing boot-args, may be needed as well. One example is USB port mapping in macOS Tahoe, which I’ll detail in a bit. Most Lilu modules will require a beta flag to be enabled in boot-args as well to work on Tahoe.
Lastly, keeping a separate macOS installation at hand (in addition to a Time Machine backup) is useful for regular Macs. This way, if the update goes wrong, you can simply boot from the working partition and sort things out. For Hackintoshes, I would say this is basically common sense. The dozens of people with botched updates (and no alternative working installation) in the Hackintosh subreddit can attest to that.
Word to the Wise: macOS Betas and Hackintoshes
Exactly a year ago, I wrote an article very similar to this one you’re reading, about the macOS Sequoia beta. What I said back then still applies: installing beta macOS releases is a riskier venture than, e.g., iOS or iPadOS.
That’s true for regular Macs too, by the way. For Hackintoshes, though, there’s one added risk: you’re severely more limited in the places you can ask for help.
Surely, OpenCore’s developers are as nerdy as OpenCore users and start tinkering with new macOS releases the moment they launch. That doesn’t mean, though, they’ll come up with a quick solution for any issues you may find.
The official policy is: if you install a beta, you’re on your own. There might be people willing to help on Reddit, or in the Hackintosh Discord server, but don’t count on it.
IMPORTANT: Enable FileVault Prior To Installing macOS Tahoe

With macOS Tahoe, Apple has decided to enable FileVault automatically during the installation procedure. You have to configure the feature yourself BEFORE installing the update. Otherwise, you will be locked out from your Mac from the second boot onwards.
Right now, there’s a workaround in case you don’t manage to enable FileVault prior to the installation. This may be needed, e.g., in cases where FileVault refuses to work altogether. However, the workaround may or may not work, so your safest bet is to set up FileVault beforehand.
(Finally) Updating my Hackintosh to macOS Tahoe Beta
Would you click “I have read and agree with the terms and conditions” if the previous sections had such a check? If so, let’s continue.
1. Preparing Kexts
The first thing to do is make sure your Kexts will work with the new macOS version. The most important part is updating your existing Kexts, but that’s only part of the story.
Update Kexts
There are some ways to check for Kext updates. The most crucial ones can be found with Lilu-and-Friends, though I have found the tool unreliable sometimes.
My preferred method is using Hackintool to list all loaded Kexts, then manually searching for updates on GitHub. But remember: while Hackintool is technically able to create a config.plist file, this isn’t recommended — no “OpenCore configuration app” is. To edit your config.plist, always use either ProperTree or, if you like getting confused by XML tag indentation, text editors.
 NOTE
NOTE
If you’re comfortable with scouring old messages, you can always check the Hackintosh Discord server’s Updates channel. It lists all Kext, OpenCore, and even macOS updates. It may take a while to find what you’re looking for, however, since the amount of messages is huge.
One special case is for AMD CPUs. If you don’t update your Kexts to the latest beta build, your Hackintosh won’t boot macOS Tahoe at all.
Checking Newly-Unsupported Kexts
Another thing to consider is that some Kexts may not work reliably (or at all) on some macOS versions. This usually happens when Apple changes the way macOS deals with some parts or drops support for older hardware.
One example is AirportItlwm, which adds compatibility with Intel wireless cards. Up until macOS Sonoma, you can use AirportItlwm normally. Starting with Sequoia, however, you need a complicated workaround to get AirportItlwm working by itself, and, even then, very unreliably.
The official solution, so far, is using the regular itlwm, which spoofs Intel Wi-Fi cards as wired Ethernet connections. This has some caveats, like lacking full Handoff and Continuity support, and requires the Heliport app. From my experience, though, it’s far more stable: the patch method listed above leads to frequent disconnections and kernel panics. Also, the patched AirportItlwm method gives you far lower transfer speeds than itlwm.
Using MinKernel, MaxKernel, and boot-args Variables
If you plan to use the same OpenCore with multiple macOS versions, the MinKernel and MaxKernel variables are very useful. They allow your Hackintosh to selectively load (or block) Kexts depending on which macOS is booting.
Regarding the macOS Tahoe update specifically, you’ll likely need at least one such adaptation on your Hackintosh. Most users have reported Bluetooth-related kernel panics, so you may need to limit Bluetooth Kexts to Sequoia and older. I’ll detail that in a bit.
Lastly, you will likely need to add at least one string to the boot-args variable. Without -lilubetaall enabled, many of the required updated Kexts simply won’t launch. Specific hardware, like AMD CPUs, may need additional boot-args strings as well.
Fixing USB Maps
Apple has never heard the “if it’s not broken, don’t fix it” saying, apparently. Most USB maps are broken in macOS Tahoe, and will give you a “prohibited” sign when you try to boot the installer.
There are two ways of fixing that. If you use UTBMap.kext, you’ll need to download an experimental build of USBToolBoox. The other option is using USBMapInjectorEdit from the beta USBMap Kext.
In my case, I originally used USBToolBox, and it worked just fine in Sequoia. In Tahoe, however, no amount of fixing saved me from the prohibited sign, so I had to change to USBMap. Your mileage may vary, though.
2. Updating OpenCore
For stable macOS releases, the latest OpenCore version should suffice. When updating your Hackintosh to macOS Tahoe, though, you’ll need a special build. You can find it in a pinned message on the Hackintosh Discord server.
3. Creating a Bootable Installation Disk

Nothing new here. You’ll need to create a bootable macOS installer, using a USB stick with 32GB or more of storage. The most up-to-date instructions on making bootable macOS installers can be found in this Apple Support article.
4. Installing macOS Tahoe Developer Beta on Hackintosh
While macOS Tahoe isn’t unusable in all Hackintoshes, the update can be taxing for some machines. Because of that, I listed two possible installation methods.
The first one creates a clean installation, so you can use Tahoe as a sandbox. This way, you can test new features or just check the refreshed Liquid Glass visuals without committing to the update.
The second method migrates all your data. In this case, you can try to use macOS Tahoe as your daily driver. Just remember: never use a beta OS on a production computer. Unless you have disaster recovery safeguards in place, the risk of being left with an unusable computer is too high. If you don’t keep a backup of your stuff, you may also suffer irreversible data loss.
Method 1: Clean Installation
This one is very simple. Reboot your Hackintosh with the USB installer connected, and select your empty disk or volume. That’s it.
If you want to skip the USB stick altogether, you can even start the installer from within your current macOS. I do find, however, that the bootable installer is usually faster.
Method 2: Keeping Files, Apps, and Data
About a month after the Sequoia beta article I mentioned earlier, I wrote a broader guide on Hackintosh macOS upgrades. I have recently updated that guide to include a method not covered previously.
That method was initially developed to avoid boot loops after using Migration Assistant. I came to find out, though, that it’s also significantly faster than performing a clean installation and then migrating.
The only caveat is that you’ll need a separate disk for the installation — a physical one, not a different APFS volume. It can be either an internal drive or an external SSD.
To use that method, do the following:
Time needed: 30 minutes
- Reboot your Hackintosh with the USB installer connected.
- When the installer opens, open Disk Utility.
- Select the empty disk you’ll be installing macOS Tahoe to, and click Restore in the top menu.
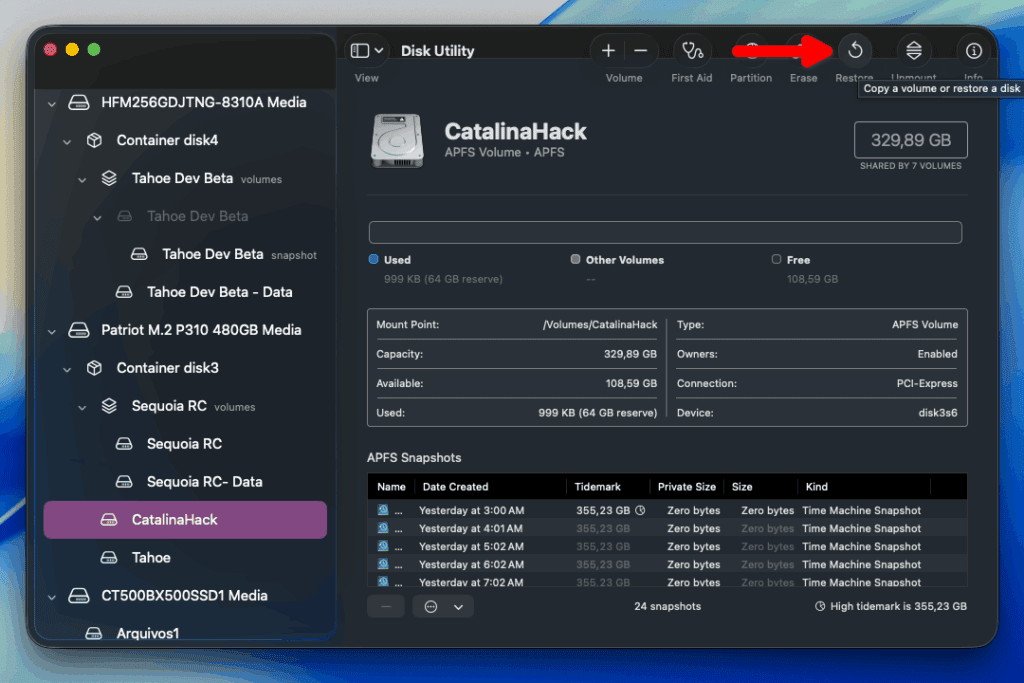
- In the dialog that opens, select your current macOS installation disk. You won’t make any changes to it, don’t worry. We’ll merely clone it to the empty disk.

- Wait for the restore to complete. This may take from a few minutes to several hours, depending on disk size, drive type, and whether you’re using internal or external storage.
- After the restore finishes, click the cloned drive’s name to change it. You’ll need to know which is the original one and which is the restored installation.
- Close Disk Utility and open Terminal: on the menu bar, go to Utilities > Terminal.
- Use diskutil to mount the Preboot partition on the cloned drive
- Edit the file listed in this Reddit comment to change the drive name in OpenCore as well. You can do that with the vi CLI text editor (and you’ll have my sympathies for doing something that torturous).
- Quit Terminal and restart. When the OpenCore boot picker appears, select your cloned installation.
- Boot normally and enable FileVault. You can do that in System Settings > Privacy and Security > FileVault.
- Reboot back to the USB installer. This time, go straight to the Install macOS option. Select the newly cloned disk.
- Your computer will reboot a few times during the installation. After that, if you have followed this guide thoroughly, your Hackintosh should be running the macOS Tahoe update. Your data — user accounts, files, installed apps, preferences, everything — will be exactly as you left them prior to the update.


macOS Tahoe on Hackintoshes: What Works, What Doesn’t, What Sort of Works
Now, here’s the thing: not all hardware in Hackintoshes is supported natively (or at all) in macOS. This may present unexpected challenges if you want to give Tahoe a try.
Liquid Glass Is a GPU Hog

As an example, my laptop has a GeForce GTX1650 graphics card. No macOS version supports this GPU, so I need to disable it. As a consequence, my HDMI port, which is hardwired to the dGPU, doesn’t work as well. Everything else works decently, and my i7-9750H iGPU, an UHD 630, handles most of the macOS well enough.
Or, rather, handled. In macOS Sequoia, it has enough power. I can, e.g., use two screens (with a DisplayLink adapter), and open multiple (large) files in Photoshop and Illustrator simultaneously. Occasional hiccups happen, but it’s manageable.
In macOS Tahoe, however, even a single, medium-sized file in Photoshop or Illustrator is enough to slow everything down. My laptop runs, I kid you not, at 1-2FPS in these cases.
What can be done about that? Not much. I could disable transparency, reduce animations, and so on. But, then, what’s the point in updating my Hackintosh to macOS Tahoe, if the major new features are design-related?
Not all Hackintoshes will suffer from that, mind you. Computers with compatible, more powerful GPUs, should run macOS Tahoe as well as Sequoia, or with minor performance losses.
For everyone else, though, I recommend passing on the update — at least for now. I can’t even fully grasp how Apple made the 2020 13-inch Intel MacBook Pros handle Liquid Glass. It’s definitely understandable why the company dropped support for the 2020 Airs and 2018 Mac Minis, by the way.
Some GPUs Won’t Work at All (at Least for Now)
Long story short, no AMD Polaris (RX 500 series) graphics card works with Tahoe, at least for the time being. If you have one of these, either disable it in OpenCore and use your iGPU, or refrain from updating for now.
Bluetooth Is a Hit-and-Miss
As for Bluetooth support, well, it’s a lottery. Some people (me included) have it working without any modifications, while others face kernel panics.
Remember what I said above about MinKernel and MaxKernel? Now is the time to put that knowledge to use.
My suggestion is to have two versions of your EFI folder at hand. In one, place the Bluetooth-related Kexts normally, as they already are for your current installation. In the other, set MaxKernel to 24.99.99 for the Kexts.
Try booting from the unchanged EFI at first. If you get a kernel panic, boot from the one with MaxKernel defined instead. If only the second EFI works, unfortunately, you’ll have to wait until a fix is released before being able to use your internal Bluetooth card. External dongles may or may not work.
One possible fix to try is changing NVRAM variables in OpenCore. This message in the Hackintosh Discord server details what needs to be done. There’s no guarantee this works for everyone, though.
Audio Is Broken, But It’s Also Not Broken
I can’t guarantee this issue will present itself the same way for everyone. For me, Bluetooth audio wasn’t working at all, at first (even though Bluetooth itself was working). At some point, it started working, but with a highly muffled sound.
The good news is that there’s already an AppleALC update to fix this. The bad news is that, on the other hand, it doesn’t necessarily fix old issues. My persistent internal speaker crackling sound remains as irritating as it has ever been.

Apple is known for releasing test builds way more polished than the average. What the company calls a developer beta could very well be labeled public beta by some of its competitors.
That doesn’t mean, however, there aren’t any issues. When we’re talking about hardware that’s not officially supported, things are even worse. These are minor problems, though, considering macOS Tahoe brought a significant number of changes both visually and under the hood.
The one issue that doesn’t seem to be easily solvable is poor performance. Considering how Tahoe can slow down Hackintoshes, it’s not surprising this will be the last macOS update for Intel Macs.


Buy a MacMini M4 – after 8 years dealing with Hackintosh I gave up wasting my time with Hackintosh, M series definitely put an end to Hacks.
To be fair, the answer to “which computer should I buy to Hackintosh?” has been “an Apple Silicon Mac” for a while now, a couple years at least. The M4 Mini makes it even truer. The starting price is unbeliavably low for a machine that powerful, and, if the potential buyer has enough cash available, I’d tell them to get a memory bump to 24 or even 32GB, which will surely be enough for another decade. A storage upgrade is recommended as well, but not as essential, since external SSDs with TB4 will basically be as good as built-in storage, in regards to speed.
For those which already have decent enough Hackintoshes, on the other hand, I would strongly recommend giving Tahoe a go (if they have a beefier GPU than mine). Might buy them some time to save money before having to buy an Apple Silicon Mac.