
If you’ve upgraded your macOS, you may have noticed a seemingly odd problem regarding Tahoe not recognizing external hard drives.
Since the Tahoe 26.0.1 version update, many users report that their system doesn’t recognize their external hard drives, even though it still works fine on Sequoia. This issue is serious because it prevents access to important data, such as backups.
Don’t miss the best of The Mac Observer
Set us as a preferred source and our Apple reporting ranks higher in your Google Search results and Discover feed — one tap, no account changes.
Table of contents
Why macOS Tahoe Doesn’t Recognize External Hard Drives
It’s still unknown why macOS Tahoe doesn’t recognize external hard drives, even though it works fine on Sequoia, the previous version.
The main culprit would most likely be upgrading to the Tahoe 26.0.1 version. Many macOS Sequoia users don’t have this problem, as it can read hard drives with no problem.

Before diving into the solutions, we can only discuss possible reasons why the macOS Tahoe 26.0.1 version fails to recognize external hard drives. Some of the most common causes could be:
- File System Incompatibility: Drives formatted in NTFS (Windows format) may appear in Disk Utility but can’t be written to without third-party drivers.
- Disk Corruption: A damaged file system can prevent macOS from mounting the drive.
- USB Port or Cable Issues: Faulty or loose cables often cause recognition errors.
- macOS Bugs: Major updates like Tahoe can introduce temporary glitches.
- Insufficient Power Supply: Some external drives need more power than a single USB port can provide.
- Drive Hardware Failure: Physical damage may prevent detection entirely.
Users report that formatting the drives in APFS (Apple File System) does not work, and sometimes an error pops up stating it’s unable to mount the drives when attempting to format them in Mac Studio.
However, keeping your system and drivers up to date can eliminate most compatibility issues you may come across.
Preparation
Before you start troubleshooting, make sure you’ve covered the basics:
- Check the power: Check if your external drives with adapters are properly plugged in.
- Try another cable or port: Using a different USB or Thunderbolt port may resolve the problem.
- Test on another computer: If the drive works on another system, the issue is with your Mac.
- Verify Finder settings: Go to Finder > Settings > General and make sure External disks are checked for both the desktop and sidebar.
If these quick checks don’t solve the issue, proceed with the steps below.
6 Fixes for External Hard Drive Not Recognized on macOS Tahoe
1. Check Disk Utility
Disk Utility is the first place to look when macOS Tahoe doesn’t recognize your external hard drive.
- Open Disk Utility from Applications > Utilities.
- Check the left sidebar for your external drive.
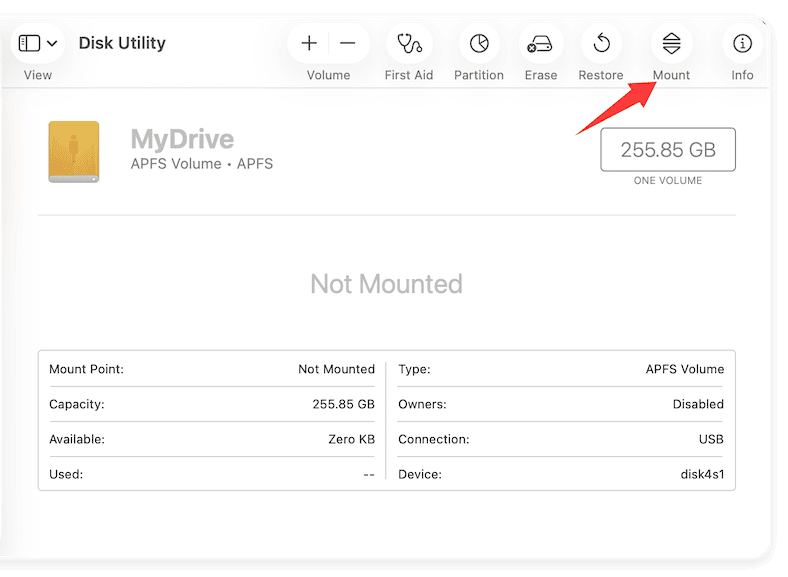
- If it appears grayed out, select it and click Mount.

If the drive mounts successfully, it should now appear in Finder. If not, move on to Fix 2.
2. Run First Aid in Disk Utility
The First Aid tool scans and repairs minor file system issues.
- Open Disk Utility again and select your external drive.
- Click First Aid at the top toolbar.
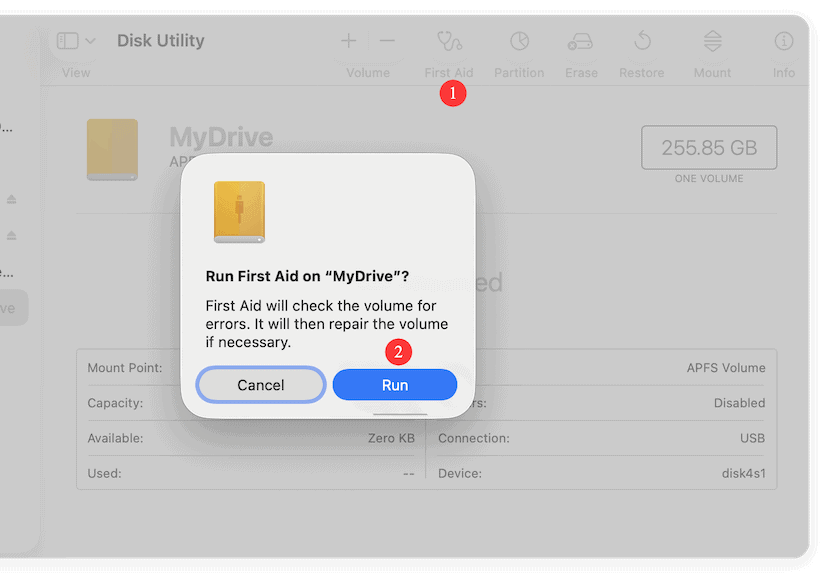
- Confirm and let the process complete.

If errors are found and repaired, your drive should now appear in Finder. If Disk Utility reports that it cannot repair the drive, move on to the next fix.
3. Reset NVRAM/PRAM and SMC
Your Mac stores certain hardware settings in NVRAM, PRAM, and the System Management Controller (SMC). Resetting them may fix USB or external drive issues.
Reset NVRAM/PRAM:
- Shut down your Mac.
- Turn it on and immediately press Option + Command + P + R.
- Hold the keys for 20 seconds, then release.
Reset SMC (Specifically for Intel Macs):
- Shut down your Mac.
- Hold Shift + Control + Option + Power for 10 seconds.
- Release all keys and restart.
For Apple Silicon Macs, simply restart — SMC resets automatically.
4. Reformat the External Drive (If Necessary)
If your external drive still won’t mount, reformatting may solve the issue. This will erase all data on the drive, so back up important files first.
When to Reformat
- The drive appears in Disk Utility but won’t mount.
- First Aid fails to repair errors.
- The drive shows as “uninitialized” or “RAW.”
- The file system is unsupported (e.g., NTFS).
Choosing the Right Format
- APFS (Apple File System): Best for SSDs and newer Macs.
- Mac OS Extended (HFS+): Ideal for older Macs.
- exFAT: Works on both Mac and Windows.
- MS-DOS (FAT32): For small drives (4GB file size limit).
Steps to Reformat
- Connect the external drive.
- Open Applications > Utilities > Disk Utility.
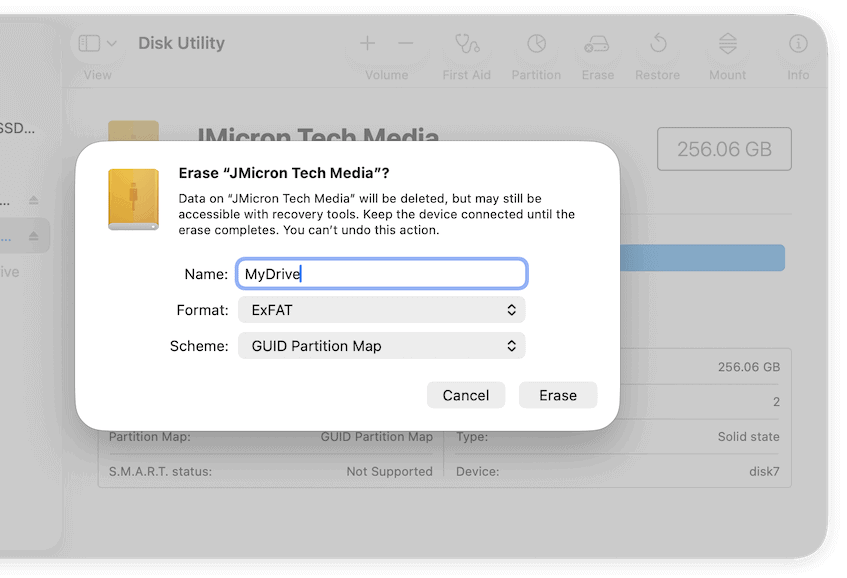
- Select the drive (not just a partition) from the sidebar.
- Click Erase.
- Enter a new name, select a file system (e.g., exFAT), and choose GUID Partition Map as the scheme.
- Click Erase and wait for the process to complete.

Once finished, your drive should appear in Finder and be ready to use.
Possible Data Recovery Note: If you need files from the drive before formatting, consider using data recovery software compatible with macOS. Avoid writing new data to the drive until recovery is complete.
5. Use Terminal Commands
If all else fails, advanced users can utilize Terminal because it may hold additional ways to troubleshoot. If the drive still doesn’t appear, you can manually mount it by:
- Open Applications > Utilities > Terminal.

- Type diskutil list and press Enter. This shows all connected drives.
- Find your external drive (e.g., disk2).
- Type: diskutil mountDisk /dev/disk2.
- Then, try repairing the drive by typing: sudo fsck_hfs -fy /dev/disk2 (replace disk2 with your actual drive identifier.)

FAQ
This is likely due to a compatibility bug introduced in the update. Installing the latest patch or resetting hardware settings often fixes it.
It’s formatted in NTFS. macOS can read but not write to NTFS without additional drivers. Reformat it to exFAT for full compatibility.
Yes. Reformatting erases the drive completely. Always back up or use recovery software before proceeding.
If Disk Utility can’t detect it, the drive might have hardware issues. Try a different cable, port, or Mac to confirm.
Yes. Running First Aid again after a macOS update can sometimes repair issues missed during the first attempt.
Summary
- Check Disk Utility to see if your drive appears and try Mount.
- Run First Aid to repair potential disk errors.
- Update macOS Tahoe 26.0.1 and all related drivers.
- Reset NVRAM/PRAM and SMC to clear hardware settings.
- Reformat the drive if necessary (after backing up data).
- Use Terminal commands for advanced troubleshooting.
Following these steps should restore your external drive functionality on macOS Tahoe 26.0.1.
Be sure to start with simple checks in Disk Utility and work through these fixes step by step. With careful troubleshooting, you’ll have your external drive working again in no time.


Discussion