
We have all been there. You are waiting for an important message, but instead, your inbox is flooded with newsletters you never signed up for or spam that just won’t quit. It is frustrating, cluttering your digital life and making it harder to find what actually matters. But here is the good news! You do not have to live with a messy inbox forever.
Apple makes it incredibly easy to silence the noise directly from your iPhone. Whether it is a persistent marketer or a mysterious bot, you can stop them in their tracks. Ready to take back control? Let’s get started!
Don’t miss the best of The Mac Observer
Set us as a preferred source and our Apple reporting ranks higher in your Google Search results and Discover feed — one tap, no account changes.
Table of contents
What You Need to Block Emails
Before we dive into the steps, let’s make sure you have everything ready. The process is straightforward, but a few basics are required to ensure the blocks actually stick.
Here is a quick checklist:
- An iPhone or iPad: This guide focuses on the iOS Mail app, but the concepts often apply to iPadOS too.
- The Mail App: You should be using Apple’s default Mail app. If you use Gmail or Outlook, the steps will be slightly different.
- An Active Account: Obviously, you need an email account set up. If you are having trouble connecting or find your email not working on iOS, you will want to fix that connection issue first.
Here’s How to Block Emails on Your iPhone
Blocking a sender is the most effective way to stop them from reaching your inbox. Once blocked, their messages will go straight to the trash or a junk folder, keeping your main list clean.
1. Block Directly from the Mail App
This is the fastest method when you spot a spam email in your inbox.
- Open the Mail app on your iPhone.
- Tap on the email from the sender you want to block.
- Tap on the sender’s name or email address at the very top of the message.
- The contact sheet will slide up. Tap Block this Contact.
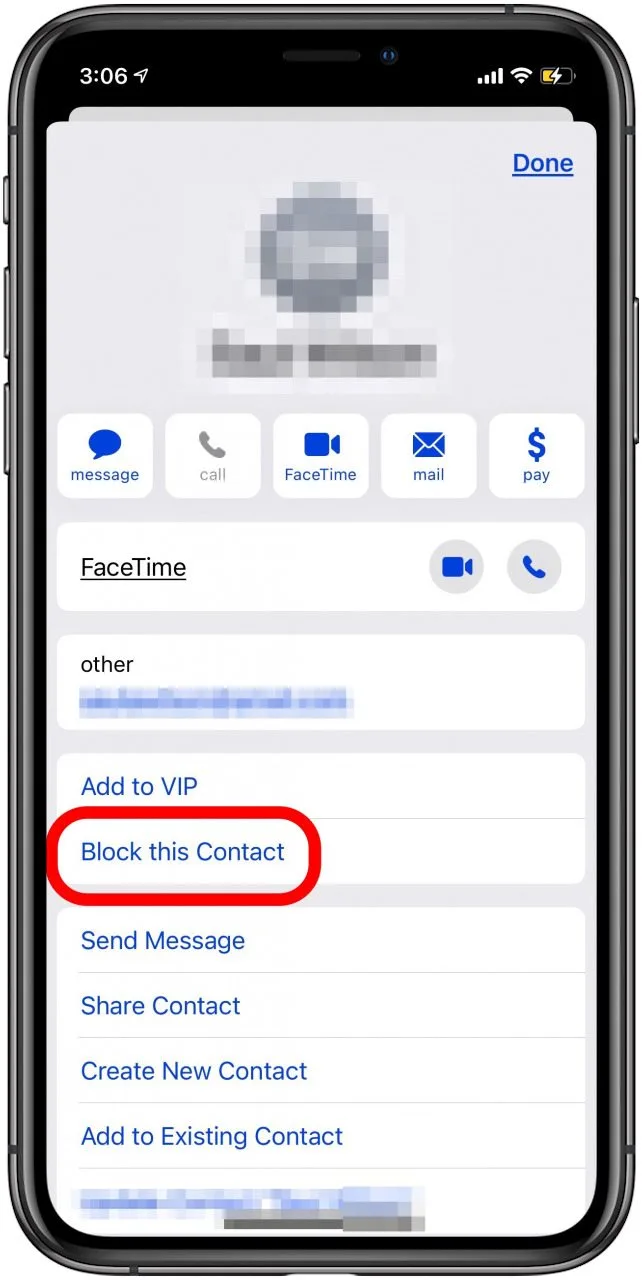
- Confirm by tapping Block this Contact again.

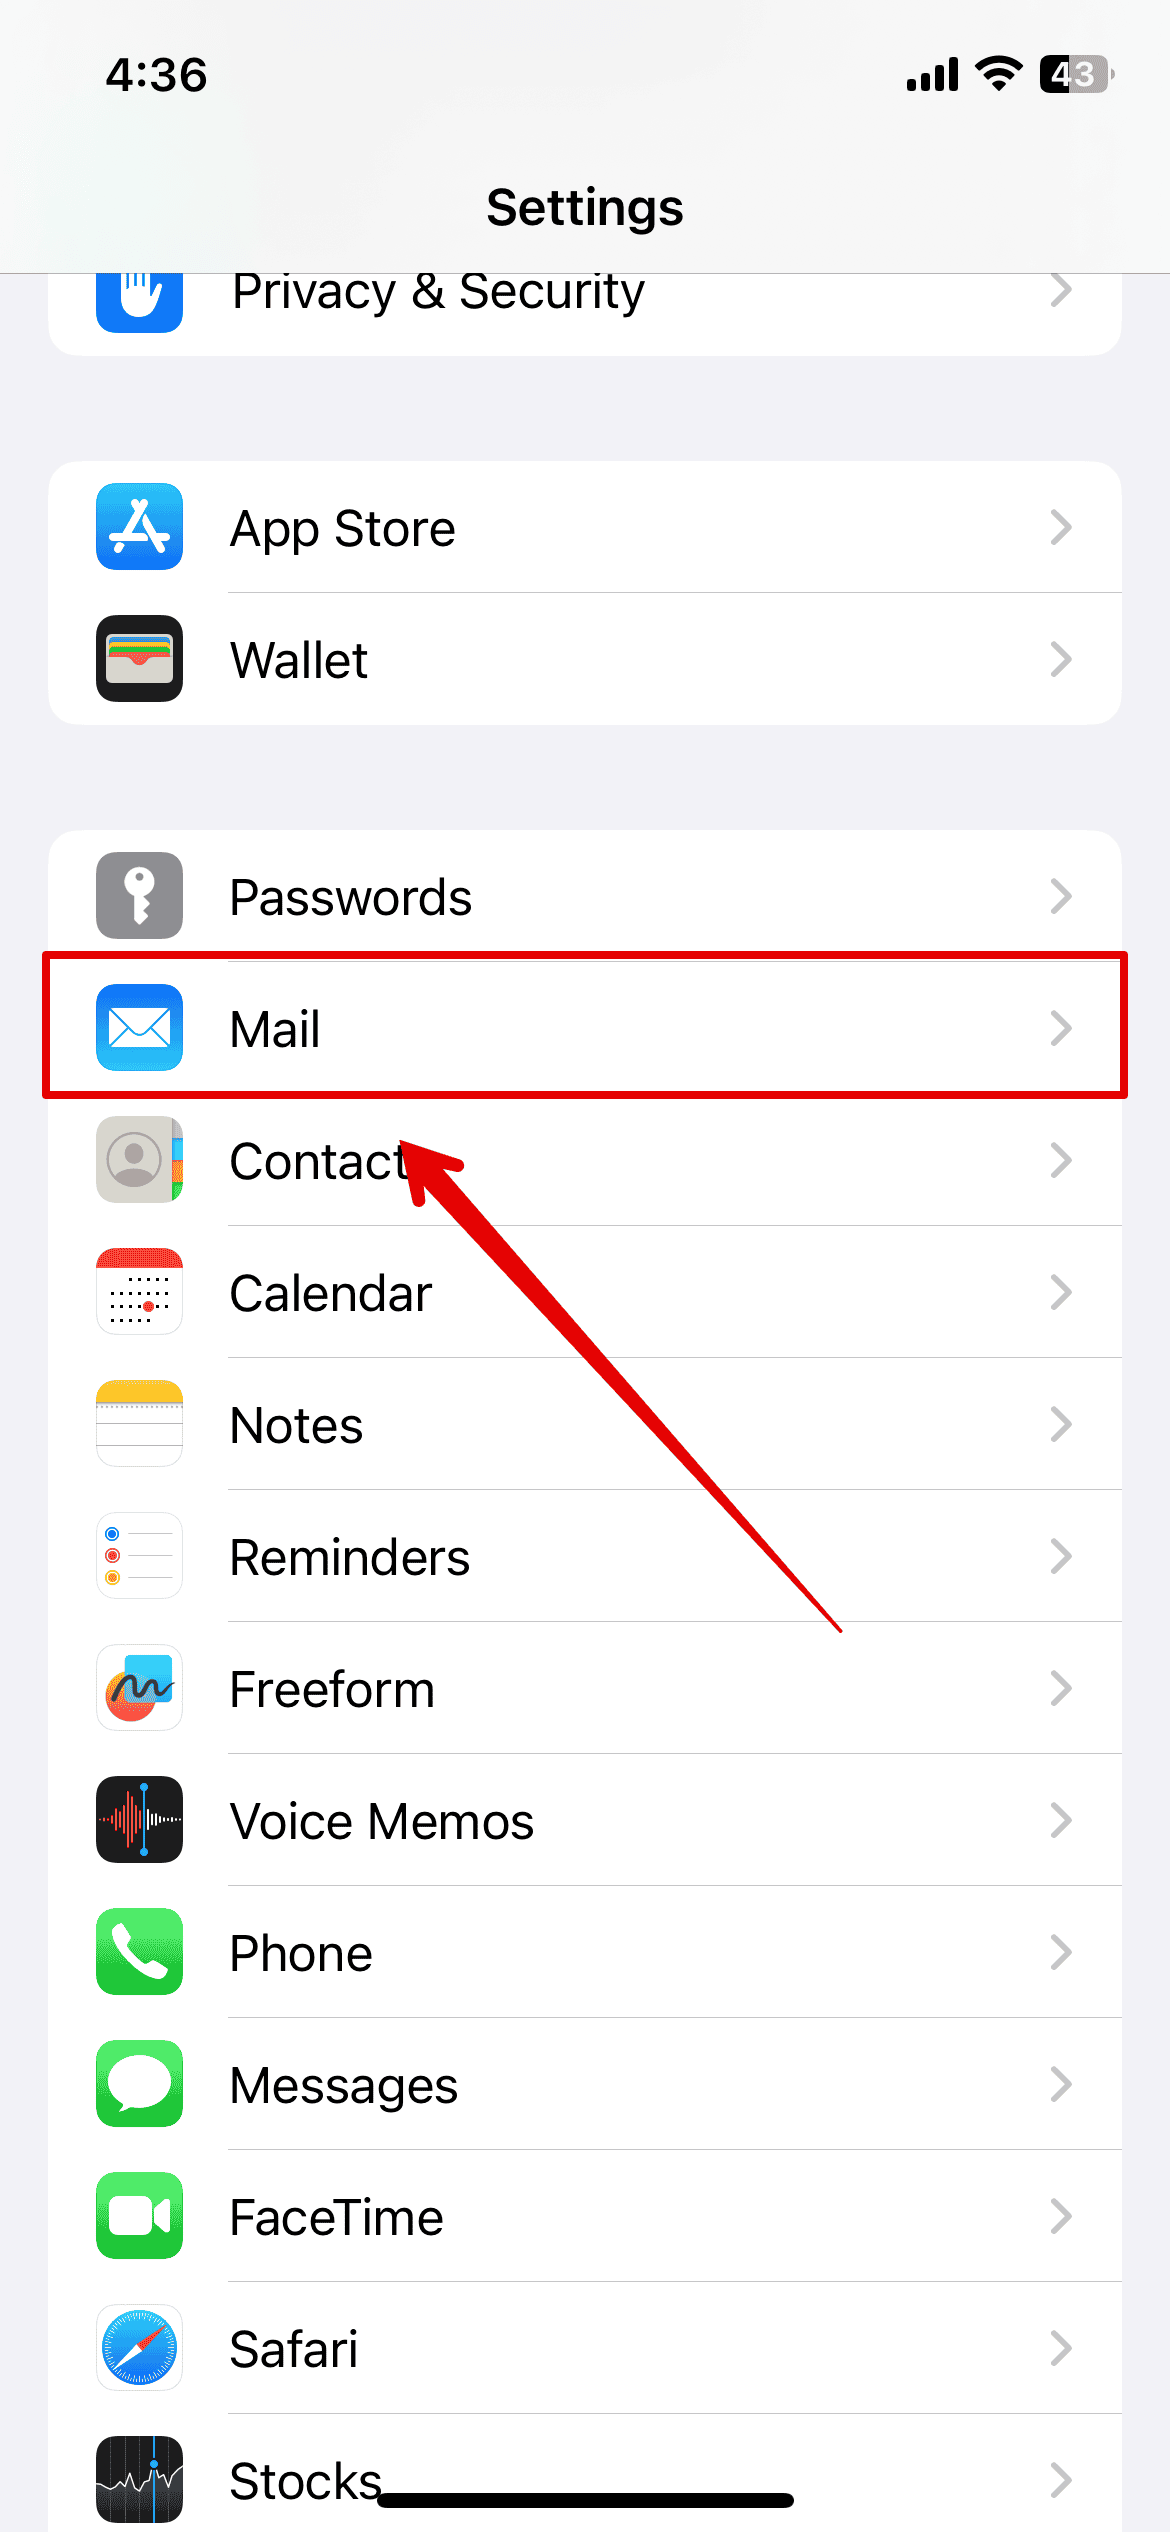
2. Manage Blocked Contacts in Settings
If you want to unblock someone or check who made the list, you can do it through the main Settings menu.
- Open the Settings app.
- Scroll down and tap Mail.
- Look for the Blocked option under the Threading section.
- Here you can add new contacts to the list or swipe left on an existing email to Unblock them.
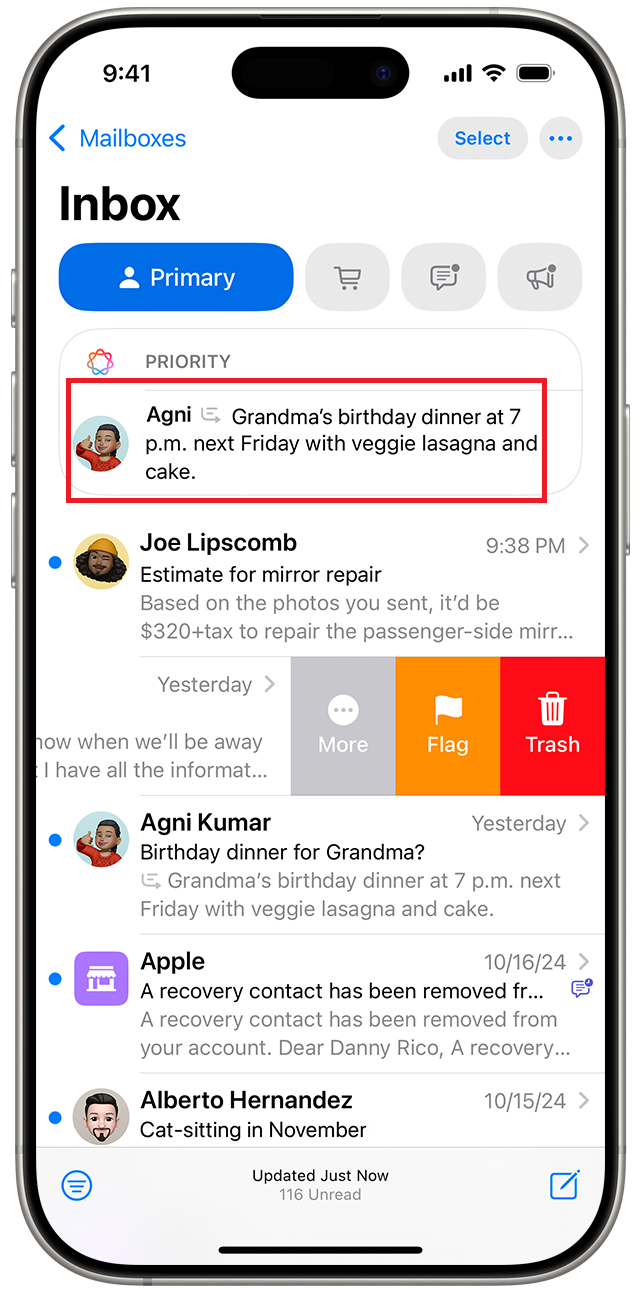
3. Unsubscribing from Mailing Lists
Sometimes you do not need to block a person; you just need to leave a list. Apple has a built-in tool for this.
- Open an email from a newsletter or marketing list.
- Look at the very top of the email, just above the subject line.
- If Apple detects a list, you will see a banner that says “This message is from a mailing list.”
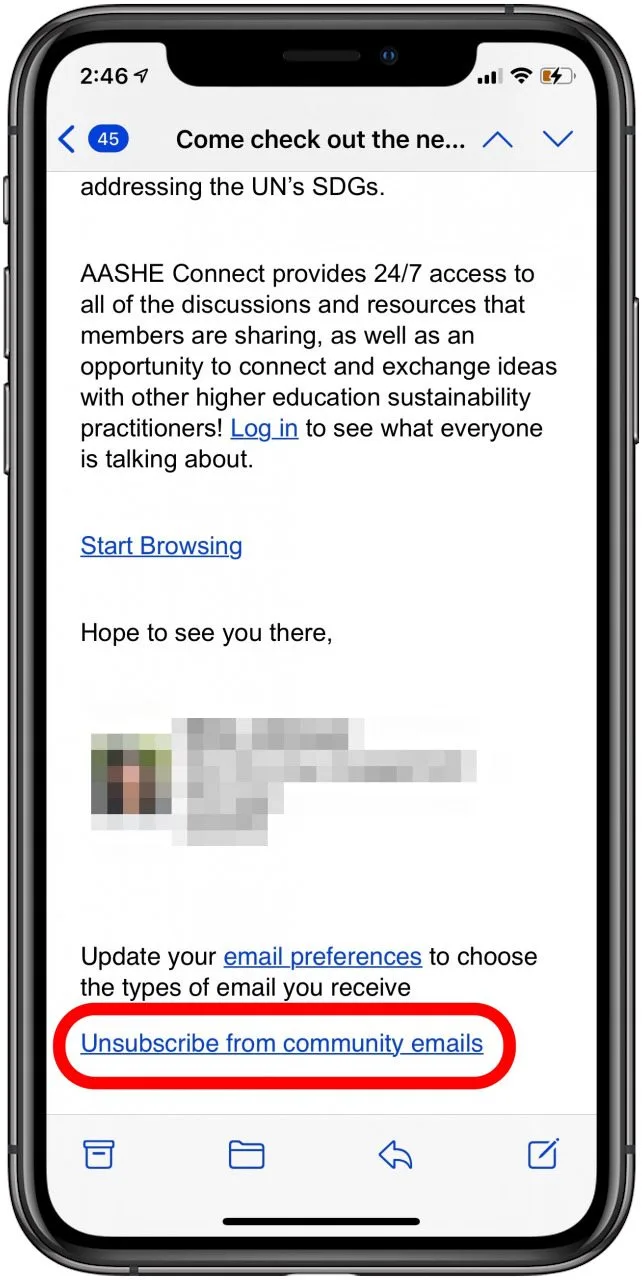
- Tap the Unsubscribe button, and Mail will send a request on your behalf to remove you.
Additional Tips
- Understanding Bounce Backs: Sometimes, you might receive weird emails that look like errors. These aren’t always spam! If you are confused by these automated responses, you should read our guide on Mail Delivery Subsystem emails explained to understand what they are and how to stop them.
- Security First: If you are receiving an overwhelming amount of spam, it could be a sign that your address has been shared on a shady list. In this case, it is a smart security move to change your email password on iPhone to ensure your account remains secure.
- Organize Your Outbox: Blocking stops incoming junk, but keeping your outgoing mail organized is just as important. If you juggle multiple addresses, you should learn how to set the default send account in Apple Mail so you never reply from the wrong work or personal ID.
Final Thoughts
Cleaning up your inbox feels surprisingly good. By taking a few seconds to block persistent spammers or unsubscribe from old newsletters, you save yourself hours of scrolling in the future. Your iPhone is a powerful tool for communication, and with these settings, you ensure it stays a helpful assistant rather than a source of stress. Enjoy your spam-free day!
FAQs
When you block a sender in the Mail app, their emails are automatically marked as blocked. Depending on your settings, they will either be moved directly to the Trash folder or stay in your inbox with a “blocked” icon next to them.
No, the sender receives no notification that you have blocked them. Their emails simply stop appearing in your main view, but they will not receive a “blocked” bounce-back message.
Not directly. You need to open the Mail app to access the sender’s contact information and initiate the block. However, you can delete emails from the lock screen by swiping left on the notification.
Yes! If you use iCloud to sync your contacts and Mail settings, blocking a sender on your iPhone should also block them on your Mac and iPad.


Nice. Ive been trying to figure out a way to do this. Good to know that it comes baked into the next rev.
I use Junk as a holder for stuff I may or may not want to read. Notices from online forums, ads from a few vendors, that sort of thing. But there is another group that are just pure garbage. I want them to go away. I don’t want to see them at all. This will do that. Nice
Nice to know. But is this done at the iCloud level so that the same blocking is done on all iOS and Mac devices?
So far it seems like it’s at the device level. Although that might change in Catalina. I’m not running that beta.