
Each country has specific laws regarding prohibited media, age restrictions, and so on. Also, many companies offer different content (or don’t offer their app at all) depending on the user’s location. If you want — or need — to change your iPhone’s region to circumvent such limitations, check our guide below.
Why Change the iPhone Region?

There are two major reasons someone would want to change which region’s content their iPhone gets. The first is accessing content or features, like circumventing the brief TikTok ban or using Apple Intelligence in the EU.
The other is saving money: in some cases, purchasing apps or subscriptions can be cheaper using foreign currency. One example is Apple Music’s student subscription: while US residents pay $6 monthly, for example, in Brazil, it costs about $2
Changing iPhone Region: 2 Methods
The methods below have different approaches. One requires physically going to a different country but requires changing fewer settings. The other can be done from home but involves configuring some stuff that may seem too complex.
1. Live Near a Border? Cross It!
Yes, it’s that simple. US resident in a town right next to Canada? Go grab some poutine to get TikTok working again. Live in Ireland, but want to try Apple Intelligence? A quick visit to the North might do the trick — but remember to use a supported language.
The best part of this method is that it requires little to no configuration. In most situations, simply connecting to a Wi-Fi network or using a carrier from another country is enough.
2. Remove All Traces of Your iPhone’s Location
The issue with the previous method is that it’s feasible for very few people. For those of us who don’t live near country borders, changing an iPhone’s region is still possible — but more complex.
Step 1: Setting Up a VPN Router
The first thing to do is set up your router to use a VPN connection. Not all routers support this feature, and you may not want to route all your home’s internet through a VPN.
In this case, using another device connected to one of the best iPhone VPNs as a hotspot can be a solution. There are even some free VPN services that allow you to choose exactly where your connection will seem to come from.
Step 2: Disabling All iOS Location Tracking
After doing the above, you’ll need to disable all methods iOS can use to track your iPhone’s actual location. It’s a lengthy process but doable. Check below:
Time needed: 10 minutes
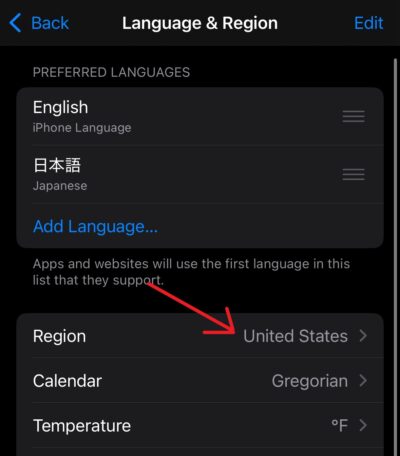
- Go to Settings > General > Language and Region and change the region to a different one.
You may want to change your iPhone’s region to a specific place, for instance, to download an app only available in a specific country. In this case, select that country. If not, you can select any country that allows you to easily gather public information — more on that shortly.
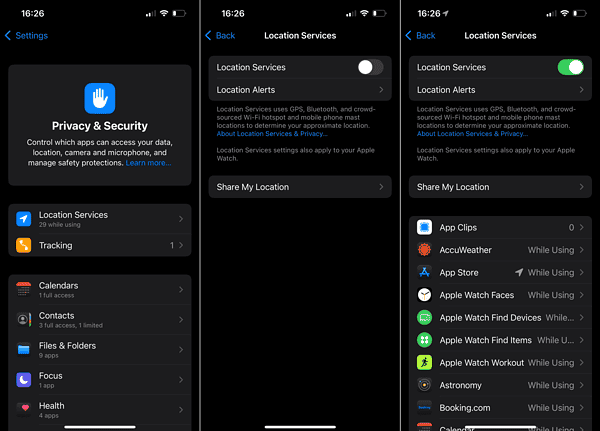
- Still in the Settings app, go to Privacy > Location Services and disable the feature.
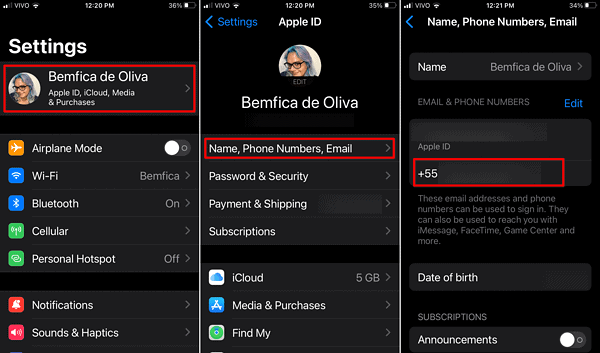
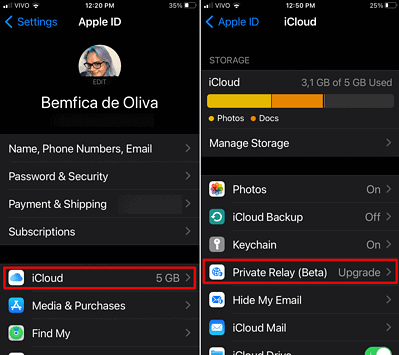
- Also, on Settings, open your Apple Account settings by tapping on your name or photo. Under Name, Phone Numbers, Email, add a phone number from the country you selected.
It can be a random number as long as it’s from that country.
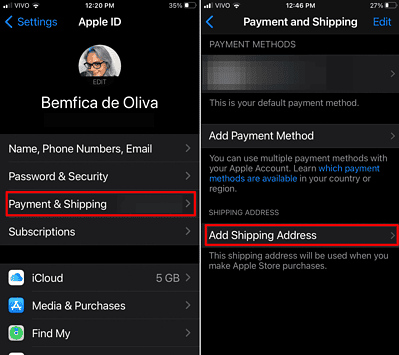
- On that same menu, go to Payment & Shipping and add an address from that same country.
It can be a random address, too, but must be in that country.
- Back to the Settings app home, go to iCloud > Private Relay. If the feature is enabled, disable it.
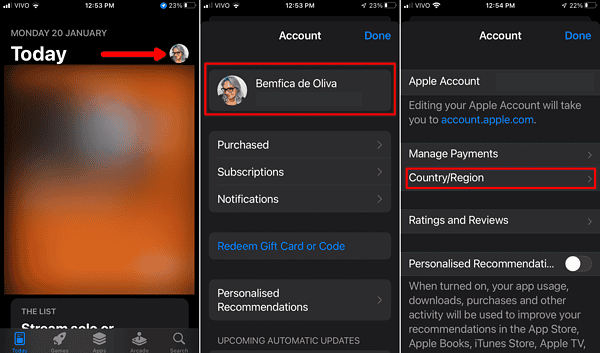
- Open the App Store and tap your photo in the top-right corner. Then, tap your name or photo at the top of the screen. Change the Country/Region to the country you selected.


 NOTE
NOTE
After doing all of the above, disable your iPhone’s cellular connection. You can simply turn on Airplane Mode, too.
Step 3: Wiping Location Settings

The settings you changed ensure your iPhone won’t reveal your location. Now, let’s make it forget what it already knows about that.
- Go to Settings > General > Transfer or Reset. Tap Reset and select Network Settings. Your device will reboot, but that’s expected.
- Do the same, but reset Location & Privacy this time. Another reboot will happen.
- Lastly, if the option is available, select Subscriber Services under that same menu.

There are lots of reasons why you may want to change your iPhone’s region. Watching a foreign TV show? Saving on subscriptions? Hiding from Secret Service agents? We won’t judge. Apple, however, apparently does, considering how hard the company has made the procedure.


