File organization is important in the digital age, if only because having a coherent system makes it easier when you want to find a file later. Now where did I put that photo of Charlotte’s birthday cake last year? Was it in iCloud Photos? Or was it in Finder? How do I search for it?
In this guide I’ll describe a personal information management system I created in 2018. I’m rewriting my previous two articles about it and merging them into one. The system defines some standards but can also be personalized to you, because you’re the one trying to find these files later. Formats that work for me may not work for you, and vice versa. This is meant to give you a starting point.
Personal Information Management: Goals
The system I created is kind of a hybrid. It’s predominantly based on file names, and the file names inform the file groups. I wanted a system that you can use regardless of the underlying OS, instead of an OS-specific feature like Finder tags (although I use those along with the system).
Universality was the main goal, not just universal between OS but also between apps. Examples: The Photos app can handle photos and videos, Apple Books can handle ebooks and PDFs, and the Files app or Finder can handle multiple types of files. Inside the Photos app you can organize photos into albums and organize albums into folders, but you can’t search file names.
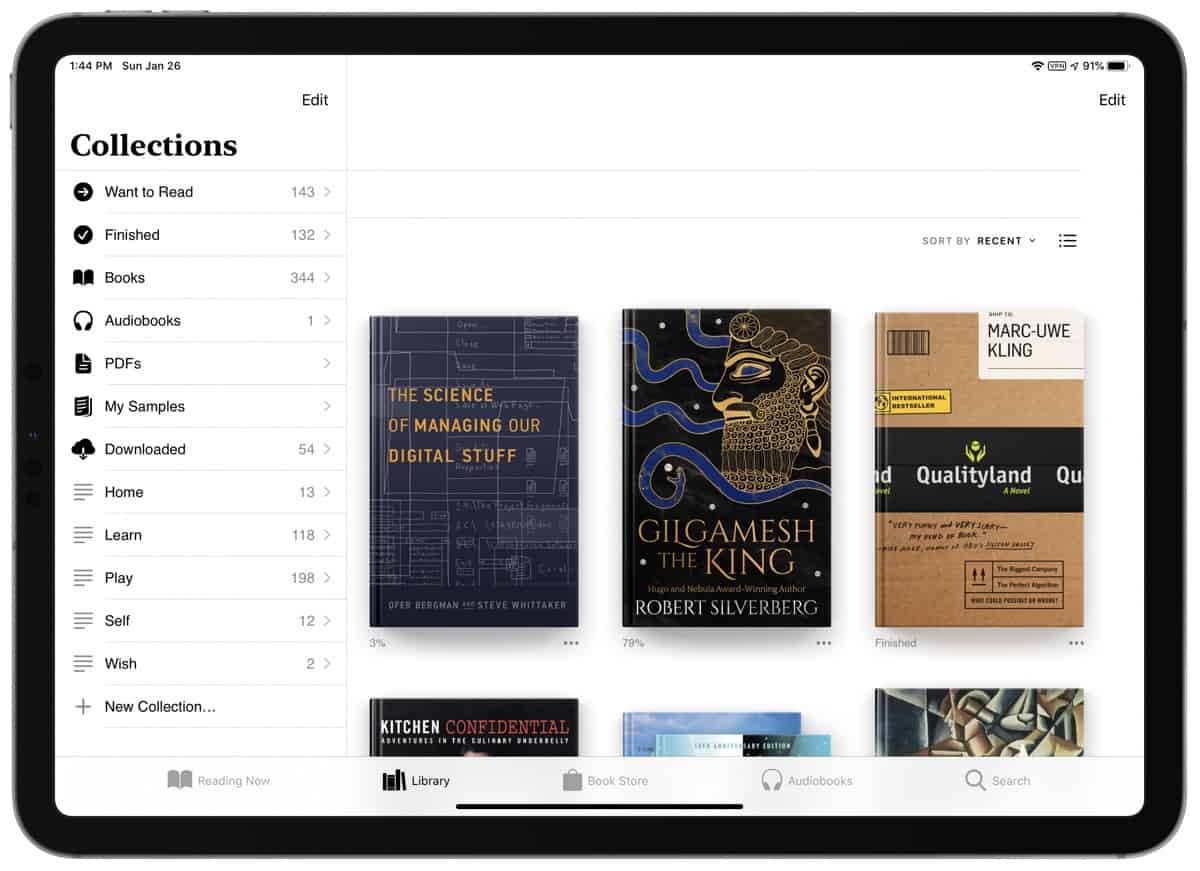
In the Books app you can organize books into collections, and search by book name or author name. In Files, Finder, and Apple Notes you can organize files into folders and sub-folders and search by file name or other text.
As you can see, each system has its own way of organizing content. Instead of Finder’s built-in directories for file types like Documents, Movies, etc., apps like Photos and Books themselves become the file type. So how then do you organize within those apps? Folder hierarchies like r/datacurator’s file tree won’t work. That’s why my primary categories below are based on lifestyle. This gives us a more general organizational layer to work with, as well as an opportunity to use them in the physical world as well.
You’ll still be limited in apps like Photos that don’t let you search by file name, but you can drill down and see which category the file belongs to. The system has two parts: A way to organize files by name, and a way to organize files into groups. Maybe some day I’ll come up with a fancy name for it, but for now I just call it “the system”.

Naming Files
It starts with a consistent way to name files. A file name is organized like this:
[Primary Category][Secondary Category]-Qualifiers
These brackets are not arbitrary; they are an important part of the system that help you precisely search for a file. Let’s say that a secondary category is “food.” I enter “food” into the Finder search bar, but that brings up every file name that includes the word “food” even if it’s a file with “food” only as a qualifier. But if I search for [food] then that specifically brings up files with [food] as a secondary category.
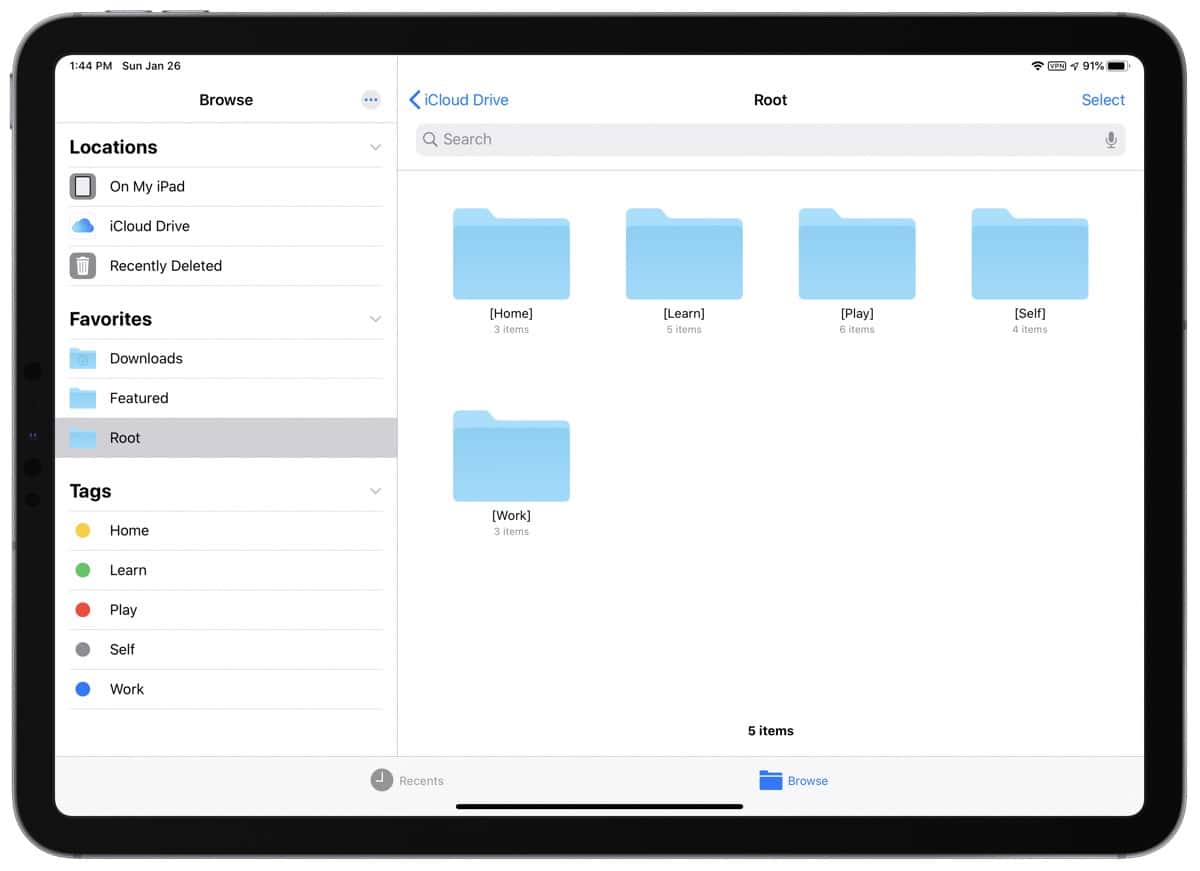
You can add as many secondary categories as you want but I only use one primary. This is because of my folder hierarchy, where the five primary categories are folders inside of a folder called Root. It also helps you remember the differences between categories if you know that the first set of brackets will always contain the primary. After the dash we have qualifiers, which I keep non-bracketed. Qualifiers are words that describe the file, and you’ll want to pick words that will help you remember the file later.
The primary categories that I chose are based on lifestyle: Home, Learn, Play, Self, and Work. It’s not a strict system; you can change the names or add new categories, like one called School for students. The important part is to use categories that work no matter which app you use. Here’s how I define them.
Primary Categories
- Home can contain data like recipes, cleaning tips, and financial information.
- Learn can contain a variety of data. I use this category as an “other” or “miscellaneous” one.
- Play is about entertainment. Movies, books, games, etc.
- Self is kind of a subjective category. I use it for my journal and other personal things like self-improvement data.
- Work is obviously work-related data.
You could even assign each primary category a number, and turn the system into a simplified Dewey Decimal Classification.
Exceptions: Dates & Backups
If you use dates in a file name then I highly recommend using the ISO 8601 format, which looks like this: YYYY-MM-DD. This format is naturally self-sorting as days and months repeat but years do not. Date should become the primary category, like so:
[20200126][Work]-Article
If you manually back up files (manually like dragging and dropping folders onto a hard drive, as opposed to automatic like iCloud Backup) then you can have [Backup] or [BU] as a primary category with the date you created the backup. A backed up file name would look like this:
[BU-20200126][Work]-Project 1

Secondary Categories
Primary categories are strictly defined but secondary categories are not. These are fluid and it depends on the file and its contents. For books, the author name could be a secondary, as shown in the next section. Or you could switch it around and have the genre become a secondary. I even have some files that don’t have a secondary category. My general rule is that once I have a minimum of three files that share the same secondary category, I create a folder for them.
Organizing Files
In iCloud Drive I have a folder called Root and inside are the five primary folders, and within each of those are folders based on type: Audio, Photo, Text, Video, Ware (software). Again, this isn’t strict, and you can add or remove folders as you see fit. You could add file type as a secondary category, and I do this for certain files.
There are certain situations in which organizing by file type doesn’t make sense. Let’s say you’re working on a project for work or school. You’ll probably be working with multiple file types. In that case, it‘s better to keep those files in one folder, instead of spread out by file type.
As another example, in Apple Books I organize books into the primary categories based on the content: Cookbooks go into Home, scientific books go into Learn, fantasy and sci-fi books go into Play, self-improvement books go into Self, and so forth.
Here’s a file naming example. Let’s say you store your books in Finder instead. You could name them like this, using the Last Name, First Name format. However, by default you won’t see the file name in Books. Apple Books also gives you sorting options, like sorting by Recent, Title, Author, or Manually. And each collection can have its own sorting option, which I think is nice.
[Learn][Genre][Author]-Title
Automation
As you can see, this system works well with automation, like using Automator or an app like Hazel to send files that have the word [Work] directly to the Work folder, [Learn] files to the Learn folder, and so forth. You’re limited only by your imagination. You could even say that I designed this system specifically with automation in mind.
For example, I recently began the task of exporting my Apple Notes, which number over 900. I wanted to export them into rich text as a backup since that is a non-proprietary format. There’s no way I’m manually dragging/dropping files into folders, but with this system I didn’t have to.
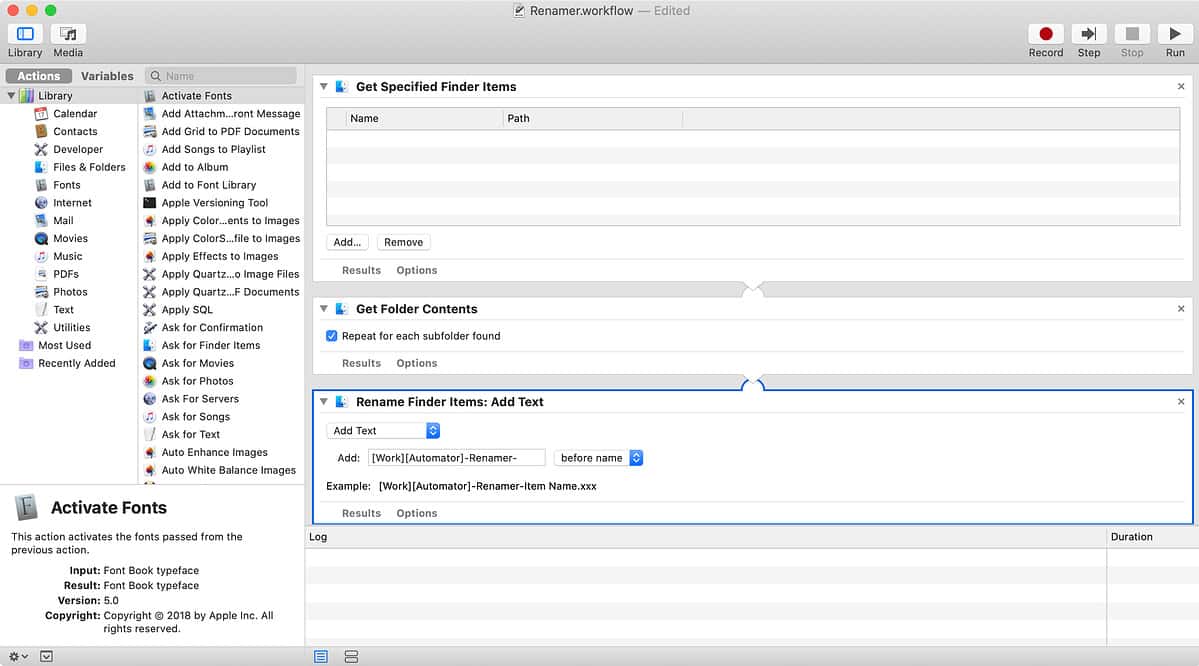
You’ll definitely want to use Automator to rename your files in bulk in accordance with the system. Use Get Specified Finder Items and drag a folder with files into the action. Then use Get Folder Contents, and finally add the action called Rename Finder Items. In the drop down menu within that action, you’ll probably be using the Add Text selection the most.

On the iOS side there are a couple of shortcuts that I use to automate file-related tasks. One lets me save photos from around the web into their relevant categories. You should obviously tweak it to suit your own set up, but it’s a nice example to use to get started. Shortcut: Save Photos.
The second shortcut is a way to rename your files in bulk. It lets you prepend text, append text, and replace text in a file name with new text. Shortcut: Rename Files.
