
Apple ID is your key to the Apple ecosystem and you might need to remove it from some devices that are no longer in use. There are quite a few ways to do so. We will learn about the best ways to remove devices from your Apple ID. Stay tuned to learn what Apple ID Device List is and when should you remove a device from your Apple ID.
What Is the Apple ID Device List?
The list of devices on which you have logged in with your Apple ID is known as the Apple ID device list or the Trusted Device List. This consists of your iPhone, Mac, iPad, AirPods, Apple Watch, etc.
These devices have access to your personal credentials like bank statements, credit card details, social security number, etc. These devices can also be used for two-factor authentication when you log into your Apple ID and can also access the Apple services that you pay for. So, if you wish to limit services to the devices, you will have to create a separate Devices List for online services.
How To Remove Devices From Apple ID Using iPad or iPhone?
First, we will learn how to remove devices from Apple ID using your iPhone or iPad.
Time needed: 1 minute
Steps to remove devices from Apple ID on an iPhone or iPad.
- Open Settings on your iPhone or iPad.
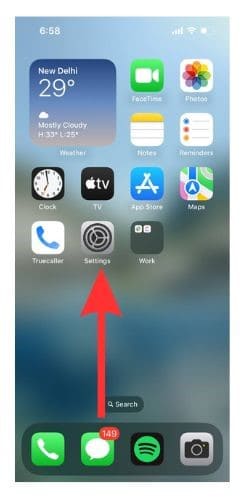
- Tap on the Apple ID section at the top.

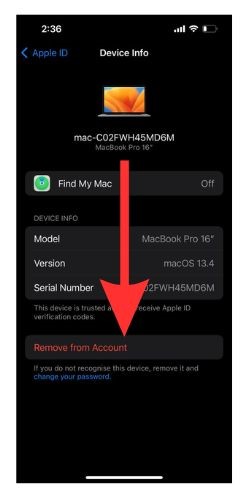
- Scroll down to the list of devices and tap on the devices that you wish to remove from the list.

- Tap on the Remove from Account option.
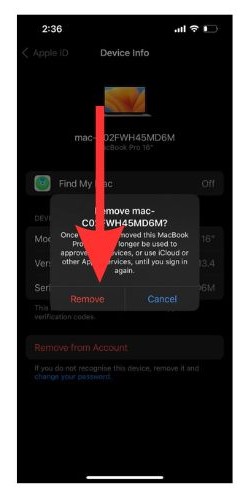
- Confirm the removal by tapping on Remove again.


Remove Devices Using Your Mac
Now we will learn how to remove devices using Macs that have the Mac OS Ventura running.
1. Open Apple Menu and Go to System Settings.
2. You will find your name on the top left side of the screen. Click it.
3. Scroll down on the right side of the screen and go to the Trusted Devices List. From the list, click on the device you wish to remove from your ID.

4. Select the Remove from Account option. Then click on Remove again on the prompt that will pop up.

The process is the same for all older Mac OS. Just the user interface is different.
Account Management Portal
If you do not have an iPhone, iPad, or Mac handy, the Account Management Portal will help you remove devices from your Apple ID.
1. Open Account Management Portal.
2. Log in to your Apple ID and go to Devices.
3. From there Choose the device that you wish to remove and select the Remove from Account option.

Steps To Remove a Device Using iCloud
iCloud can also be used to remove devices from your Apple ID. Let us see how.
1. Open iCloud on any device.
2. Click on your name on the top right side and select Manage Apple ID. This will redirect you to the Account Management Portal.
3. Go to the My Devices section and remove the device that you wish to remove.

When Should You Remove a Device From Your Apple ID?
There are a number of reasons why you might need to edit the device list of your Apple ID. Let us look at some of the possible reasons.
- You got an upgrade over your current device. (iPhone, iPad, Apple Watch, etc.)
- Your device got misplaced and you do not want it to access your Apple ID for the time being.
- Someone is accessing your Apple ID through a device, and you wish to limit it.
- You wish to stop using a particular device.
Wrap Up
Your Apple ID contains your personal details and information. So, it is imperative to keep it safe. If you wish to learn how to manage your Apple ID, please follow our comprehensive guide.
If you have any more questions regarding removing a device from your Apple ID, do let us know in the comments below. We will get back to you as soon as possible and try our best to help you fix your issue.


