
Having the option to disable the Continuity Mic on your iPhone can be a game-changer for those that work with audio. Some users may find themselves in a situation where they are needing access to a microphone, though they find that their Mac is constantly connecting and defaulting to their iPhone mic. For users that implement GarageBand, Logic Pro X or even Dictation, this can be a major issue. Fortunately, there is something of a fix.
This problem is likely arising from the Continuity Camera—a new feature that I will discuss. It would seem that the Continuity Camera and the Continuity Mic are currently attached to each other directly within Apple software, meaning that users may find their iPhone attempting to connect to their Mac as a microphone when they do not want this happening. I’m going to take a look at a couple of solutions.
Continuity Camera and Mic
For some users attempting to connect to audio, they may find that their devices are attempting to use the iPhone microphone rather than using the microphone on their Mac. This is likely due to the Continuity Camera feature attempting to connect to your device through the microphone. With some users declaring this to be a bug, many are having issues with their Mac defaulting the mic to their iPhone.
If you keep seeing this screen and you don’t want to, here’s some tricks that may provide a solution.
You will truly know that this is an issue when you hear your iPhone constantly making a connection sound similar to the sound it makes when connecting to Bluetooth. If you hear a constant ringing sound from your iPhone while using your Mac, that means your device is trying to pair with your Mac as a microphone.
While this is likely not going to be a problem for everyone, it can be a problem for certain users. For those looking to use their Mac microphone with their Mac apps, defaulting to the iPhone mic can be a major problem. For those using Dictation, Logic Pro X or GarageBand, you will likely want your iPhone to not be the default microphone.
What is likely happening is an issue with Continuity Camera. Introduced in iOS 16, this feature is a means to allow users to have their iPhone act as a webcam for an iPad or Mac. In this sense, it can be incredibly useful, as it gives users the option of taking advantage of the powerful cameras on their iPhone.
If you find that Continuity Camera is giving your iPhone microphone access when you don’t want it to, there are a couple of different options to remedy the situation.
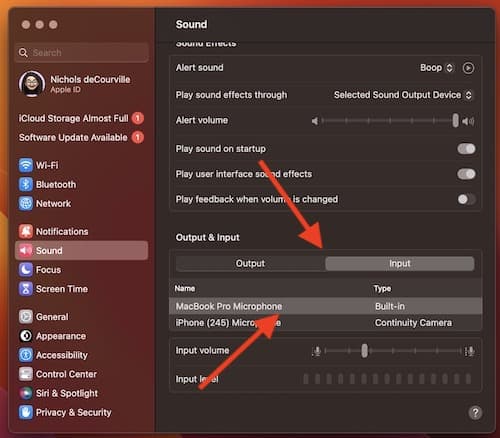
Check Sound Settings on Mac
One of the first things you can do is ensure that the Settings on your Mac have the microphone you want actually set as the default Mic. While you may need to do this every time you are running an application when you need the microphone, your only other option is disabling Continuity Camera, which I will also show you how to do.
To ensure your Mac is using the mic you want, follow these steps.
Time needed: 1 minute
How to check your default microphone on Mac.
- Go to Apple > System Settings from the menu bar.
- Go to Sound.
- Under Input, ensure that the microphone you want to use is selected.

Again, this may be slightly frustrating for some users. Personally, I found the issue while using GarageBand, and I found myself having to constantly check my Settings to ensure I was using the right microphone. While using an iRid HD2, I found that my Mac wanted to continuously connect to my iPhone microphone, even when selecting the iRig HD2 from my Settings.
Other users are reporting similar instances as well, especially within Mac apps that require constant access to the mic. While checking your Settings all of the time can be a bit of a nuisance, disabling Continuity Camera entirely is also an option for users.
Disable Continuity Camera and Mic
When it comes to stopping an iPhone from acting a microphone, there’s also disabling the Continuity Camera and Mic. While this may not be the ideal solution for some users, it will ensure that your iPhone is not registering as a microphone for you. For those that are working extensively within an app that needs something other than an iPhone mic, this may likely be your best option.
Fortunately, these steps are rather easy. If the Continuity Mic is giving you issues when using certain programs, disabling Continuity Camera on your iPhone at least provides a temporary resolution. Besides, turning it back on when you’re done is also rather easy.
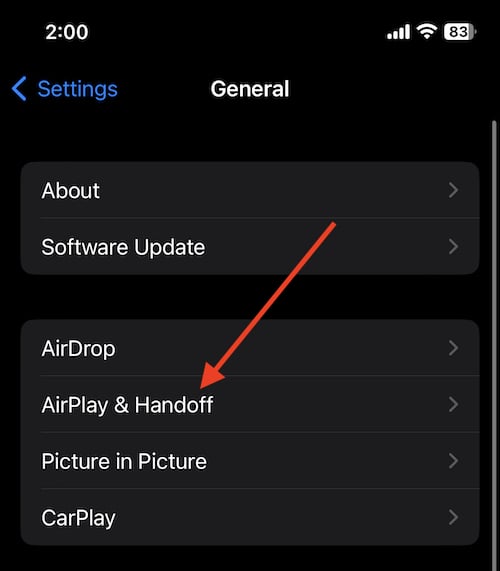
To disable the Continuity Camera and Microphone, simply follow these steps.
- Go to Settings > General on your iPhone.
- Select AirPlay & Handoff.
- Turn off Continuity Camera.
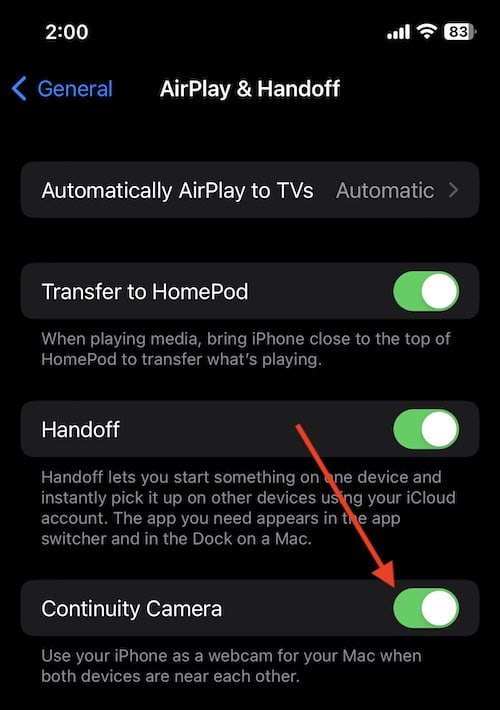


You can follow these same steps again to turn your Continuity Camera back on. Again, while this may not be an ideal solution for some users, turning off Continuity Camera is still the easiest way to ensure your iPhone doesn’t connect as a mic for your Mac when you don’t want it to.
Conclusion: Disable Continuity Mic on iPhone
For those that need their Mac for recording audio, Continuity Camera can be a demon in disguise. While the feature is fantastic for providing the iPhone as an option for a user’s Mac or iPad webcam, those that need constant access to their microphone may find themselves banging their head against the wall.
For those experiencing this issue, you can give your head and your walls some rest by following these steps. While they may only provide a temporary solution, you can at least know that you are able to get some work done the way you need to get it done.
To piggy back on a previous comment…God bless you. I have be struggling with this for weeks couldn’t find anything helpful! You rock!
I created an account to say..
God bless you
Always happy to help!