
I noticed this frustrating issue two days after upgrading to macOS Sonoma 14.0. Time Machine kept saying ¨Backup Not Completed. Some of the files on your Mac cannot be backed up until Cloud Files syncing has completed.¨ This was no small pickle as I love to perform periodic backups previously having fallen victim to some unfortunate events that ended with me losing all my data.
Fortunately, some kind assistance from an Apple Support Adviser got me through this tumultuous time. I also found several workarounds on the internet that helped other Mac owners. I’ll show you how to perform each of them. First, let’s identify the culprit here.
Why Is Time Machine Not Working on macOS Sonoma?
In all likelihood, Time Machine fails to backup because of ongoing files syncing between iCloud and your Mac. Every time you perform a software update, iCloud performs a synchronization operation to correlate files on Mac and your iCloud Drive. The same applies when you upgrade to macOS Sonoma.
While it may not be apparent at first, taking a closer look at file syncing across all user accounts on your Mac may reveal that some files still need to be synced. In some cases, Mac owners have identified two Login Items allowed in the background by default as the culprits that prevented file syncing from completion.
Now, let’s get started on solving each issue, and then explore some of the other fixes that exist.
How Do I Get Time Machine To Work Again in macOS Sonoma?
You can get Time Machine to work again in macOS Sonoma by checking for ongoing iCloud sync operations in your administrator account and other user accounts on your Mac, turning iCloud Drive off and on again, removing OSMessageTracer and UpdaterStartupUtility from background allowed login items, or using an external drive and a third-party backup tool.
Let me now walk you through the first troubleshooting method.
Check Ongoing iCloud Drive Sync Status Using an Administrator Account
Time needed: 2 minutes
To check ongoing icloud drive sync, follow the steps below:
- Open Finder in the dock.
- Hover the cursor over iCloud Drive in the Finder sidebar so the information icon shows up.
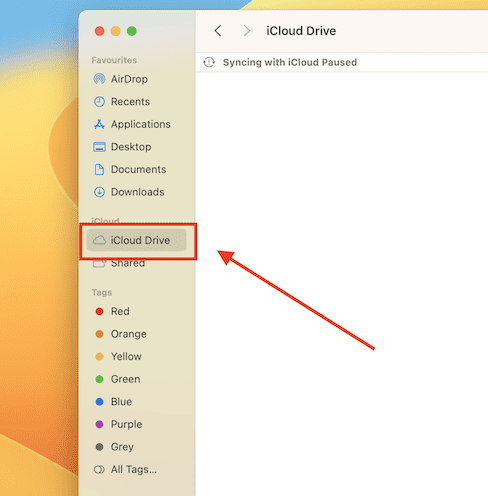
- Then click the status or information icon to see the sync status.
- Wait for about 5-10 minutes even if it says sync has already been completed. You should soon begin to see a message that iCloud is downloading and uploading files.
- You may need to check back periodically, as iCloud synchronizes in short bursts over a long period.
- Wait for the sync to complete, however long that takes, and try the Time Machine backup again.
Because iCloud synchronizes in short stints over a period of time, it may take a day or more to complete, so be patient. Now if iCloud as completed syncing and Time Machine still won’t backup, move on to the next fix.
Complete iCloud Sync in Other User Accounts
Possibly, other user accounts on your Mac have ongoing iCloud Drive sync operations that you’re not aware of. You must log into each account and wait for the operation to be completed. Check the status of the sync by following these steps:
1. Open Finder.
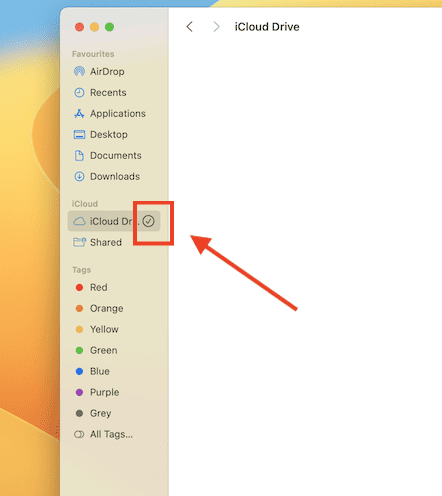
2. Find iCloud Drive in the Finder sidebar.

3. Click the circled tick icon beside iCloud Drive and wait for a minute to see if any ongoing sync messages will pop up.

4. Once sync messages start showing up, wait for all sync operations to be completed.
5. Restart your Mac and try the backup again.

Allowing iCloud Drive to complete syncing across all user accounts should sufficiently resolve the problem and you should now be able to backup your Mac. However, if these still do not resolve the issue, try turning iCloud Drive off and on again.
Turn iCloud Drive Off and On Again
This hack works because it stops iCloud Drive syncing altogether, eliminating the major culprit in the issue of Time Machine not working in macOS Sonoma. To turn off iCloud Drive, follow these steps:
1. Open System Settings in the Apple menu icon on the menu bar at the top of the screen.
2. Click your name at the top of the sidebar on the left side of the System Settings window. If your name does not appear at the top of the column, first sign in with your Apple ID.

3. Next, click iCloud and under Apps Using iCloud, un-check the checkbox next to iCloud Drive.
4. Choose Keep a Copy on the pop-up window to download your iCloud Drive data or Remove from Mac to delete them.
5. Now, try the backup again.
6. Once your Mac has finished backing up your data, turn on iCloud Drive again by following the same steps and checking the iCloud Drive box again.
These three troubleshooting methods are the most straightforward I could find on the internet that address the root of the problem, or at least provide an easy workaround. However, a few Mac owners continued to face Time Machine issues despite following one or more of these. If that is you, try the following suggestions.
Remove OSMessageTracer and UpdaterStartupUtility From Login Items
This is the advise I got from an Apple Support adviser that helped me get through my issue with the Time Machine backup error days after I upgraded my operating system to macOS Sonoma.
1. Click the Apple menu icon on the menu bar at the top of the screen and open System Settings.
2. Select General in the left sidebar and switch to the Login Items tab.

3. Scan through the items listed under Allow in Background for OSMessageTracer and UpdaterStartupUtility.

4. Toggle both items off using the toggle switches opposite each.
5. Afterwards, try the Time Machine backup again.
The UpdaterStartupUtility extension is Adobe’s update mechanism for its creative suite while OSMessageTracer seems to be Apple way of eliminating the repetitive task of rebooting after an OS installation.
While the reason these extensions are interfering with Time Machine and iCloud sync is yet unknown, excluding them from Login Items that are allowed in the background solved the backup issue for many Mac owners running macOS Sonoma.
If that still isn’t you, you should try tackling another likely culprit – com.apple.findmy.FindMy*.
Add All com.apple.findmy.findmy* Paths to Exclusion List in Terminal
com.apple.findmy.FindMy* is another problematic extension that could interfere with Time Machine backups in macOS Sonoma. Severing their connection by adding all associated paths of com.apple.findmy.FindMy* to Time Machine exclusion list is one workaround that worked for several Mac owners used to resolve their issue.
Follow these steps to carry out this operation:
1. Open Launchpad, search for Terminal and click to open it.

2. Then type the following command in the prompt and hit enter:
tmutil addexclusion -p ~/Library/Containers/com.apple.findmy*
3. Terminal will add all paths associated with com.apple.findmy.FindMy* to the Time Machine exclusion list as follows:
/Users/username/Library/Containers/com.apple.findmy, /Users/username/Library/Containers/com.apple.findmy.FindMyWidgetPeople, /Users/username/Library/Containers/com.apple.findmy.FindMyWidgetIntentsPeople, /Users/username/Library/Containers/com.apple.findmy.FindMyNotificationsServiceExtension, /Users/username/Library/Containers/com.apple.findmy.FindMyWidgetItems, /Users/username/Library/Containers/com.apple.findmy.FindMyWidgetIntentsItems
4. Afterwards, try the Time Machine backup again.
Time Machine should run seamlessly now and a fresh backup should be baking in the oven in no time. If for some other obscure reason, Time Machine still does not oblige, you may need to abandon trying to fix it. Instead, use an external drive as a backup disk and backup your Mac using a third-party backup tool.
Use an External Drive and a Third-Party Mac Backup Tool
If you have an external drive, you may temporarily use it as a backup disk until, hopefully, Apple releases an update that rectifies this and other macOS Sonoma issues. Download and install a third-party backup tool such as Intego Personal Backup and use it to backup your data.
Intego Personal Backup is Intego’s backup solution for Mac owners. The tool allows you to create bootable clones of your Mac to boot from your backup disk and access your files.
Intego Personal Backup can also create backup tasks so you can backup only specific file types at intervals that you choose. You also get the option to backup your Mac to another device such as another Mac, a Windows PC or a network storage device.
Click this link to go over to the Intego’s Personal Backup page and check out their plans.
Conclusion
Now you have seen different ways to work around the Time Machine backup issue on macOS Sonoma. Hopefully, Apple rolls out an update that fixes this problem soon, or at least helps iCloud Drive sync faster.
Which of these methods worked for you? And how long did it take to get to that fix? Feel free to vent your frustrations here in the comment section.
Also, if you are having problems with Finder not responding after you upgraded to macOS Sonoma 14, check out our guide for effective solutions.


I was having this issue when upgrading to Sequoia. Thanks so much for the solution of turning the Icloud Drive off. That did it. I don’t sync to the cloud anyway and if someone does, they can turn it back on, like you said. THANK YOU so much!
Time Machine Back-up fixed!