
When Apple released macOS Ventura and iOS 16, one of the best features of both software updates was Continuity Camera. This new feature allows users to use their iPhone’s camera as a webcam for their Mac. Using my iPhone camera as a webcam for my MacBook made FaceTime calls better from the first time I tried it. Unfortunately, several users have encountered problems with macOS Ventura not detecting their iPhone camera. So, these users are being deprived of the Continuity Camera feature that iOS 16 and macOS Ventura brought to so many Mac and iPhone users.
The good news is, there are several troubleshooting methods to make macOS Ventura detect your iPhone camera again. Read on to know more about these tips plus more other useful information you need to know about Continuity Camera on iOS 16 and macOS Ventura.
Basic Requirements for Using Continuity Camera Feature
Apple recommends mounting your iPhone as near as possible to your Mac. You can use Continuity Camera mounts or other iPhone-compatible mounts. The most important thing to note is that your iPhone must be located as near as possible to your Mac. Additionally, Apple also recommends the iPhone be locked, in landscape mode, and the screen turned off.
By following those three requirements, Apple said that third-party apps should be able to detect the iPhone camera and allow you to use the macOS Ventura Continuity feature.
How to Use iPhone Camera as Webcam for Mac
The easiest way to start using the Continuity Camera feature is to start a FaceTime call. Apple states that FaceTime automatically detects the iPhone camera for as long as it is near the Mac. In case it doesn’t work when you open FaceTime, you can manually set your iPhone camera as the webcam for your Mac during FaceTime calls.
- Place your iPhone on top of your Mac using a Continuity Camera mount.
- Alternatively, you may mount your iPhone on a stand and place it beside your Mac
- Open the FaceTime app.
- From the menu bar. click Video.
- Select iPhone Camera.

To allow macOS Ventura to auto-switch for Continuity Camera, turn on Automatic Camera Selection.
Other Important Things You Need to Know When Using iPhone Camera as a Webcam for Mac
- The basic requirement for the Continuity Camera feature is that your iPhone should be running iOS 16 or later. At the same time, your Mac should be running macOS Ventura 13 or later.
- In addition, you should also note that using an iPhone camera as a webcam for Mac is supported by iPhone XR or newer models.
- However, when using Center Stage or Desk View, you must have iPhone 11 or newer models.
- Additionally, the Studio Light feature is only supported by iPhone 12 or newer models.
- Before using your iPhone camera as a webcam for your Mac, ensure sure that both devices use the same Apple ID.
- On your iPhone, go to Settings > Profile and check what Apple ID you are using.
- On your Mac, go to Settings > Apple ID Banner and make sure it is using the same Apple ID as your iPhone.
- Also, make sure that Bluetooth and Wi-Fi are enabled on both your iPhone and Mac.
- Finally, make sure Continuity Camera is turned on.
- On your iPhone, go to Settings > General > Airplay & Handoff > Continuity Camera.

How to Fix macOS Ventura Not Detecting iPhone Camera
Time needed: 15 minutes
If, after you’ve checked all the basic requirements to use your iPhone camera as a webcam for Mac, you’re still having problems, check out some troubleshooting tips below that could resolve the issue.
- Toggle On/Off Bluetooth and Wi-Fi
Since using the iPhone camera as a webcam for Mac relies heavily on wireless connectivity, the first thing to do if macOS Ventura is not detecting the iPhone camera is to enable/disable your Bluetooth and Wi-Fi. So, on your iPhone, go to Settings > Wi-Fi/Bluetooth > On/Off. On your Mac, simply click on the Control Center icon and toggle on/off Bluetooth and Wi-Fi.
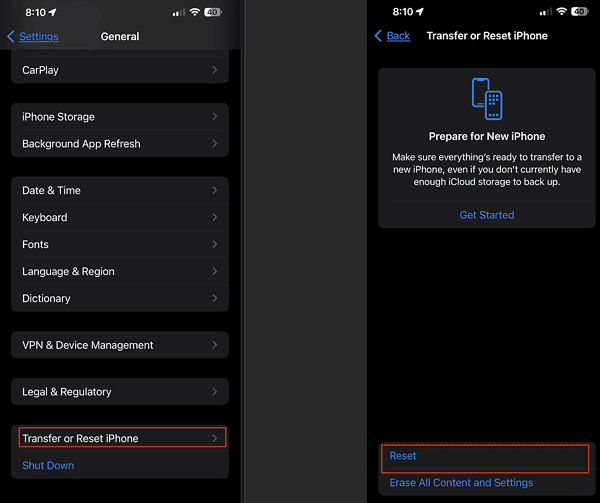
- Reset Network Settings
Another reason why macOS Ventura is not detecting the iPhone camera is because of network issues. So, it would be best to reset your network settings if you encounter this problem. To refresh network settings, go to Settings > General > Transfer or Reset iPhone > Reset > Reset Network Settings. Hopefully resetting network settings will resolve the issue. If not, consider doing the next step.
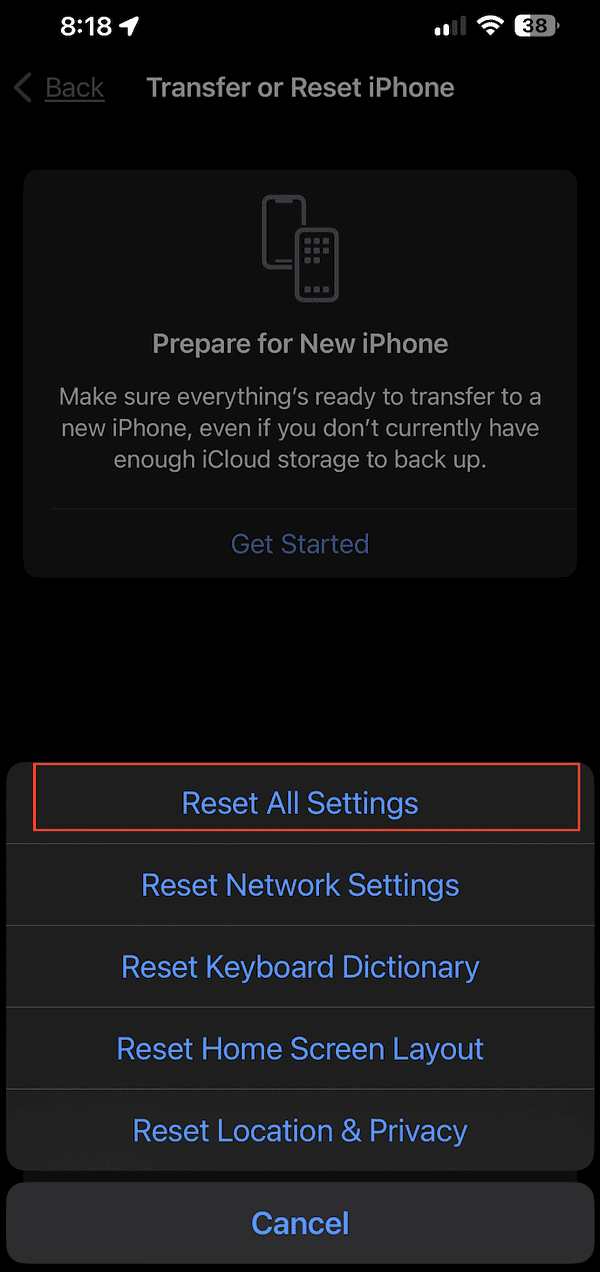
- Factory Reset Your iPhone
Hopefully, you won’t have to do this tip, as it is quite tedious to factory reset an iPhone. But this process has a high probability that it will solve the problem of macOS Ventura not detecting the iPhone camera. So, you might as well do it if all things fail. To factory reset your iPhone, go to Settings > General > Transfer or Reset iPhone > Reset > Reset All Settings.


That’s it. We hope that following the tips above will solve your issues of macOS Ventura not detecting your iPhone camera.


