
Apple Silicon is a groundbreaking transition in Mac’s architecture, and with it comes the need for Rosetta 2, a critical translation layer. Rosetta 2 facilitates the execution of Intel-based apps on Apple Silicon Macs. This new chipset was launched alongside macOS Big Sur and has since undergone updates to enhance performance and compatibility.
Now, Let’s explore how to install Rosetta 2 on your Apple Silicon Mac. But, before that, let’s quickly understand its importance.
Why Do You Need Rosetta 2?
Rosetta 2 serves as a bridge between the past and the future of Mac computing. As Apple transitioned from Intel processors to its custom-designed Apple Silicon, compatibility became a primary concern. Many Mac users rely on older Intel-based applications that are not readily compatible with the new architecture.
This is where Rosetta 2 steps in. It is essential for ensuring the smooth operation of Intel-based applications on your Apple Silicon Mac. It translates Intel x86 code to ARM so that it can run on the new Apple Silicon hardware ensuring that your favorite apps and utilities, which were originally intended for Intel Macs, continue to work without a hitch now on your Silicon Mac.
Now that we’ve grasped the importance of this program, let’s explore the methods for its installation.
Installation Methods for Rosetta 2
You have three options for installing Rosetta 2, each designed to cater to different preferences and needs:
Install Rosetta 2 Manually via Software Update
Time needed: 2 minutes
Here’s how to manually install Rosetta via software update.
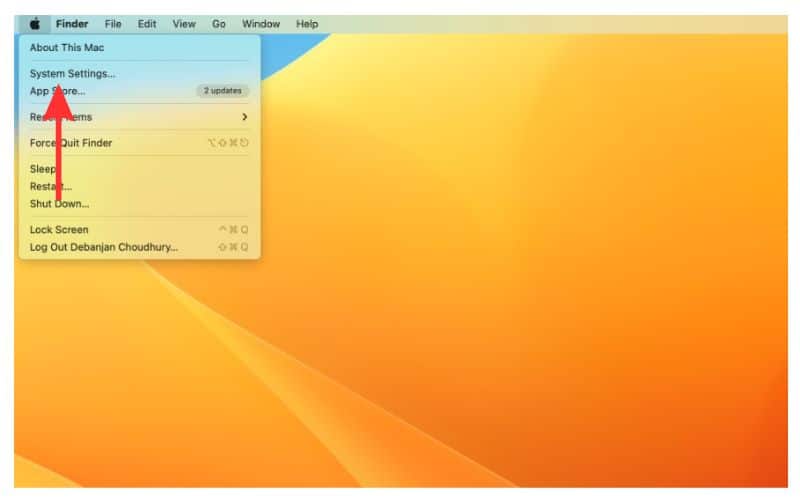
- Open System Settings.
Access this from the Apple Menu or the Dock
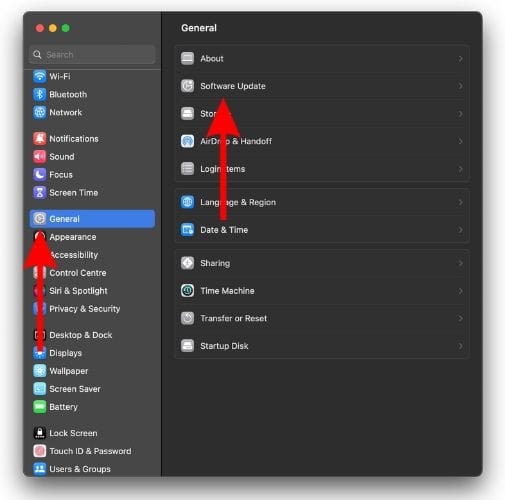
- Click General and navigate to the Software Update tab.
This is where you typically find updates for macOS and related softwares.
- Simply click the Install button next to Rosetta 2 and the installation process will begin.
- Follow any on-screen instructions as necessary.


Install Rosetta 2 Manually via Terminal

If you prefer a command-line approach, you can use the Terminal to install Rosetta 2:
1. Open the Terminal application, a command line tool available in the Utilities folder within the Applications folder.

2. Input the following installation prompt and press Enter key.
softwareupdate –install-rosetta
3. If prompted, type in your administrator password and press Enter.
The command instructs your Mac to fetch and install. Your Mac will start the process of downloading Rosetta 2 through Software Update. Wait till download is done and let Software Update proceed to install it.
The installation may take a few minutes to complete. Once the installation is finished, you’ll receive a message confirming that “Rosetta 2 was successfully installed.”
Now, you’re all set – Rosetta 2 is now available on your Apple Silicon Mac, enabling you to run Intel-based apps seamlessly.
Automatic Installation
The automatic installation method comes into play when you attempt to open Intel-based macOS apps that lack a native Apple Silicon version: When you launch an Intel-based app, and there’s no Apple Silicon counterpart available, macOS will promptly suggest the installation of Rosetta 2.
Accept the prompt by clicking Install, and macOS will handle the rest. It will download and install it, enabling the app to run smoothly on your Apple Silicon-powered Mac.
Check if Rosetta 2 is installed on your Mac by clicking the Apple logo in the top left corner, and select “About This Mac > System Report > Software > Installations“. Scroll down the list, and look for “RosettaupdateAuto.” If you see it, Rosetta is installed on your Mac; if not, it hasn’t been installed.
Troubleshooting Tips
While installing Rosetta 2 is usually a straightforward process, you might encounter the occasional hiccup. If you run into issues, consider the following troubleshooting tips:
1. A stable internet connection is essential for downloading and installing, so ensure that your internet is good.
2. Make sure that your Mac is running macOS Big Sur or a later version.
3. If you encounter any unexpected behavior, a simple restart of your Mac can often resolve minor installation issues.
4. If issues persist, don’t hesitate to explore alternative methods for installing it.
5. If you are finding it hard to use the Manual Installation via Terminal method or you’re new to the terminal environment, please refer to our guide on how to use Terminal on your Mac.
Conclusion
Now, we have explored how to install Rosetta 2 on Apple Silicon Macs, equipping you to ensure a seamless transition on your Mac. If you found any of these methods particularly helpful in installing this program and ensuring compatibility with your Intel-based applications, we encourage you to share your thoughts. Your experiences and insights can be valuable to others in the Mac community.
Additionally, if you’ve used alternative methods or encountered unique challenges during the installation process, please drop a comment or share your experiences in the comment section.


*sigh*
Even the comment block inserts the error.
Before the word “install”, there are two dashes which this site turns into an em dash.
sudo softwareupdate [space dash dash]install-rosetta
There is no space between the two dashes and the word “install”.
Apparently we need two dashes before the word install: softwareupdate –install-rosetta
I use the terminal method, because in the Software Updates there is no Rosetta to be selected.
When I enter the line you suggest in terminal, I get the following:
usage: softwareupdate [ …]
** Manage Updates:
-l | –list List all appropriate update labels (options: –no-scan, –product-types)
-d | –download Download Only
-i | –install Install
… specific updates
-a | –all All appropriate updates
-R | –restart Automatically restart (or shut down) if required to complete installation.
-r | –recommended Only recommended updates
–os-only Only OS updates
–safari-only Only Safari updates
–stdinpass Password to authenticate as an owner. Apple Silicon only.
–user Local username to authenticate as an owner. Apple Silicon only.
–list-full-installers List the available macOS Installers
–fetch-full-installer Install the latest recommended macOS Installer
–full-installer-version The version of macOS to install. Ex: –full-installer-version 10.15
–install-rosetta Install Rosetta 2
–background Trigger a background scan and update operation
** Other Tools:
–dump-state Log the internal state of the SU daemon to /var/log/install.log
–evaluate-products Evaluate a list of product keys specified by the –products option
–history Show the install history. By default, only displays updates installed by softwareupdate.
** Options:
–no-scan Do not scan when listing or installing updates (use available updates previously scanned)
–product-types Limit a scan to a particular product type only – ignoring all others
Ex: –product-types macOS || –product-types macOS,Safari
–products A comma-separated (no spaces) list of product keys to operate on.
–force Force an operation to complete. Use with –background to trigger a background scan regardless of “Automatically check” pref
–agree-to-license Agree to the software license agreement without user interaction.
–verbose Enable verbose output
–help Print this help
In other words: nothing happens. Apparently, the command line is incomplete or incorrect?
The copy paste from the article to Terminal will create an error like that.
The correct syntax is sudo softwareupdate –install-rosetta