
There’s a lot to know when it comes to being able to isolate vocals in GarageBand. Concerning audio, I really try not to keep it a secret that working with music is one of my favorite hobbies. With that in mind, I want to show users how they are able to isolate and remove vocal tracks in GarageBand, while also showing how this can be an incredibly simple or difficult process depending on what resources a user has available to them.
When it comes to isolating or removing vocals from a track in GarageBand, there’s a couple of things a user should know before starting. One of the most important things to a user should know is whether or not they have an isolated vocal track. Let me explain.
How Do You Separate Audio in GarageBand?
When it comes to isolating vocals in GarageBand, one of the most important things to remember is that you are really only able to do it if the vocal track is on a separate track from the rest of the instruments/vocals. For example, if you are trying to isolate the vocals from a song that is an MP3 or a WAV, this will be incredibly difficult to do.
Essentially, you’re really only able to isolate a vocal track if it is already separated from the rest of the other tracks. While I will show you how you can isolate or remove vocals from a track using a Graphic EQ, this is an incredibly difficult process that a beginner will likely not be able to perform on their first try.
Essentially, remember that an isolated vocal track is easy, and one that is not isolated is much harder.
How do I Isolate in GarageBand?
However, if you are looking to isolate an audio track so that you can edit it in an easier fashion, then this is actually rather simply to perform.
Time needed: 1 minute
How to isolate or mute a track in GarageBand on Mac.
- Open GarageBand on your Mac.
- Open the project featuring the vocal track you want to isolate or remove.
- You can select Mute, and this will remove the vocals from the song without deleting the track from the project.
However, you can highlight the vocal track and press delete on your keyboard to remove the audio entirely.
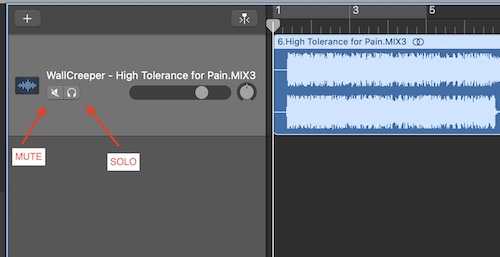
- Additionally, if you want to isolate the vocals, simply press Solo underneath the name of the track. This will make it so that only the vocals play.

Remove Vocals Through the EQ
Now, if you do want to attempt to remove vocals that are not isolated, there is a way to do this through EQ controls. Remember when I said this was difficult? It’s difficult because what you are going to have to do is remove the vocals by lowering their respective EQ frequencies.
Again, I will warn that even doing this well may likely produce some funky results, as you are messing with the EQ of the entire song to try and remove the vocals from the track. This is essentially the only way to remove vocals if you do not have an isolated track of them.
However, if you are brave, and wish to venture forth, here’s how.
- Bring up the song you want to remove the vocals from in GarageBand.
- Select the entire song track.
- Choose Smart Controls to access the EQ settings.
- Then, click the Track heading in the Smart Controls window.
- Click EQ from the Smart Controls window.
You will then see a graphic EQ band that you can adjust.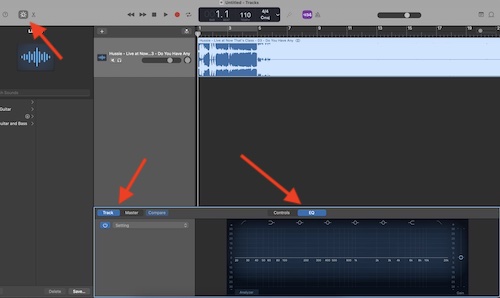
- Thanks to the graphic EQ display, this allows users to adjust the specific frequencies within a song.
For vocals, they typically are within the 86 to 350Hz range on an EQ chart. You will have to adjust the EQ in these ranges to remove the vocals.

Essentially, you are going to try and find the exact EQ frequencies of the vocals and then lower them through the graphic EQ band. In this sense, you’re not even removing them, rather, you are lowering their volume. The Undo button is really going to come in handy during this process. Remember that practice makes perfect.
How to Isolate or Remove Vocals from a Song in Garage Band on iPhone and iPad
If you are looking to isolate or mute a vocal track in GarageBand on your iPad or iPhone, it’s pretty much as easy as doing it from your Mac. Just remember that this only works for an isolated vocal track.
Simply follow these steps from your iPhone or iPad.
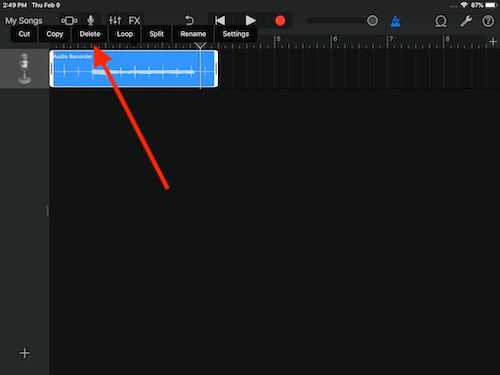
- Open GarageBand, and open the project featuring the vocals you want to isolate, mute or remove.
- Within the vocal track, tap the Mute icon, which is a speaker with a slash through it.
This will keep the track in the project, but you will not hear it upon playback or exporting.
- You can tap on the track and select Delete to remove it.
- If you want to isolate the track, simply click the headphones icon next to the Mute button.
This will isolate the track.


Remove Vocals by Adjusting the EQ
You can also try removing the vocals from an un-isolated track by adjusting the EQ.
Within your project on GarageBand, follow these steps:
- Select the track you want to EQ.
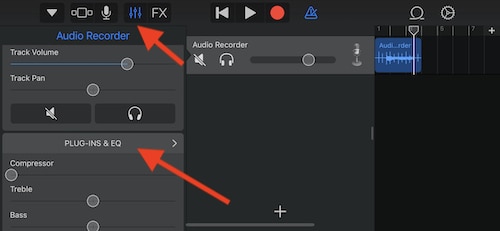
- Tap the Controls icon.
- Select PLUG-INS & EQ heading.
- You will see a side-bar with more settings.
Select VISUAL EQ to bring up a Graphic EQ display.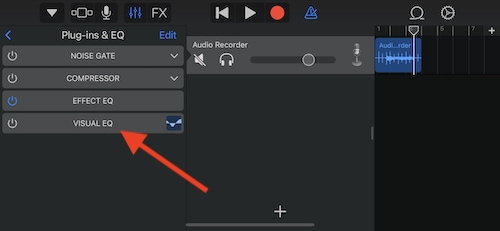
- Just like with GarageBand on Mac, you will now see a Graphic EQ display.
For iPad and iPhone, you can adjust this EQ by tapping and holding the dots on the line to grab them up and down to change the frequencies.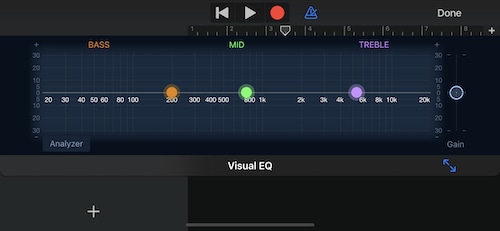
- Tap Done in the top-right corner when you are satisfied with your work.


Conclusion
When it comes to isolating or removing vocals in GarageBand, the best solution is to already have an isolated vocal track. When it comes to isolation in this sense, simply pressing the Solo button is all it takes. Doing this on Mac, iPhone or iPad is rather simple.
If a user does not have an isolated vocal track, there are still some options, but these options will take practice. However, should a user get good at removing vocals through a Graphic EQ, they will now have a quite-handy skill available to them. It can be an interesting challenge, though remember it likely will not produce the best results. If you’re looking to remove a vocal track from a song in GarageBand, giving it a try can be rather fun, though try not to get discouraged if your first try don’t produce the best results.


