
For those that edit video in iMovie, they may want to know how to layer audio within the program as well. This can be incredibly useful for adding sound effects to a project, and it can also be helpful if you’re attempting to add additional music to your project. While layering audio is straightforward, the one thing to keep in mind is that stacking audio on top of each other can create quite the ruckus.
With that in mind, I’m going to take a look at how to stack audio in iMovie, regardless of whether or not you’re using the program on Mac, iPhone or iPad. Naturally I will also take a look at how to adjust the volume of audio clips, so that the sound doesn’t become too overwhelming.
How Do I Overlay Audio in iMovie?
Fortunately, being able to layer audio in iMovie is pretty easy. However, the first thing you will need to do is ensure that the audio you want is within in the program. There’s a couple of different ways you can go about this.
For me, the easiest way to add audio, or any media, to iMovie is to locate it in a Finder window, and then drag and drop it into the program.
- Locate your audio files in Finder.
- Select which files you want in the program.
- Drag and drop them into iMovie.
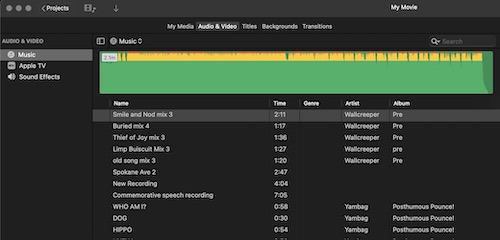
- In iMovie, you will then see your audio files located in the Audio & Video section.
- You can also add media from the Menu Bar by going to File > Import Media.

From here, adding and stacking or layering two audio files is as simple as dragging and dropping them to the Timeline within iMovie.
Layer Your Audio in iMovie
Time needed: 2 minutes
How to layer audio in iMovie on Mac.
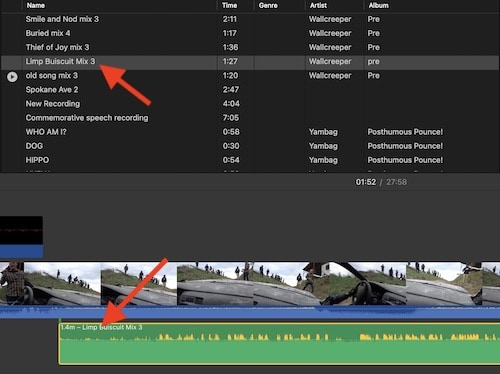
- Within iMovie, take the first audio file you would like to use from your Audio & Video section, and drag it to the Timeline.
Using iMovie, you can either stack audio above or below the video. Personally, I like to put audio files below the video on the TimeLine.
- Then, take the second audio file, and place it wherever you would like on the Timeline.
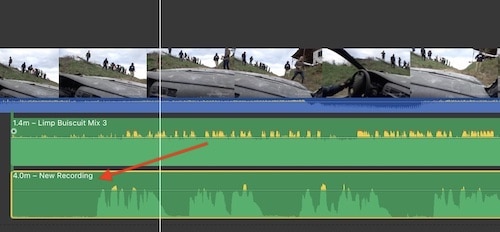
- Once the audio is on the Timeline, remember that clicking the audio file and dragging it left or right can ensure you’re placing the audio exactly where you want it.
- You can also adjust the length of the audio file by clicking one of the columns at the start or end of the track. Drag left or right to change the length of the audio file.
- You can also adjust the volume of the audio file by clicking the line at the center of the audio clip. Drag it up or down to adjust the volume.
You will know you are adjusting the volume properly when you see a percentage-icon indicating volume level. There is also a button at the beginning and end of an audio clip that will allow you to adjust the volume.


And that’s all there is to it! Remember that when it comes to stacking audio, the volume control is really going to come in handy. I would highly recommend that you do not keep both audio files at 100 percent volume. If anything, if you’re going to use two audio files at the same time, I would set them both at 50 percent to begin with, and then adjust for taste from there.
Can You Layer Audio in iMovie on iPhone?
If you’re using the iOS and iPadOS versions of iMovie, you’re also able to layer audio. Fortunately, it is also an easy process as well. However, note that for this tutorial I will be using iMovie on iPhone. Either way, the process is the same.
Layer Audio in iMovie on iPhone and iPad
- First, open your project in iMovie.
- Then, tap the + button to add new media.

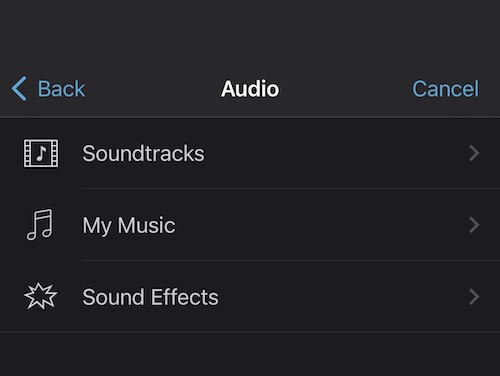
- You should then see several option. You’re going to want to select Audio.

- From here, you will have several options, including Sound Effects that come preloaded with iMovie. Select the audio that you would like to use by tapping the plus button. The audio will be placed wherever the Playhead is selected.
- You will then see the audio file in your Timeline. You can long press on the audio file to drag it wherever you would like within your project for better accuracy. Repeat steps 2 through 4 to add additional audio.
- You can then drag an audio file and drop it on top of another audio file to layer them.
- Additionally, you can also grab the yellow handles at the beginning and end of your audio file to adjust the length of the audio.
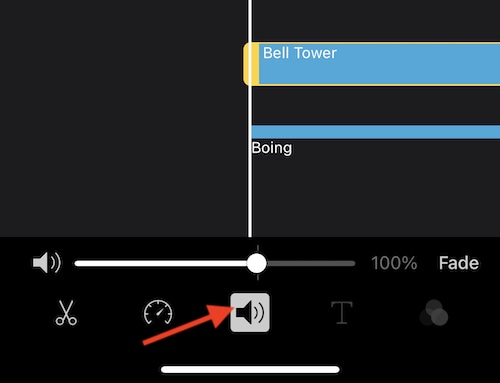
- If you want to adjust the volume, simply tap the audio you want to adjust, and then select the speaker icon. A volume slider will then appear. Remember that if you’re using more than one audio file, you’re not going to want them to be at 100 percent. You will also have the option to fade the audio in and out.


And there you go! You can now layer audio in iMovie. The important thing to remember is that you really don’t want the audio to be at 100 percent for each file. Even with two audio clips playing, one being at 100 and another being lower may still cause an earful. Again, I would recommend starting each audio file at 50 percent volume and working from there.
Getting the Most out of Your Project
Even when using the mobile version, there’s a lot of options when it comes to iMovie. Of course, for those with hearing loss, there’s always a way to add subtitles to your iMovie project as well. When it comes to layering audio, it can really add extra dimensions to your project, especially if you are working on a cinematic movie.
For something that comes free with any Apple product, iMovie can offer plenty of power and options, especially for those that are just learning to trim and edit video. Personally, I recommend experimenting with the program to see what you can develop on your own. Remember that the Undo feature always exists, and remember to save often. With that, there’s nearly endless possibilities when it comes to creating video in iMovie.
![How to Clear Cache on iPhone [Safari & Apps]](https://www.macobserver.com/wp-content/uploads/2025/08/how-to-clear-cache-on-iPhone.webp)


