
In today’s digital age, there are many ways by which other people can pry at your privacy. Take the case of text messages on your iPhone. No matter how careful you are, there will come a time when other people may get a hold of your precious iPhone. When that happens, your text messages, including private ones can be easily read by whoever got your iPhone. Even if your iPhone is locked, they could still get a glimpse via Message notification preview.
Thankfully, there are several methods of safeguarding messages on your iPhone. And in this guide, I will teach you how to lock messages on your iPhone using Screen Time.
Lock Messages on Your iPhone Using Screen Time
For those who are asking how to password-protect their messages on their iPhones, this is the answer. You can lock your text messages using Screen Time. That’s the first item on the second section of your iPhone Settings. If this is your first time using Screen Time, you go to Settings > Screen Time to toggle it on. Then follow the onscreen instructions to set up your preferences for Screen Time. After that, tap on Select Screen Time Passcode and assign a 4-digit numeric passcode. Note that this is different from the passcode used to unlock your iPhone.
Time needed: 1 minute
Follow the steps below to lock the Messages app using Screen Time.
- Tap Screen Time > App Limits.

- Tap Add Limit > Social.
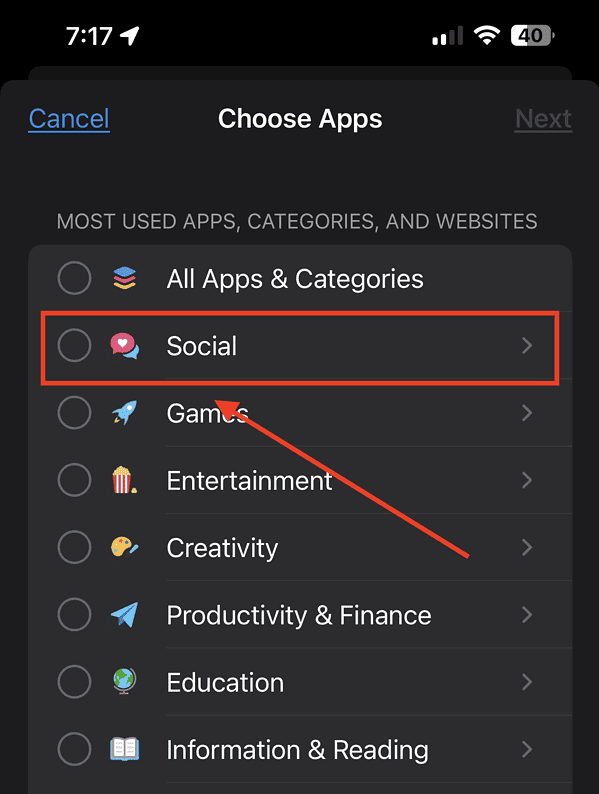
- Tap Messages > Next.

- Set the time limit to 1 minute, then tap Add.
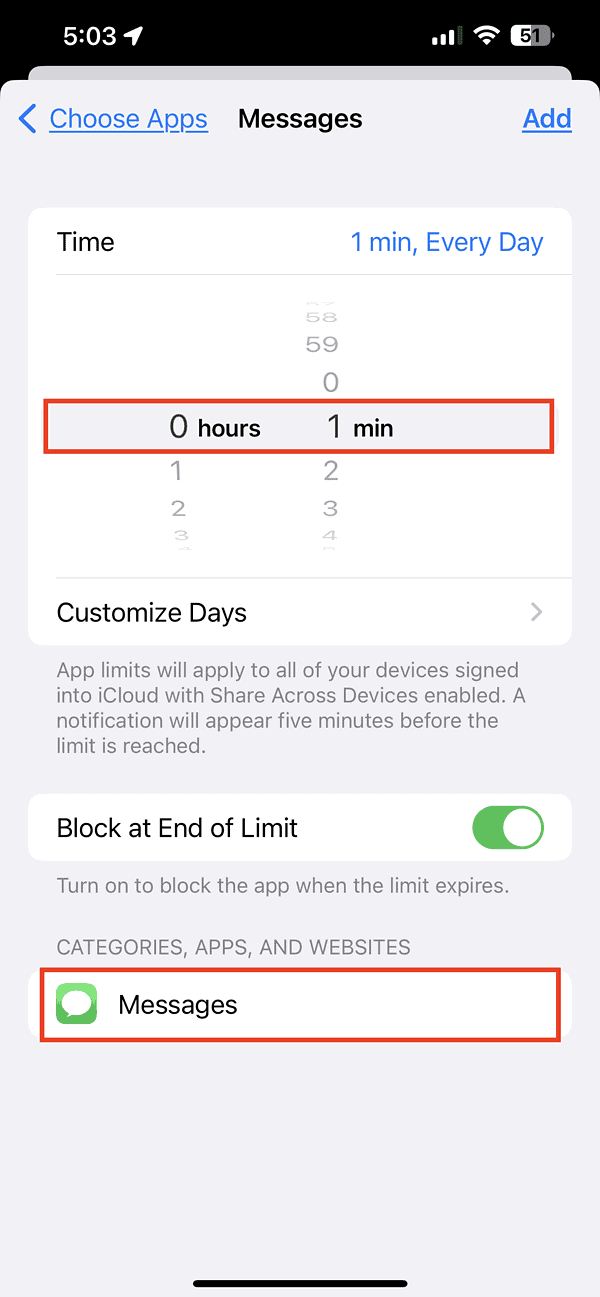


That’s it. After one minute of usage a day, the iPhone Messages app will ask for a Screen Time passcode to unlock it. Easy, right? Apart from using the Screen Time passcode to password-protect your text messages on your iPhone, there are other ways you can keep them private.
Other Ways of Keeping Your iPhone Text Messages Private
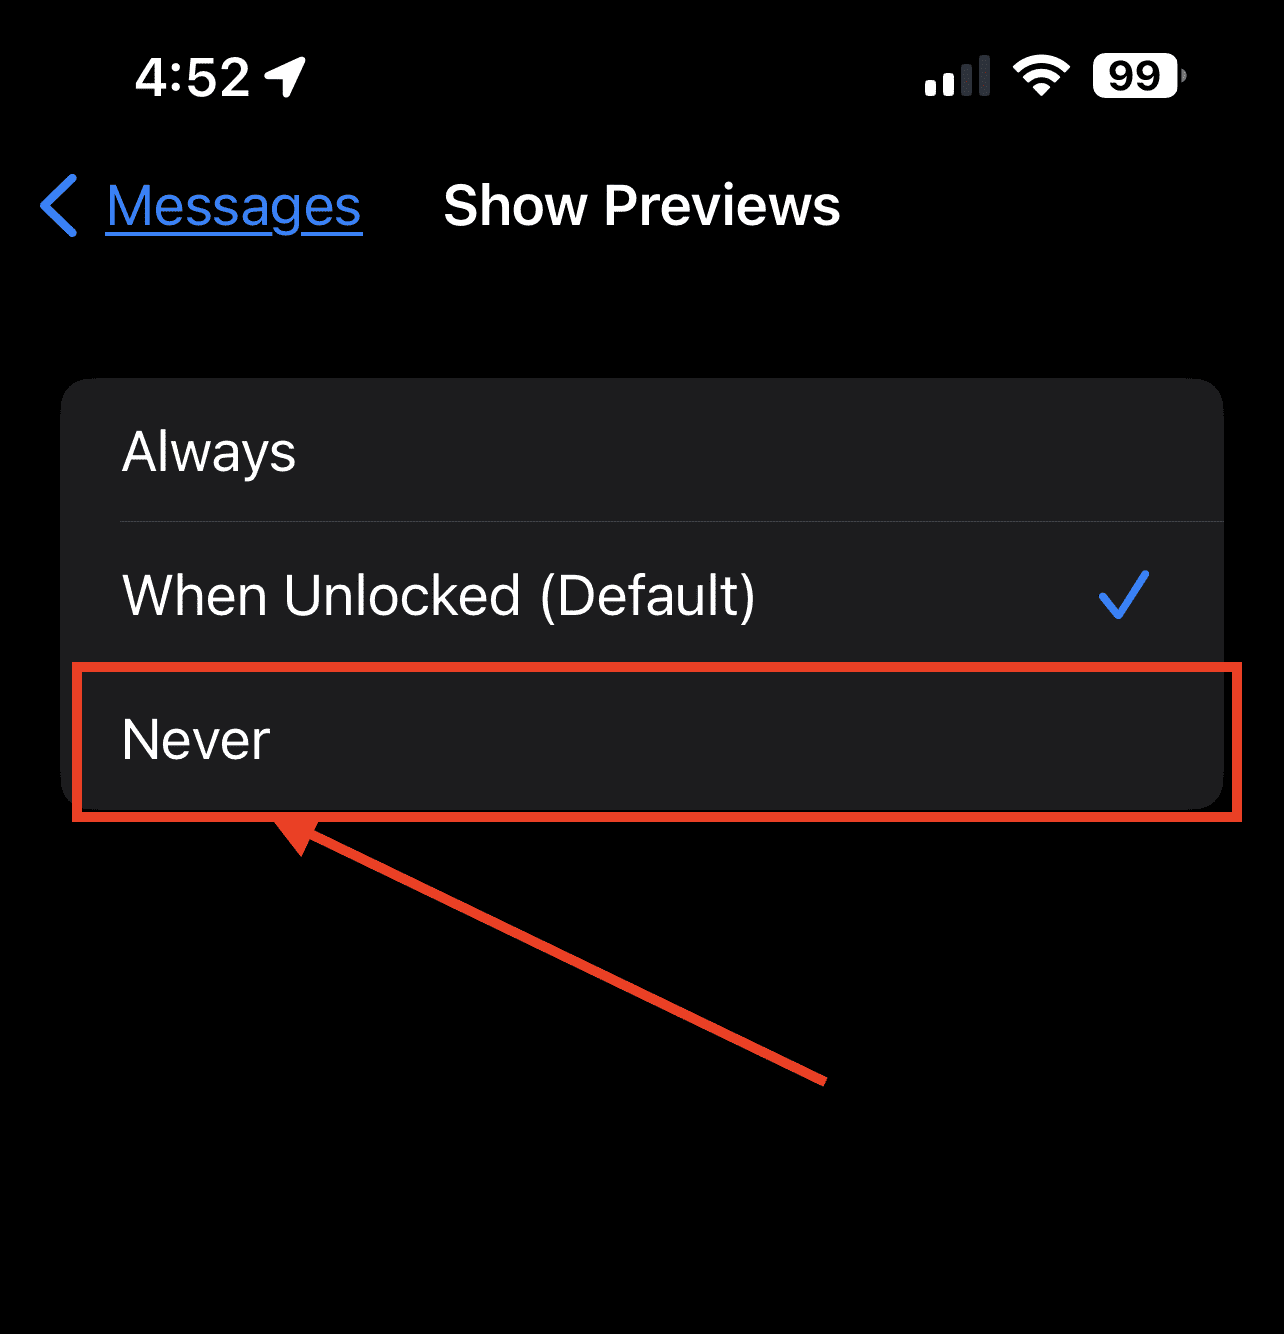
Turn Off Messages Preview
To prevent others from intentionally or unintentionally reading your text messages, you should first do something about the default iPhone settings of previewing text messages you received, including the sender’s name. To change that, follow the steps below.
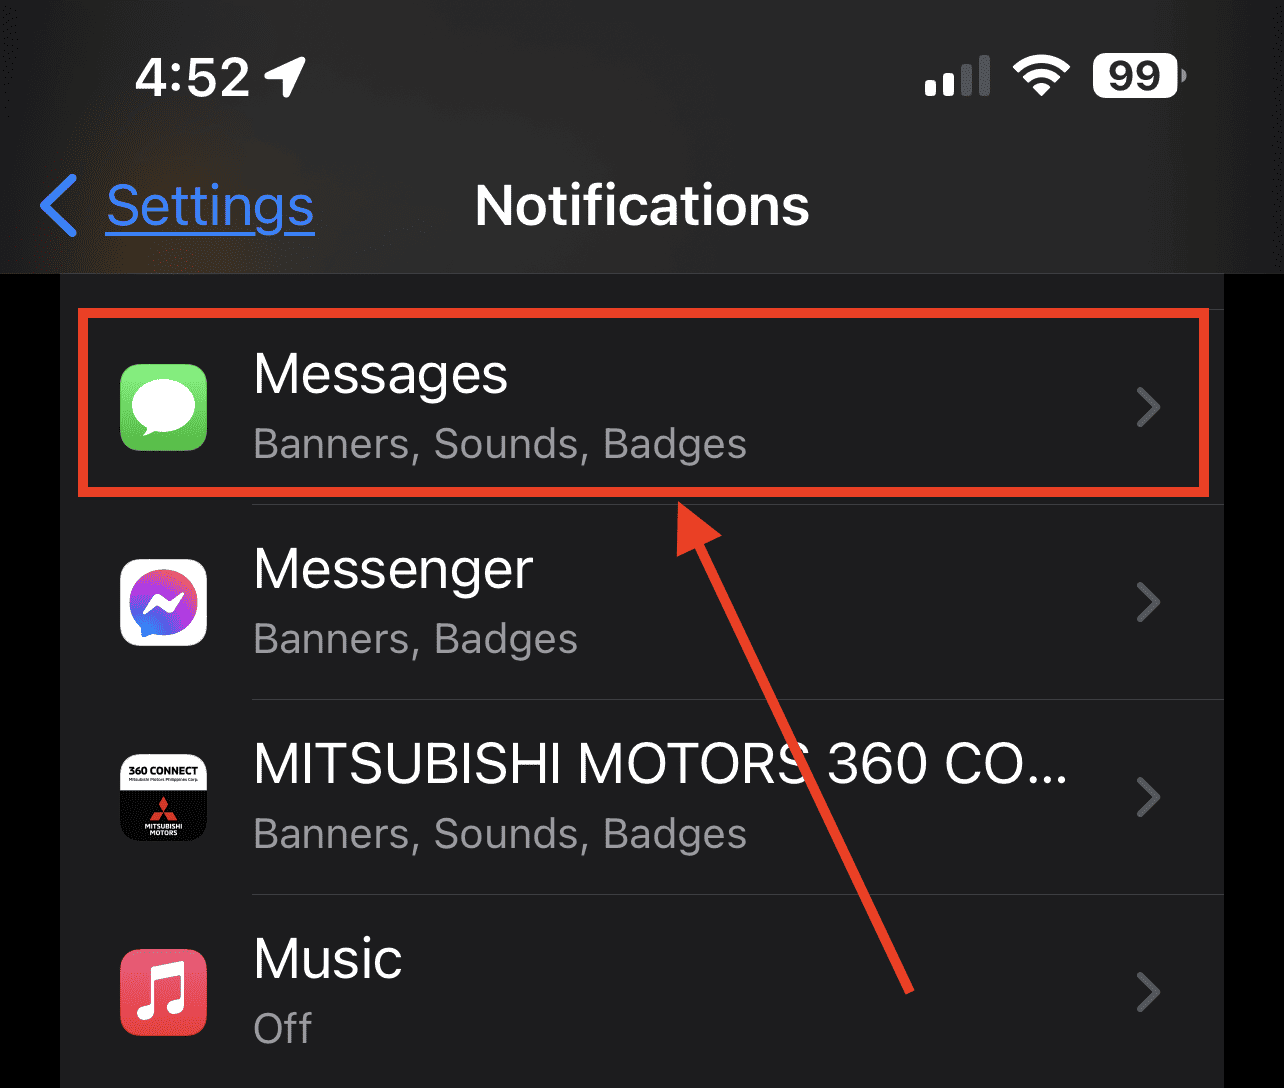
- Go to Settings.
- Tap Notifications > Messages.
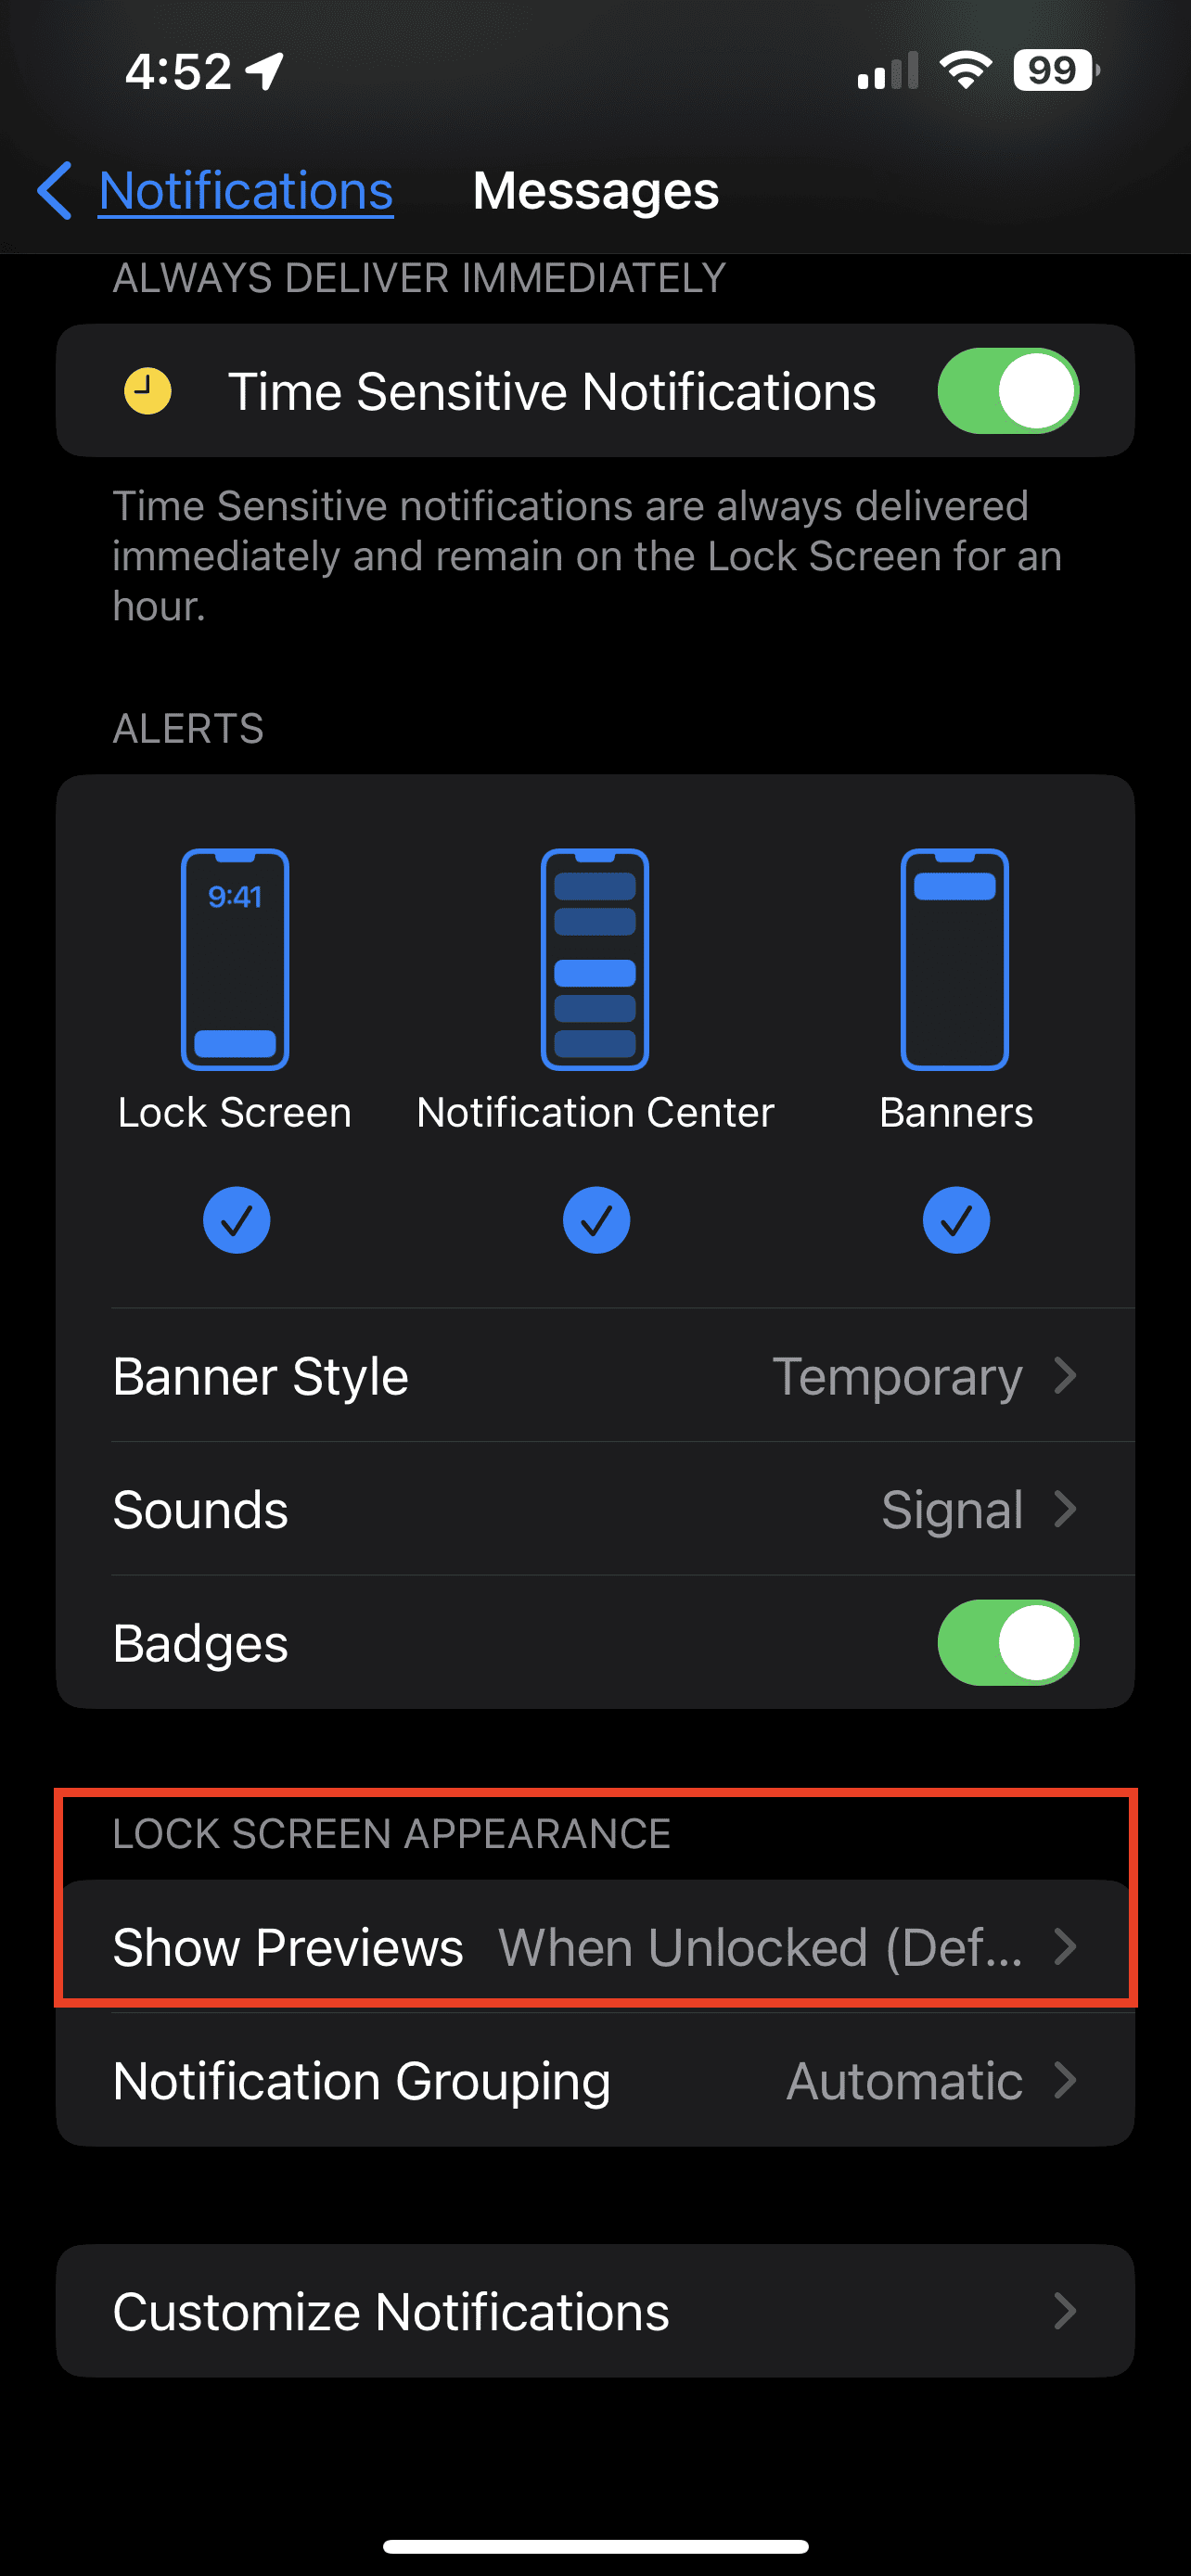
- Tap Show Previews > Never.


Use Invisible Ink When Sending Messages
You can protect messages containing sensitive information, images, or videos through iMessage by using invisible ink. If you do this, the content of your message will not be readable until the recipient taps on the message. Follow the steps below to use the invisible ink.
- Open the Message app, then type your message.
- Tap and hold the send button until the Send With Effect menu pops out, then select invisible ink.
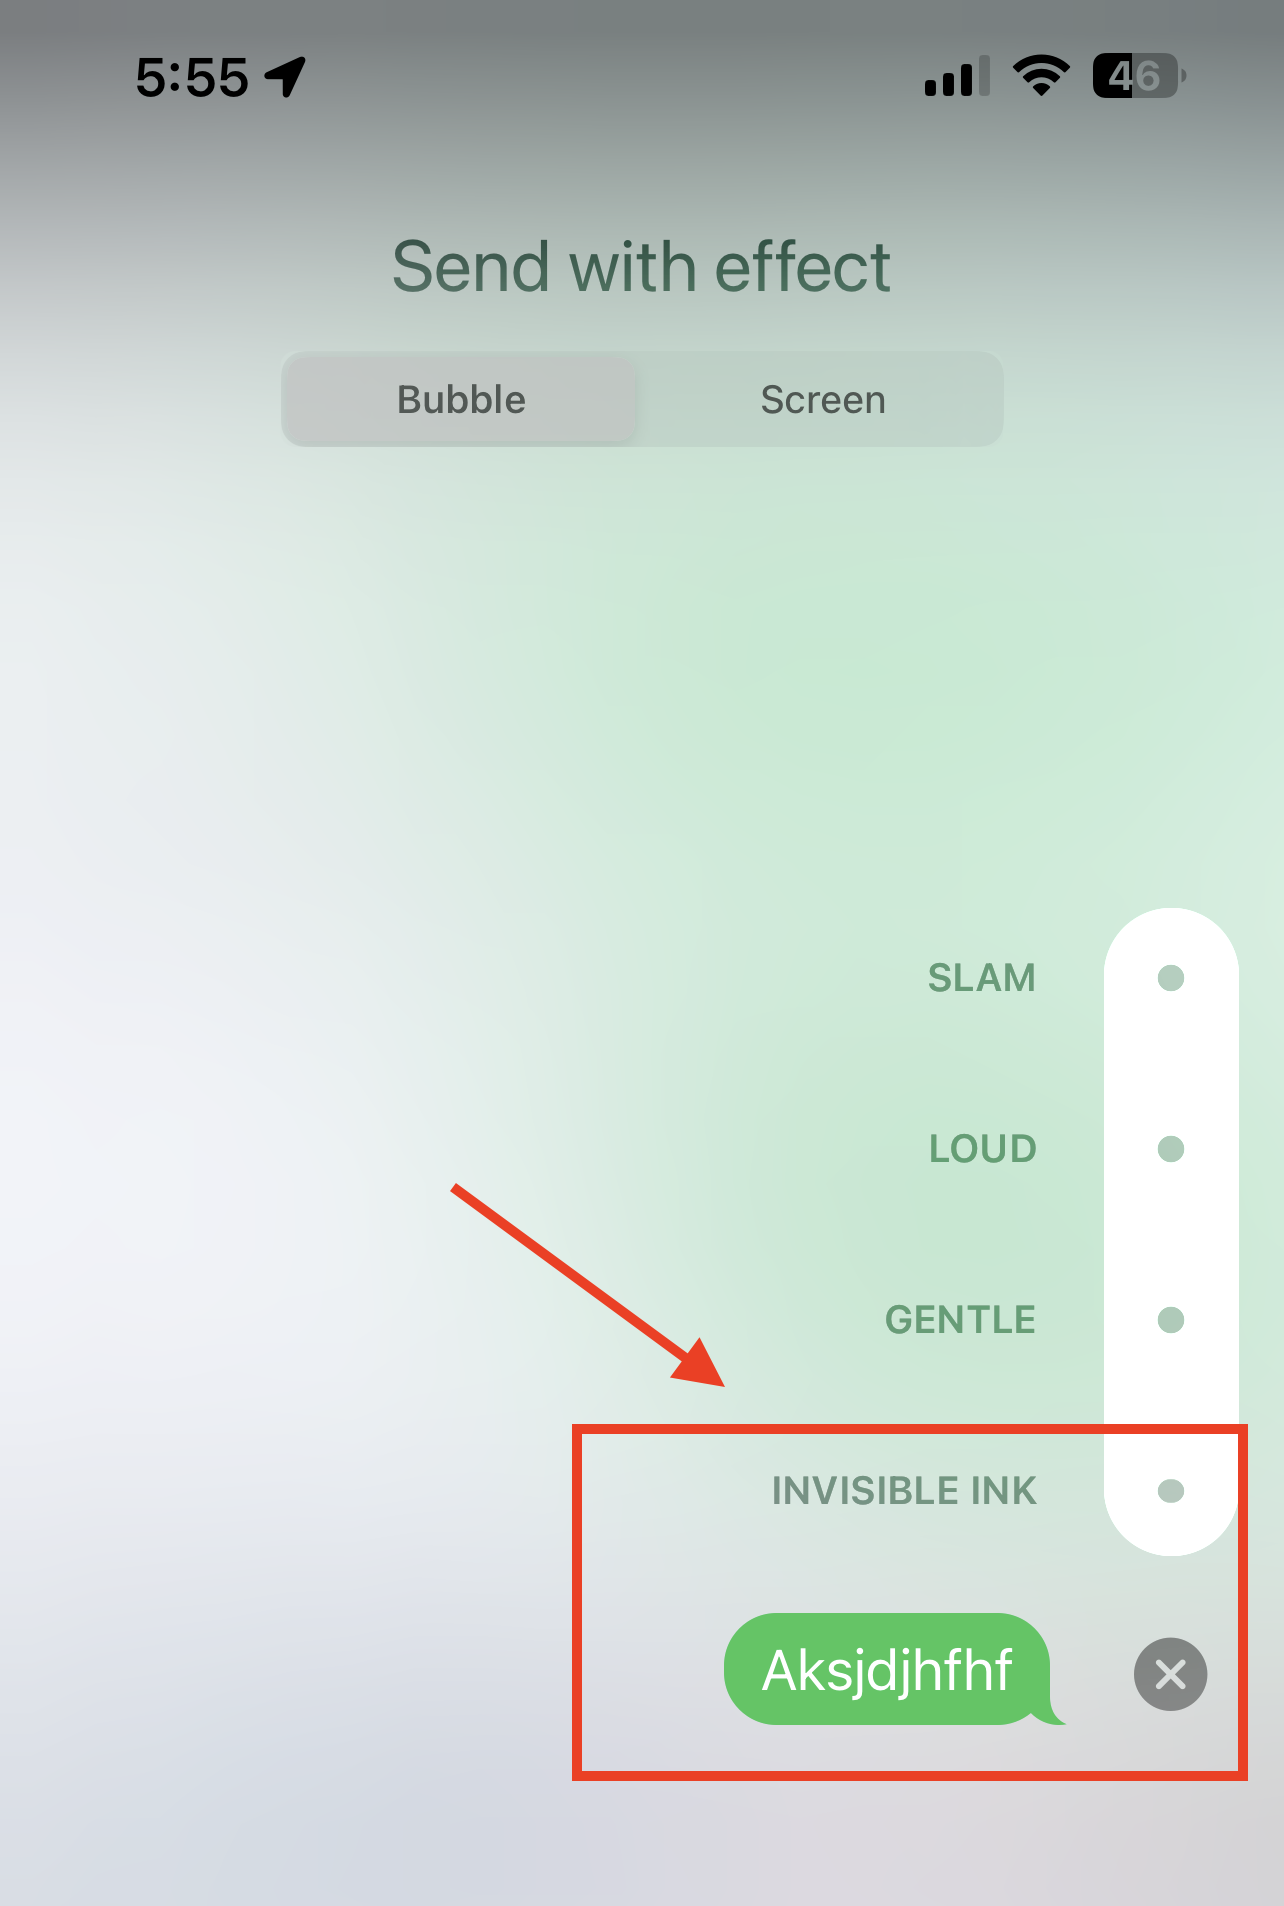
- Tap the message to send it.

Auto-Delete Messages
This is another way of preventing others from reading messages on your iPhone, setting them to auto-delete after a certain period. To do this, go to Settings > Messages > Keep Message. Then choose to have your messages deleted after 30 days or one year.
Use Face ID or Touch ID to Lock Third-Party Messaging Apps
If you use third-party messaging apps such as WhatsApp or Facebook Messenger, you can use Touch ID or Face ID to lock them up so that only you can open the messages. Follow the steps below to do this, you simply open the app and look for the options to enable Face ID or Touch ID under Settings.
Final Words
Hopefully, by doing one or all of the methods mentioned above, you’ll be able to safeguard your privacy and prevent other people from reading your private messages. However, your iPhone messages could also be be accessed by other people through your device. If somebody is persistent in getting access to your private messages for whatever reason, they can access them through your iCloud account, if you set up iCloud for Messages. Read our guide on how to know if a scammer is texting you. It is helpful in safeguarding your device.
So, anyone who knows your Apple credentials (hopefully no one does) can read your messages through iCloud. To prevent this from happening, it would be best to set up two-factor authentication on your Apple account, if you haven’t done so yet. It also helps Follow the steps below to set up two-factor authentication for your Apple ID.
- Go to Settings on your iPhone or iPad.
- Tap on your name > Password & Security.
- Toggle on Two-Factor Authentication.
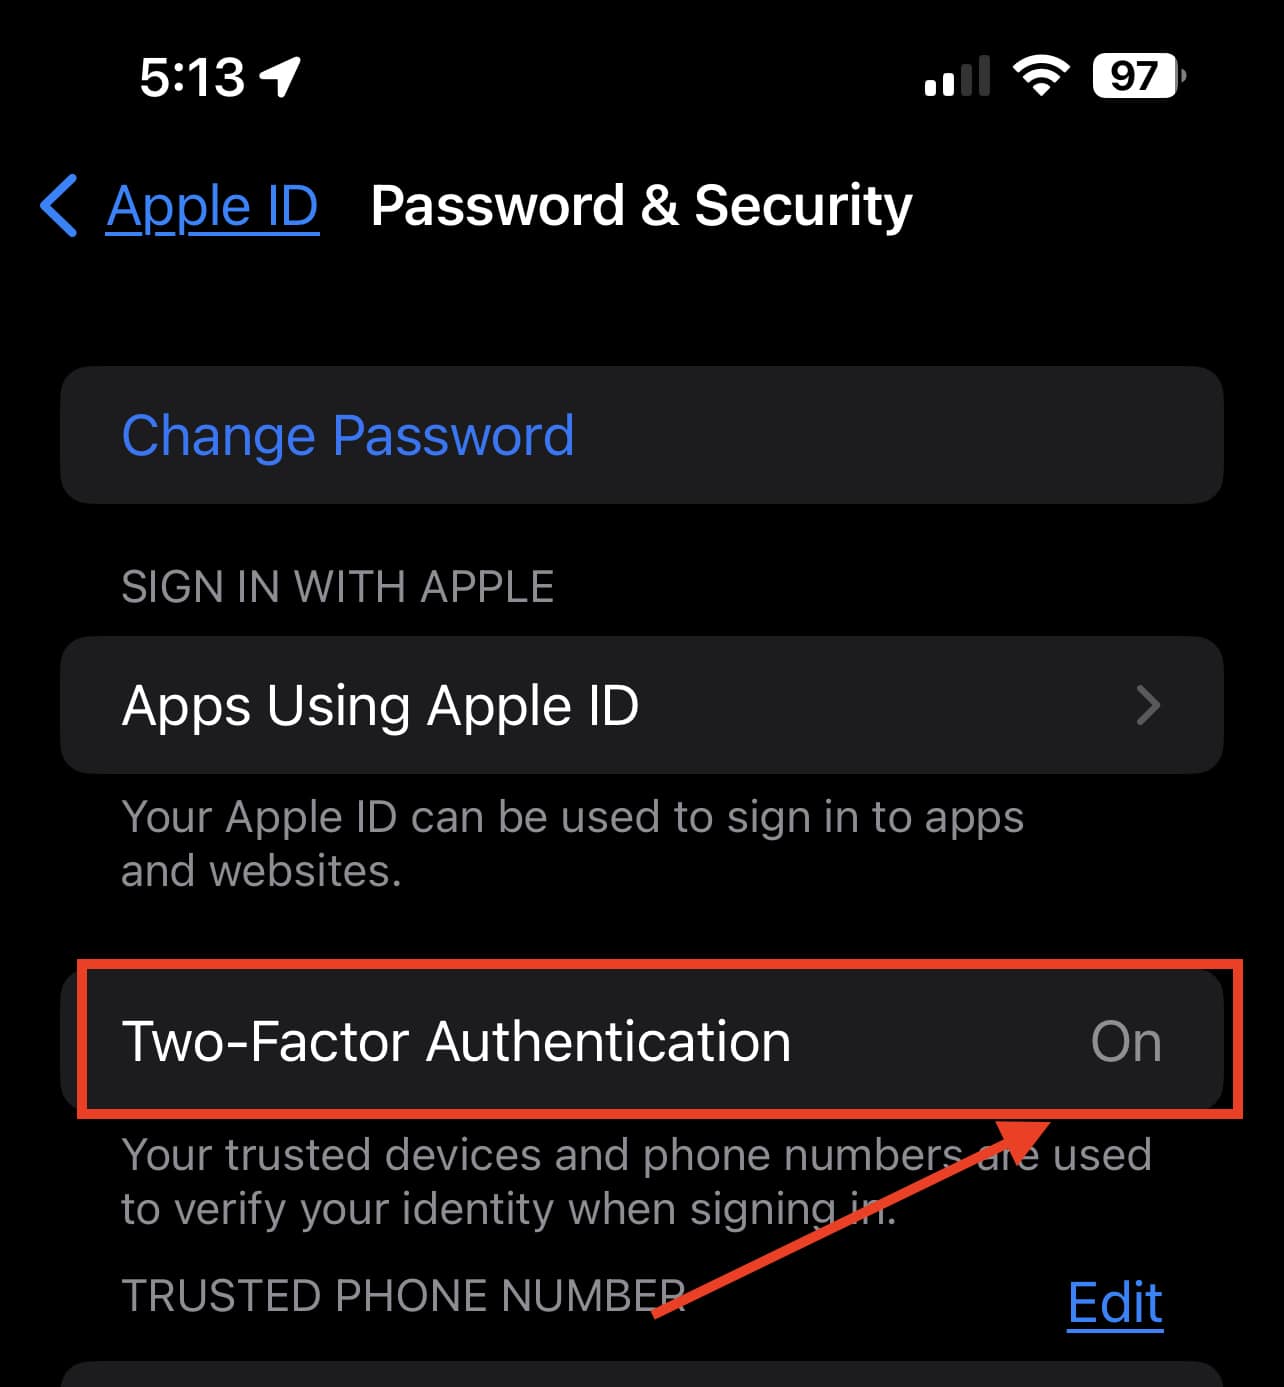
- Follow the onscreen instructions to activate the feature.

Once this is set up, a verification code will be sent to your authorized Apple devices when somebody tries to use your Apple credentials on another device.