When you try to reinstall macOS on your computer via Internet Recovery, there’s a chance that you might encounter Mac error 2003f. This error code happens when you reinstall macOS via Internet Recovery under a poor and unstable connection.
In this guide, we explain error 2003f, what causes it, and most importantly how to resolve the issue.
Understanding Mac Error 2003f
Mac error 2003f is one issue you may encounter when reinstalling macOS using Internet Recovery. For the unfamiliar, macOS Internet Recovery is a built-in system on a Mac computer. Using this method to reinstall macOS on your Mac requires a reliable internet connection. Failure to satisfy that basic requirements might lead to error 2003f.
When error 2003f happens, your Mac may freeze, causing the reinstallation of macOS to fail. In addition, you may also get a spinning globe or blank screen on your Mac’s display. This means that the reinstall process has frozen.
Sometimes, you’ll see a flashing folder with a question mark before the error 2003f appears. If that happens, it means your Mac was unable to locate its system software. Hence, it couldn’t continue reinstalling macOS.
The worst thing that could happen if you encounter error 2003f, though, is that you’ll lose access to your Mac.
Causes of Error 2003f On a Mac
As mentioned, a poor or unstable internet connection can cause error 2003f on a Mac. Since macOS reinstallation requires an internet connection, your Mac should have a strong, reliable internet connection to complete the reinstall process.
Additionally, Mac error 2003f could also be caused by a virus infection, hard disk errors, and incomplete installation of macOS.
Mac Startup Error 2003f: How to Fix
Before doing the troubleshooting tips below, it would be best to get rid of junk files on your Mac first. We suggest doing the following to get rid of junk files on your Mac.
- Clear cache files including system, user, and browser cache files
- Remove user log files
- Delete system log files
- Remove localization files
- Delete app leftovers
- Delete unused.DMGs
- Remove large and old files
- Remove Xcode junk files
If you want to save some time and opt for an easier alternative of getting rid of all junk files, we suggest you try a handy Mac cleaner like Intego Washing Machine to optimize your system within seconds.
You might also scan your Mac with antivirus software before proceeding. This would ensure that your Mac is not being hampered by pesky viruses.
Now, that you’ve done those two important steps, it’s time to do some troubleshooting to resolve Mac error 2003f on your machine.
1. Use a Wired Internet Connection on your Mac
As mentioned, reinstalling macOS via Internet Recovery requires a reliable internet connection. If you’re experiencing problems with your wireless internet connection, you should switch to a wired internet connection. To do this, follow the steps below.
- Disconnect Wi-Fi
- Restart Router
- Connect Mac to Router using Ethernet Cable
- Run Internet Recovery again
On Macs without an Ethernet port, you need to use an Ethernet adapter. We recommend using the Belkin USB-C to Gigabit Ethernet Adapter or the Apple Thunderbolt to Gigabit Ethernet Adapter.
Hopefully, reinstalling macOS via Internet Recovery while your Mac is on a wired connection resolves Mac error 2003f. If not, proceed to the next fix.
2. Reset PRAM and NVRAM
Resetting the Parameter RAM or Non-Volatile RAM could be all you need to resolve error 2003f. For those unfamiliar, NVRAM is the latest version of PRAM. It stores system settings including serial port configuration and definition. PRAM stores information related to macOS, including display settings, time zone, speaker, and more.
Here are the steps to reset the PRAM/NVRAM of your Intel-based Mac. These are unnecessary and do not apply if your Mac has an Apple Silicon system-on-a-chip.
- Restart your Mac
- Hold down Command + Option + P + R when you hear the startup sound
- Release the keys after 20 seconds
- Wait for the system to finish booting up
- Reinstall macOS via Internet Recovery again
If everything goes well, you might have solved Mac error 2003f. If the error code still shows up, try doing the next fix.
3. Run Disk Utility in Recovery Mode
Another reason why error 2003f happens when reinstalling macOS via Internet Recovery is a damaged or defective hard drive. You can try repairing your Mac’s hard drive by running Disk Utility in Recovery Mode. The steps for running Disk Utility in Recovery Mode For Intel-based Mac are listed below.

- Restart your Mac and hold Command + R
- Release the keys when the Mac Recovery page loads
- Click Disk Utility > Continue
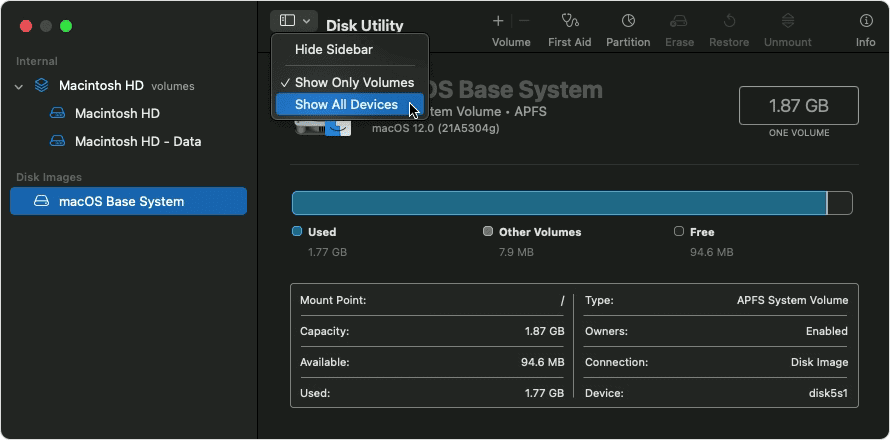
- Click View > Show All Devices
- Choose Installation Disk
- Click the First Aid Button > Run
- Follow the on-screen instructions to repair the disk
Here are the steps to run disk utility in recovery mode for Apple Silicon Mac.
- Shut down your Mac
- Press and hold the Power button until the “loading the startup options” appear
- Click Options > Continue
- Select a volume to recover > Next
- Select administrator account > Next
- Enter administrator password > Continue
- In the Recovery app select Disk Utility > Continue
- Choose View > Show All Devices
- Select a volume > Click the First Aid button
- Wait for the First Aid process to finish > Done
Once the system finishes repairing your Mac’s damaged hard disk, you can try reinstalling macOS via Internet Recovery again. Hopefully, you won’t encounter Mac error 2003f any longer. But if you still do, there’s one final troubleshooting procedure that you can do to reinstall macOS via Internet Recovery without encountering Mac error 2003f.
To simplify all this procedure about data recovery for your Mac, you can try apps specifically created to recover deleted, damaged, or even lost data from your hard drive. Disk Drill is a safe option here and has a free download version to see its features in detail.
4. Install macOS Via Bootable Installer
You can also try reinstalling macOS via a bootable disk. This means that you need to download the macOS installer from the App Store to an external bootable media. Doing so eliminates the need for a good and stable internet connection during the reinstallation. Below are the steps that you need to do to install macOS via a bootable installer.
But first, here are the steps to create a bootable installer.
- Download the macOS installer directly from the App Store
- Quit the installer when it begins to load after downloading
- Find the file Install in your Mac’s Applications folder
- Connect the bootable media (USB device or external hard drive labeled Mac OS Extended)
- Launch Terminal from the Utilities folder

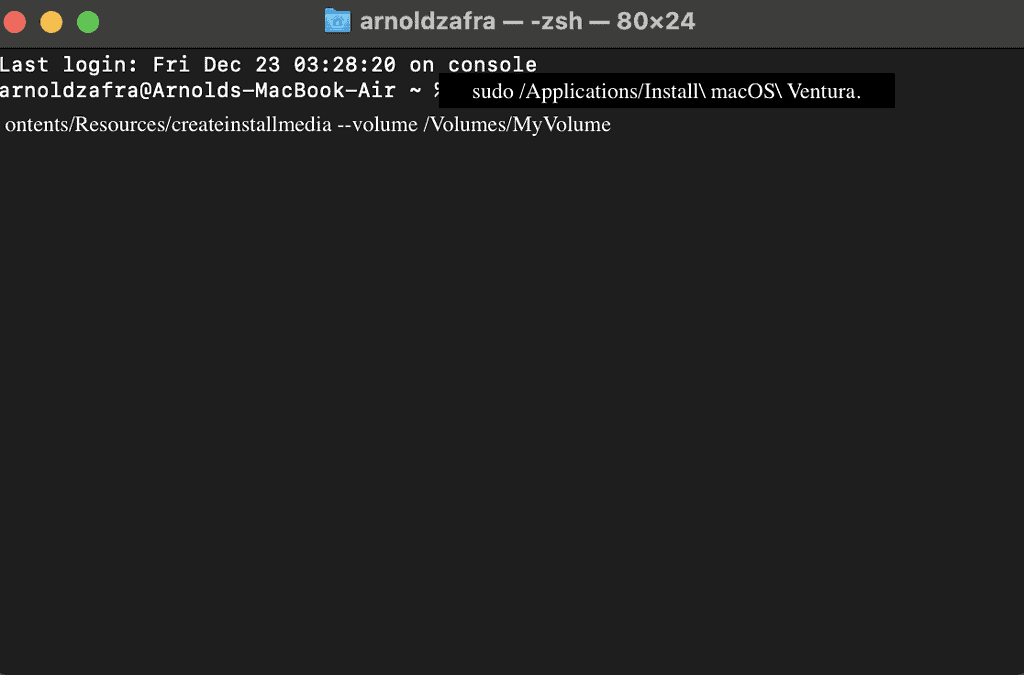
- Type in the command to install macOS (see below for commands specific to the macOS version)
- Mojave: sudo /Applications/Install\ macOS\ Mojave.app/Contents/Resources/createinstallmedia –volume /Volumes/MyVolume
- High Sierra: sudo /Applications/Install\ macOS\ High\Sierra.app/Contents/Resources/createinstallmedia –volume /Volumes/MyVolume
- Sierra: sudo /Applications/Install\ macOS\ Sierra.app/Contents/Resources/createinstallmedia –volume /Volumes/MyVolume –applicationpath /Applications/Install\ macOS\ Sierra.app
- El Capitan: sudo /Applications/Install\ OS\ X\ El\ Capitan.app/Contents/Resources/createinstallmedia –volume /Volumes/MyVolume –applicationpath /Applications/Install\ OS\ X\ El\ Capitan.app
- Monterey: sudo /Applications/Install\ macOS\ Monterey.app/Contents/Resources/createinstallmedia --volume /Volumes/MyVolume
- Ventura: sudo /Applications/Install\ macOS\ Ventura.app/Contents/Resources/createinstallmedia --volume /Volumes/MyVolume
- Hit Return
- Type in your username and password
- Press Y to erase the volume
- Wait for the process to finish, then eject the volume
Follow the steps below to reinstall macOS via a bootable installer on an Intel-based Mac.
- Start or restart your Mac and immediately press and hold the option key on your keyboard.
- Release the option key when you see the Startup Manager window.
- Select a startup disk.
- Click the arrow or press return on your keyboard.
To reinstall macOS on Apple Silicon Mac, simply click Reinstall macOS while the Recovery app is open, then click continue. Follow the on-screen instructions to proceed and select your current macOS disk when asked during the process.
There you have it, our troubleshooting tips to resolve the Mac error -2003f that occurs when reinstalling macOS via Internet Recovery. We hope that one of these tips was able to resolve the said error in your Mac.
