
For those looking to make a beat in GarageBand for iPhone or iPad, I’m going to show you the very basics. Keep in mind this is by no means an in-depth look, rather just a general overview. Honestly, each instrument in GarageBand could easily get their own article. This is merely giving you the basic premise of making a beat or track in GarageBand. Even though we’re only going through the basics, there’s still plenty you need to know. However, getting started isn’t that difficult, you mainly need to know where everything is.
GarageBand is Apple’s in-house Digital Audio Workstation (DAW), and it offers quite a bit, even in the mobile version. While it may seem like there is way too much going on in this app, creating the very basics of a song is still pretty easy. With that in mind, I’m going to briefly cover some of the instruments available, as well as how to get started in building your own track or beat in this program. Of course, you can also share your music with the world when you are finished. Let’s explore!
Getting Started with GarageBand on iPhone: Make the Beat
If you are starting out in GarageBand on your iPhone, I would recommend beginning by checking out this guide I have written concerning how to make a beat with GarageBand for macOS. While the two are not entirely similar, there’s going to be a lot of terms that I use that you may want to familiarize yourself with. Additionally, while they’re not entirely identical, they do have some pretty large and important similarities.
When you first open GarageBand, you’re going to want to create a new song/track by clicking the Plus button in the top right corner. This will get you started with making a beat in GarageBand. From here, it’s all about learning how to navigate your instruments, loops, and workstation.
Adding Sounds and Instruments to Make a Beat in GarageBand for iPhone
When it comes to the available sounds and instruments, there’s a lot to choose from. When you are on the instrument selection screen, you should see a divider that says Live Loops and Tracks right at the top of the app. Keep in mind that this article is going to focus almost exclusively on instruments available through Tracks. If you have an understanding of how the individual tracks work, loops are a breeze. You can also access Loops from the Sound Library under the Tracks option.
When it comes to the instruments, users have a lot of choices. There’s Drums, Guitar, Bass, World, Strings, Keyboard, Amp and more. Considering that this article can get quite lengthy, I’m only going to focus on a couple of these. Again, much like Loops, once you have an understanding of how one instrument works, figuring out the rest is rather straightforward.
Waltz or Disco: Adjusting Song Parameters
Another thing users may want to know about is how to adjust the settings of the song or track itself. You are able to adjust things like the key of the song, the tempo, the time-signature and more. Simply click the Gear icon in your workstation to bring up the settings for your track. Personally, I would leave all of these alone for now. It’s good to know they exist, but if you’re new to song and beat writing, you may want to just leave these settings alone for the time being.

Since we are just starting, GarageBand is going to want you to select an instrument before you actually get to the track portion of GarageBand. At least, it will whenever you start with a new song. Choose whatever you want for now, as we can move out of it almost immediately after you select an instrument.
Getting to Know the Track Editor
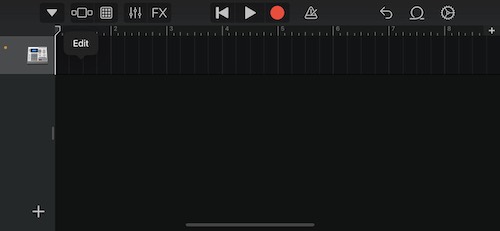
From here, knowing how to move between individual instruments and the track (your song) is going to be crucial. From the instrument you just selected, navigate to the icon at the top of the program that looks like one block next to two smaller blocks. In the below image, it is next to the down arrow. This will bring you to your track editor, and you need to know how to navigate this.

This is where you can see all of your instruments at once, and honestly, this will be the easiest way to get going when it comes to creating beats in GarageBand. Remember, there’s a lot that GarageBand can offer, I’m merely trying to cover the basics to get people making beats and songs.
The bottom-left hand corner has a “+”, which allows you to add more instruments. Additionally, there’s settings in the top-left center that allows you adjust the settings of each individual track. For example, if you need to lower the volume of your guitar, you can do so from here. The settings for the song itself are in the right-hand corner.
What Else You Need to Know
When it comes to working within the track field, this is where you can adjust the length of time that each of your instruments play, or how many times they play. There’s a way to make loops of your instruments, which I’ll get in to later, but also remember Apple supplies loops as well. Wherever there is an instrument in the track, you can press on it to bring up the Edit option. This will allow you to edit the individual notes for each instrument track. Keep this in mind, as this is essentially how you will build your songs and loops. Again, if this seems confusing, that’s okay. Experimentation is the key to song writing and composing.
To boil it down, your loops are going to create your song or beat, and your instruments can help make your loops. Now that we have the basics somewhat down, it’s time to start looking at instruments.
Add the Beat: Taking a Look at the Drums
Since drums are often the heartbeat of a song, let’s start here. GarageBand offers a plethora of different drum sounds, kits and styles. Even from the Drums menu you have a lot of options.

- Smart Drums: This setting allows you to make beats using specific parameters. You can choose which drums you use, and also change the style of said drums using X/Y coordinates.
- Acoustic Drums: While this is a fun feature, I personally don’t think this is going to be the most useful for actually creating beats. Acoustic Drums allows users to use their fingers to “play” an electronic drum kit. It’s fun, but can be a bit difficult to actually record.
- Beat Sequencer: Personally, I think this one is going to be the easiest to use when it comes to making drum beats. Beat Sequencers allows you to map-out the specific hits of your beat, meaning you can easily edit them. It can also generate random beats, sort of similar to Smart Drums.
Keep in mind that when you’re using any of these, you can hit the record button to get a recording of your playing. You will be able to edit any of your recordings later note-for-note, so don’t worry if you mess up at any time while you are recording.
Adding Your Strings
Now that we’ve taken a look at drums, I naturally would like to talk a little bit about your guitar and bass options in GarageBand. When it comes to using the program to record your own guitar and bass, I’ve already written an article on how to connect your guitar to GarageBand. Note that you will need an additional peripheral if you want to go this route.

Of course, if you don’t have your own Guitar or Bass, there’s options built-in to GarageBand as well. When it comes to the string-instruments in GarageBand, many of them have similar options.
- Smart Guitar/Bass: GarageBand has the option of Smart instruments. Concerning Guitar, Bass and the World Instruments, users can present themselves with a guitar neck that allows for “live” playing by tapping on the strings of the guitar. While this can be a lot of fun, I wouldn’t totally recommend it for creating beats, as you will likely need to do a lot of editing anyway. However, this can be a lot of fun, so give it a try!
- Notes: This a lot like the Smart Guitar, however, it will not provide you with Chords. It will just be the guitar neck, and you will have to make notes yourself. This can potentially be even more aggravating than using the Smart controls.
- Scales: GarageBand also offers Scales, which can be a great way to create leads and guitar solos for your projects.
Other Things to Remember
As mentioned before, I would simply recommend choosing the guitar, and then going back to the track itself by clicking the switch button at the top. Once the instrument is part of your track, you can single-click on it to edit the notes individually. This is also a great time to warn that it can be easy to get “lost” in the GarageBand DAW, especially when using iOS. Try not to get discouraged, and do your best to retrace your steps if you do get lost.
Introducing Billy Joel: Taking a Look at Your Keyboard Options
Just like with the strings, GarageBand offers some keyboard options as well. There’s plenty of different sounds, and again, most of them are going to operate in the same way as the rest of the instruments that are available. However, let’s take a brief look at the the major keyboard options.

- Smart Piano: just like the Smart Drums and the Smart Guitar, GarageBand includes a keyboard that can automatically generate chords for you. You will still need to create the actual sounds yourself using your fingers on the keyboard, but you won’t have to know the shapes of chords to get the results you want.
- Alchemy Synth: This is how you can create keyboard sounds without the aid of Smart Keyboard.
- Sampler: Perhaps one of the most fun options available in GarageBand, this allows you to record a sound and then use it as a sample on a keyboard. If you select this, you can then go to the Setting option (looks like a know) in the top right corner to record your own sound for the Sampler.
Keep in mind, this only briefly covers the instruments available in GarageBand. Again, for something that is free, there’s a LOT available in this app. There simply isn’t the time to cover every possibility available in GarageBand. Of course, you’re also able to record vocals as well. Don’t worry, this one is super straightforward. There’s also World instruments that behave much in the same way as the guitar.
Putting it All Together: How to Make a Beat in GarageBand
With all that said, let’s take a look at the basics of creating a beat. Now that we know about the tools, I’m going to give you the basics for actually creating a song in GarageBand, using most of the instruments
Time needed: 5 minutes
The basics of making a beat in GarageBand
- Starting at the main screen of GarageBand (Should be GarageBand Recents), go to the Plus sign at the top-right corner and click it. This will create a new project.
- Next, you’ll need to choose an instrument. Pick whichever one you want to start with and select it.
- From here, you can either record the instrument yourself using the record button, or move back to the main workstation of the DAW.
- You can see your instrument track in the main project window. Whether or not you did record something, click the play area within the track area of your instrument, and click edit.
- From here, you can then manually edit your individual instrument. If you want to edit the individual notes, you will need to click and drag the Lock icon in the top-left corner. You can then click anywhere in the play area to generate and edit notes. Click Done when you are finished.
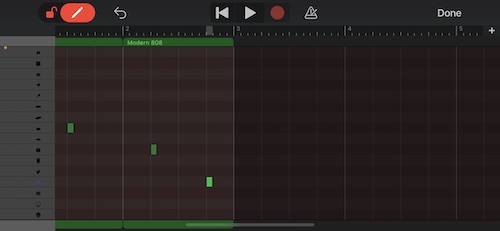
- After this, you can continue to add tracks to your song by either click the + in the bottom-left corner in the play area, or by clicking the three-square icon at the top-left center. You can then add additional tracks and then edit them manually or record them yourself.


Other Things to Remember
And that’s (essentially) all there is to it! While there is still plenty to learn, you now have the basics of songwriting in GarageBand. Remember that there’s also an FX option next to the instrument-selection button at the top of the app. This will allow you to add additional effects to each of your instrument tracks.
What About Loops?
You may also be wondering how loops work as well. Even if you are not using the loops offered by Apple (which are always accessible from the Loop-looking icon in the top-right), anything you create in GarageBand can be turned into a loop. Single-click on a recorded track to bring up your options to Loop. This is also where you will find your cut/copy/paste options. You can also edit your “loops” in the play area, much like you can with GarageBand in macOS. Again, I would highly recommend reading this article on GarageBand for macOS to learn more about this.
Mixing and Mastering Your Beat in GarageBand for iPhone
Of course, when it comes to mixing and mastering, your options on iPhone or iPad aren’t going to be nearly as expansive as if you were going to make a beat in GarageBand for macOS. However, that doesn’t mean that there aren’t any. Clicking the icon that looks like three different sliders will introduce you to the settings for each instrument. Select your instrument, and then click this track settings button to further adjust settings.
Sharing Your Beat
Once you’re all done, you may want to share your project with the world. Fortunately, this is really easy to accomplish. You can also check out this article for a more in-depth guide to sharing in GarageBand.
- Go back to the Recent Projects menu, and long press on your song. If you are in a song, you can click the down arrow in the top-left corner, and then choose My Songs.
- Select Share.
- You will have three options: Song, Ringtone and Project. I’ve talked about making your song as a ringtone in another article, and this also covers some additional share features. For the purposes of this article, we’re just going to hit Song.
- On the next screen, select your audio quality. I would recommend keeping it at High Quality (192 kBit/s), as this is the typical quality of a song.
- Click Share.
- The typical iPhone sharing options will then pop-up, including sharing the song to social media, or sending it as a text message.
Unleash Your Inner Rockstar: Make a Beat with GarageBand on iPhone
A lot is going on with GarageBand, even if you’re using the version available for iPhone/iPad. This is really only scratching the surface. As previously mentioned, I would recommend exploring and experimenting with the app to get the most out of it. Especially concerning the mobile version, I would recommend fully exploring as much as you can before diving into actually creating a song. If you are not experienced with this app, maybe a more intuitive one would ease your music production path. For instance, FL Studio is one of the most reliable tools for music production, allowing you to loop and arrange drums, instruments, and samples swiftly, which instantly makes it much easier to create a beat.
While exploration is going to be your best friend in GarageBand, hopefully, this at least provides you with the basics of how to make a beat in GarageBand on your iPhone. There are a lot of awesome features available, especially the Sampler feature with the keyboard. Now that you know the basics, get started with your own track, and see where your imagination takes you. Hopefully this information helps you make a beat in GarageBand with your iPhone.


