
iOS 26 brings the Liquid Glass design with translucent layers and fluid effects. If you find motion distracting, want better battery life, or need clearer visuals on older hardware, you can reduce or remove those animations. This guide shows the practical settings you should change and gives step-by-step instructions for each method.
Table of contents
- Methods
- 1. Reduce Motion
- 2. Disable Auto-Play Video Previews
- 3. Turn Off Auto-Play Animated Images
- 4. Reduce Transparency
- 5. Increase Contrast
- 6. Limit Frame Rate (ProMotion Devices)
- 7. Configure Vehicle Motion Cues
- 8. Turn Off Auto-Play Message Effects
- 9. Enable Prefer Non-Blinking Cursor
- 10. Add Button Shapes
- 11. Dim Flashing Lights
- Tips
- FAQs
- Summary
- Conclusion
Methods
Below are the primary controls iOS 26 exposes to reduce motion, transparency, and automatic playback. Each method includes a clear description and numbered steps you can follow on your iPhone or iPad.
1. Reduce Motion
Reduce Motion is the most effective system-level control. It replaces zoom and slide effects with simple dissolves, removes parallax, and reduces many system animations. Use this first when you want a consistent, low-motion experience across the OS.
- Open Settings.
- Tap Accessibility.
- Tap Motion.

- Toggle on Reduce Motion.

2. Disable Auto-Play Video Previews
Video previews in apps like the App Store and some web content can start automatically and add motion. Disabling auto-play stops those previews from playing unless you start them manually.
- Open Settings > Accessibility > Motion.
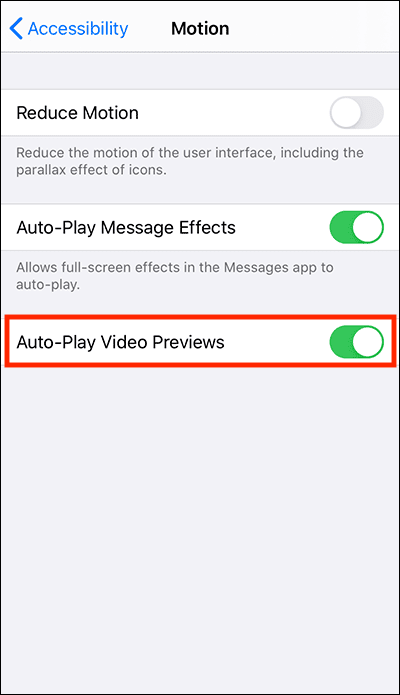
- Toggle off Auto-Play Video Previews.

3. Turn Off Auto-Play Animated Images
Animated GIFs and similar images add repeated motion in Messages and Safari. Turning off auto-play keeps those images static until you choose to play them.
- Open Settings > Accessibility > Motion.
- Toggle off Auto-Play Animated Images.
4. Reduce Transparency

Liquid Glass relies on translucent layers. Reduce Transparency replaces frosted glass with solid backgrounds, which simplifies rendering and improves contrast.
- Open Settings.
- Tap Accessibility > Display & Text Size.
- Toggle on Reduce Transparency.
5. Increase Contrast
If you want to keep some visual style but need clearer UI elements, Increase Contrast sharpens outlines and improves visibility without fully removing Liquid Glass effects.
- Go to Settings > Accessibility > Display & Text Size.
- Toggle on Increase Contrast.
6. Limit Frame Rate (ProMotion Devices)
Devices with ProMotion displays run at up to 120Hz. Limiting frame rate to 60Hz reduces perceived motion and can improve battery life and stability for motion-sensitive users.
- Open Settings > Accessibility > Motion.
- Toggle on Limit Frame Rate.
7. Configure Vehicle Motion Cues
iOS 26 adds Vehicle Motion Cues to reduce motion sickness while traveling. You can adjust dot patterns and visibility to lower discomfort.
- Open Settings > Accessibility > Motion.
- Tap Vehicle Motion Cues and customize patterns, colors, or visibility as needed.
8. Turn Off Auto-Play Message Effects
Messages can auto-play full-screen and bubble effects. Disable auto-play to stop automatic animations and let you replay them manually.
- Open Settings > Accessibility > Motion.
- Toggle off Auto-Play Message Effects.
9. Enable Prefer Non-Blinking Cursor
Typing feels calmer when the insertion cursor stops blinking. This option stabilizes the cursor for a less distracting typing experience.
- Open Settings > Accessibility > Motion.
- Toggle on Prefer Non-Blinking Cursor.
10. Add Button Shapes
Button Shapes adds outlines or underlines to controls so you can spot actionable elements without relying on translucency or motion.
- Open Settings > Accessibility > Display & Text Size.
- Toggle on Button Shapes.
11. Dim Flashing Lights
Flashing or strobing content can trigger discomfort. Dim Flashing Lights reduces the intensity of detected flashes in real time.
- Open Settings > Accessibility > Motion.
- Toggle on Dim Flashing Lights.
Tips
- Start with Increase Contrast if you want a mild change. Move to Reduce Transparency for a stronger effect.
- Add frequently used toggles like Reduce Motion to the Accessibility Shortcut for a triple-click toggle.
- Add Accessibility controls to Control Center for immediate access without opening Settings.
- Use per-app accessibility settings to lower motion only in apps that bother you.
- Enable Low Power Mode to automatically reduce animations and lower frame rates in some cases.
- Limiting frame rate on ProMotion devices gives a smoother, more consistent experience at 60Hz.
FAQs
No. These settings only change visual transitions. Apps keep their full functionality. Visual feedback may look simpler, but controls and features behave the same.
Yes. Use Increase Contrast to keep some Liquid Glass styling while improving readability. That gives you a middle ground.
Yes. Reducing transparency, limiting frame rates, and disabling auto-play extend battery life, especially on older devices.
No. System motion settings affect UI transitions, not media rendering. Videos still play at their native frame rates unless an app specifically changes playback behavior.
Yes. Use the Accessibility Shortcut or add controls to Control Center for fast access.
Summary
- Enable Reduce Motion for system-wide animation reduction.
- Turn on Reduce Transparency to remove frosted glass effects.
- Limit frame rate on ProMotion devices to 60Hz with Limit Frame Rate.
- Disable Auto-Play Video Previews and Auto-Play Animated Images.
- Use Button Shapes and Increase Contrast to improve clarity.
- Add an Accessibility Shortcut or Control Center tiles for quick toggles.
- Disable Auto-Play Message Effects and enable Prefer Non-Blinking Cursor for a calmer experience.
- Customize Vehicle Motion Cues and Dim Flashing Lights to reduce travel and strobe discomfort.
Conclusion
iOS 26’s Liquid Glass design adds motion and translucency by default. If you prefer a quieter interface, these settings let you remove or reduce animations without losing functionality. Try one change at a time until you find the balance that fits your device and comfort. All settings are reversible, so you can test and revert quickly.


I would like to stop these constant overlays of screens, the unwanted appearance of Preview is the most annoying.
SUPER, indeed as JJ says so well: “this very concise and timely post is an incredibly great help, not only for the battery life, but for me personally as well. All the time lost with finding out and changing all these unwanted and unnecessary changes. Not even interesting. Thank you so much.
This very concise and timely post is a great help to turn off what I discovered to be unwanted, distracting, unnecessary movements that were draining the battery faster than just prior iOS. Thank you!