
If you enable the File Sharing feature on your Mac, it will significantly help improve your ability to share files and collaborate with users on the same network. This guide’ll help you understand what File Sharing is, how to set it up from scratch, and more. Additionally, we will also explore the steps to share files between Macs and also between a Mac and Windows computer. Read along to learn everything about the File Sharing feature.
What Is File Sharing on Mac
File Sharing has been available on macOS for a while now. It allows you to share files and folders from your Mac with others on the same network. And, you can access this feature through the Sharing option in System Settings on your Mac which we will cover further in the article.
With File Sharing, you can choose which files or folders you want to share. Then, you can grant access to other users who are on the same network. Moreover, different permissions can be given like Read & Write, Read Only, and Write Only (Drop Box).
There are many scenarios in which File Sharing on Mac turns out to be extremely useful. For example, you can share documents, photos, videos, etc., securely within your Local Network which is quite useful if there are a group of people working together and need access to certain files regularly. Also, you can turn one Mac with the highest storage capacity into a storage unit so everyone on the network can access these files whenever they want.
Unfortunately, cloud storage replicates the same functionality while being more convenient. Regardless, File Sharing on Mac is still here and it has its positives. You need not upload and download files to any services you don’t trust. So, read along to learn how to set up and use File Sharing on Mac.
How to Set Up File Sharing on Mac
Now that you’re aware of the File Sharing feature, read along to learn how to set up File Sharing on Mac.
Time needed: 5 minutes
Steps to enable and set up File Sharing on Mac.
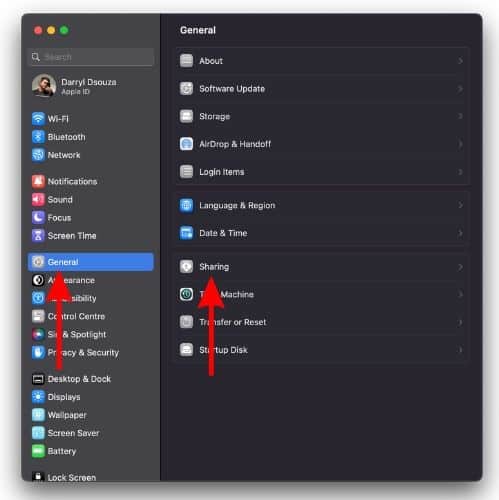
- Open System Settings on your Mac.
- Click on General and select the Sharing option on the right side.
- On the Sharing screen, turn on the File Sharing toggle and Click on the i (info) icon beside the File Sharing toggle.
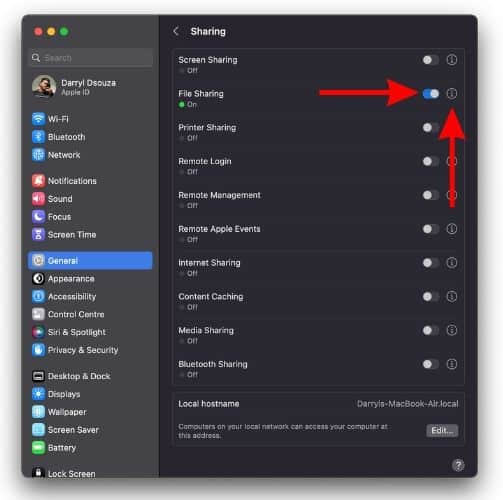
- By default, the Public folder of every user with an account on your Mac will be listed below Shared Folders. In case you do not want to share a folder, select it in the Shared Folders list and click the – (Remove) button.
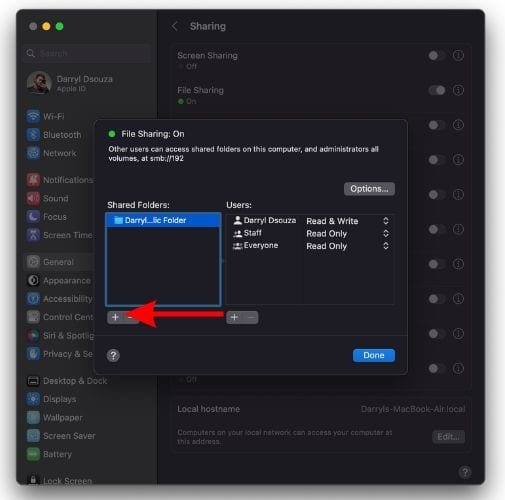
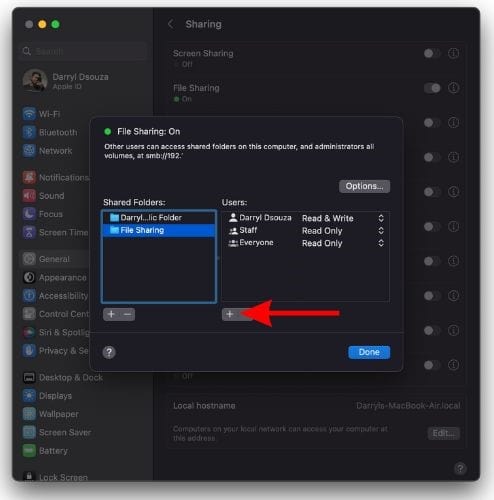
- Now, if the Folder you want to share is not listed in the Shared Folders box, click the + (Add) button to add the folder.
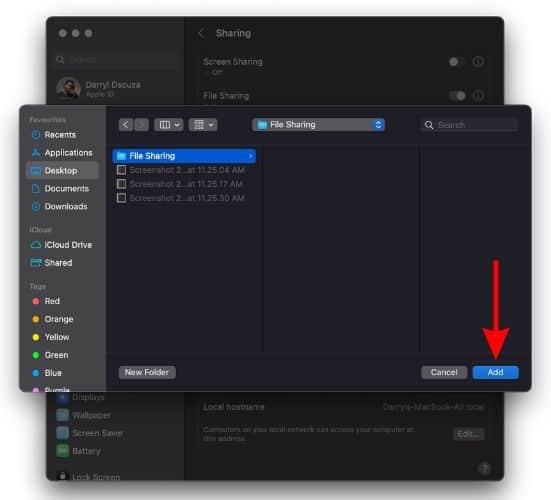
- On the next screen, select the Folder you want to share and click Add.
- If you want to allow access to a specific user to the Shared Folder, click the + Add button below the Users section.
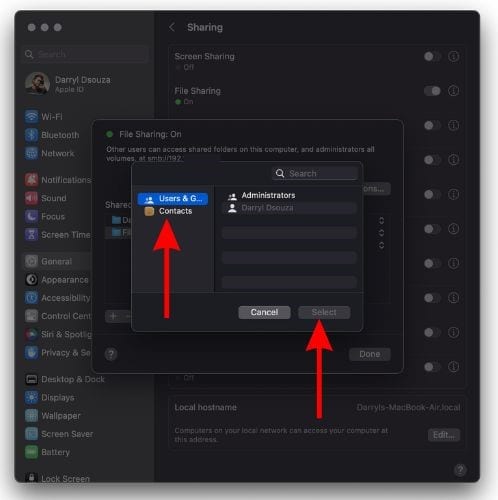
- Now, navigate to the user from Users and Groups or Contacts and click Select.
- Create a password for the user, enter it in the specified area, and click Create Account.
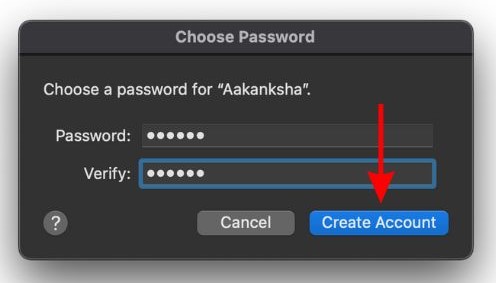
- Enter your Touch ID or Passcode to save the changes.
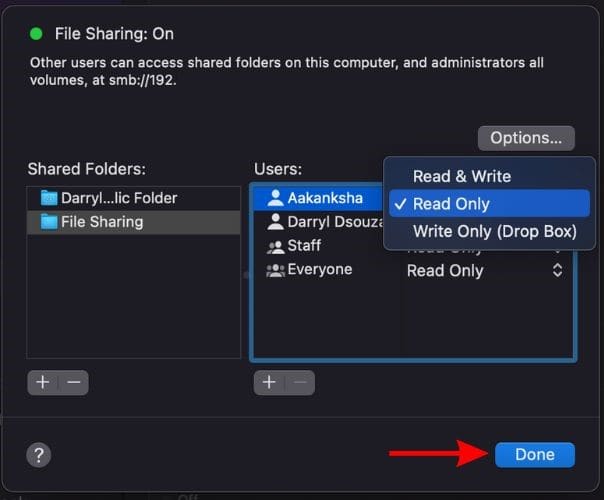
- Click on the Read Only list beside the user’s name from the list and select from the available options. After you make all the desired changes, click Done.


How to Share Files Between Macs Using File Sharing
After you’ve set up File Sharing on your Mac, and made all the necessary changes, you can share files and folders from one Mac to another. Just ensure that both these devices are on the same network and you’re good to go.
Also, you will need the network address of the primary Mac to connect to a secondary Mac. You can find the Network Address through System Settings > General > Sharing > i button beside the File Sharing > below the File Sharing: On (example: smb://192.011.0.221.)
Once you have this network address, follow the steps mentioned below to share files between Macs using the File Sharing feature on Mac.
1. Open Finder on your Mac.
2. Click the Go option in the menu bar and select the Connect to Server option at the end of the list.
3. Type in the network address and click Connect.
4. Select from the available options on how you want to connect to the primary Mac.
5. If asked, enter your Username and Password and select the Server Volumes or Shared Folders you’d like to access.
How to Share Files Between Mac and Windows Using File Sharing
Change File Sharing Settings on Mac
The primary requirement to share files between a Mac and a Windows computer is that both of these devices should be connected to the same network. After that, you need to change a few settings in the File Sharing feature on your Mac to allow a Windows computer to access files on your Mac. Follow the steps below to learn how to share files between Mac and Windows using the File Sharing feature.
1. Open System Settings on your Mac.
2. Click on General and select the Sharing option on the right side.
3. Click on the i button beside the File Sharing toggle.
4. Select the Folder you want to share and click the Options button.

5. Now, select the Account under Windows File Sharing.

6. Enter the Password you created, click OK and then click Done to save the changes.

Connect to Mac Using a Windows Computer
Once you’ve made these changes, you can share files between Mac and Windows. Also, you will need the network address of the Mac to connect to your Windows PC. You can find the Network Address through System Settings > General > Sharing > i button beside the File Sharing > below the File Sharing: On (example: smb://192.011.0.221.)
Once you have this network address, follow the steps mentioned below to share files from your Mac to a Windows computer.
1. Open File Explorer on your Windows computer.
2. Right Click on the This PC option in the menu bar and select the Map Network Drive option.

3. Now, you must enter the network address of the Mac in the text box beside the Folder option. Ensure that you add “\\” before you type the network address. Also, you must add the name of the Shared Folder. If you miss these details, you won’t be able to access the shared folder. Here’s an example, “\\192.178.1.134\File Sharing”
4. Once you’ve entered the correct IP address with the shared file name, click Finish.

5. A Windows Security menu will pop up. Enter your User name and Password and click OK.

6. If the credentials match, you’ll get access to the shared file. It’ll be visible in the File Explorer in the This PC section.

Don’t Let File Sharing Die
Enabling File Sharing on your Mac will help you share files without worrying about any third-party apps or tools. We covered everything about File Sharing including the steps to set up the feature and the steps to share files between Macs and Windows computers. It is a free alternative to cloud storage (in certain aspects) and will hopefully turn out to be useful to many.
If you have any doubts about File Sharing on Mac, please let us know in the comments below.


The problem is when macOS has a bug and File Sharing does NOT work and some Macs cannot be upgraded to newer macOS versions.
For instance, macOS 10.15.7 (19H1922) Catalina security update generated a bug, that was not fixed in the following and last 19H2026 security update build, even after reporting Apple many times via Feedback Assistant. If File Sharing was on before such update, it cannot turn it off later on. And vice versa.
And a bit off-topic, but taking about macOS-generated bugs not fixed by Apple after reporting them many times, another bug was generated by macOS 13 Ventura on Intel Macs that do not see Panasonic TV via HDMI using “Apple USB-C Digital AV Multiport Adapter” with Macs like iMac which do not have HDMI port. No problem with previous macOS versions or Apple silicon Macs. Full details here:
macOS 13 Ventura BREAKS Panasonic TV connection via HDMI
https://discussions.apple.com/thread/254775822