Perhaps one of the most commonly asked questions by those who just got a new MacBook is how can they take a picture using their new laptop. Some folks might also ask how can they access the camera on their MacBook. This quick guide will answer those questions. So, read along as I show you how to take a picture on MacBook.
Can You Take a Photo with Your MacBook?
The straight answer to that is yes, you can. Although the MacBook’s built-in FaceTime HD camera was built for video calls, nothing is preventing you from using it to take a photo of yourself or even of you together with other people. But first, you need to know how to use your MacBook’s FaceTime HD camera. To do that, you need the built-in Photo Booth app on your Mac.
How to Take a Picture on Mac Using the Photo Booth App
For those who are unfamiliar, you don’t need to go to System Settings on your Mac to enable the FaceTime HD camera or webcam. You can automatically use it once you open the FaceTime app or other supported video conferencing apps such as Facebook Messenger, WhatsApp, and others. You will know that the webcam has been activated when a green light flashes beside it.
Time needed: 1 minute
Follow the steps below to take a picture using the Photo Booth app on your MacBook.
- Open the Photo Booth app.
- Click either the group photo or single photo icon on the lower-left side of the screen.
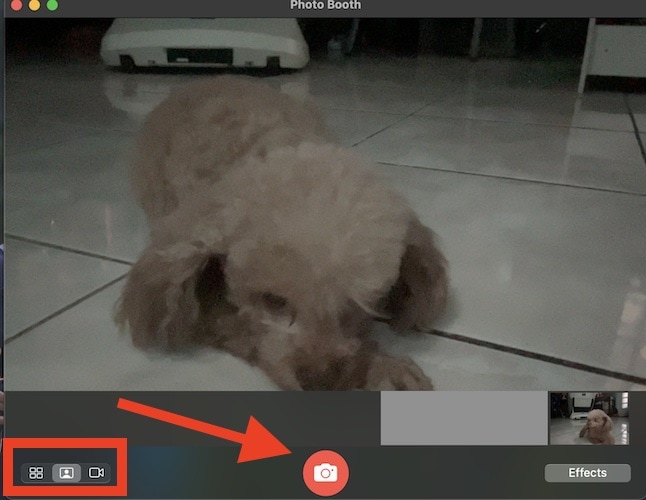
- On the opposite side, you can also choose to add effects.
- Click on the camera icon to take a picture.

To save the picture on your MacBook, simply right-click on the thumbnail on the lower-right side of the screen, then select Export from the context menu. Click Save after naming your picture and choosing where to save it on your Mac.

Alternatively, you may want to directly share the picture you took using the webcam via AirDrop or other apps. You can do so by clicking on the Share icon at the bottom of your Mac’s screen.
Bonus Tip: How To Take a Picture on Mac Using the Continuity Camera Feature
That’s how easy it is to take a picture on your Mac using the Photo Booth app. However, you should note that the quality of pictures that you take using the FaceTime HD camera won’t be as good as, say, on your iPhone. That’s because the webcam is not meant for taking high-quality pictures. If you just want to have fun and take random pictures of yourself and other people, the FaceTime HD camera is good enough, especially if you apply the built-in effects.
But if you want to take better-quality pictures of yourself or other people while on a FaceTime call, you can use the Continuity Camera feature on macOS Ventura. Using this feature, your iPhone is used by your MacBook as a webcam; it will take the picture. And since the iPhone has a better camera than your MacBook, the pictures will have higher quality.
We previously featured a step-by-step procedure for disabling the Continuity Camera feature on macOS Ventura. You can learn how to enable it by following the same steps but choosing to toggle on the feature instead of toggling it off.


