
I thought it was normal for my Wi-Fi to work smoothly until I received the “Wi-Fi not configured on Mac” error message. The internet is an integral part of our lives, and not being able to configure your Wi-Fi network can be frustrating. I was able to explore some troubleshooting steps that helped me fix this problem, and I will be sharing them with you in the subheadings below.
Basic Solutions To Fix Wi-Fi Not Configured on Mac
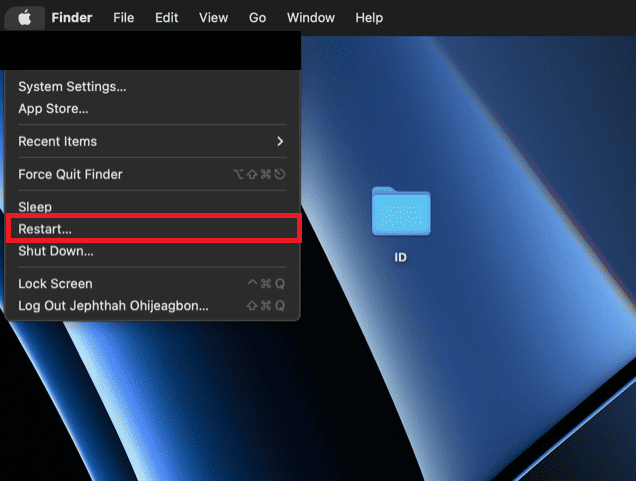
- Reboot Your Mac: It’s often said that rebooting can solve almost any issue on a device. Try rebooting your Mac to fix this error. To reboot your Mac, click the Apple menu icon > Restart.
- Wi-Fi connection to the wrong Hotspot: Errors can occur if your Wi-Fi is connected to the wrong hotspot. Ensure that your Wi-Fi is properly connected to the intended hotspot. Wi-Fi issues may also arise from nearby networks without internet access. If you see the Wi-Fi symbol with an exclamation point, it indicates a connection to your router but a lack of the necessary DNS handshake from your provider.
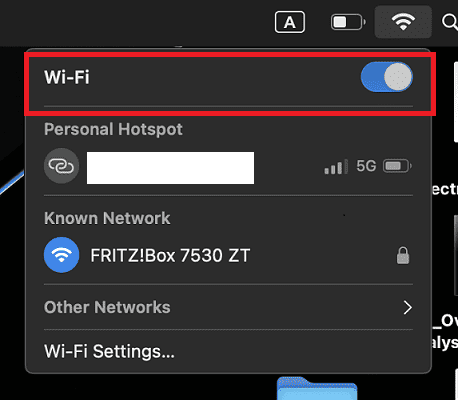
- Switch off Wi-Fi and Switch on after 30 Seconds: Toggle the Wi-Fi logo at the top right corner and click it afterward.
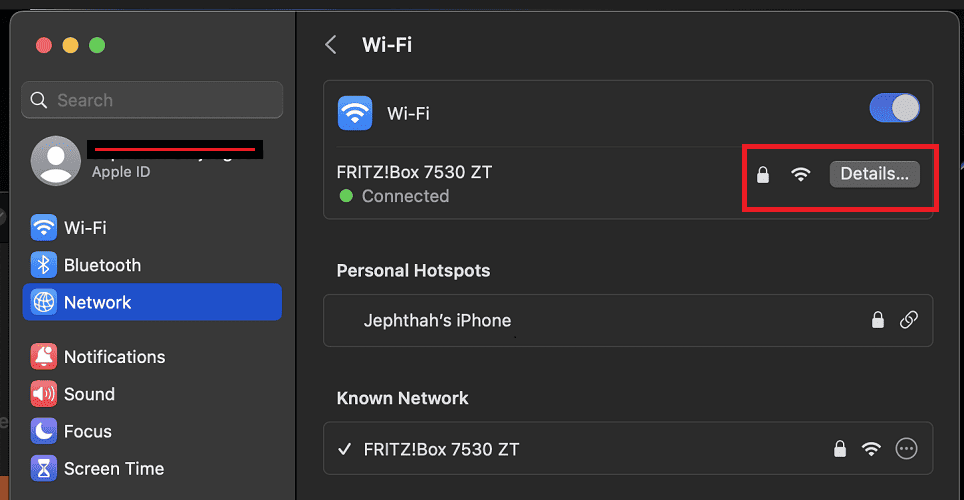
- Forget Wi-Fi and connect again: For macOS Ventura or later: Go to System Settings > Wi-Fi > Select Details for the Wi-Fi network you are using, then choose Forget This Network. Connect after 30 Seconds.
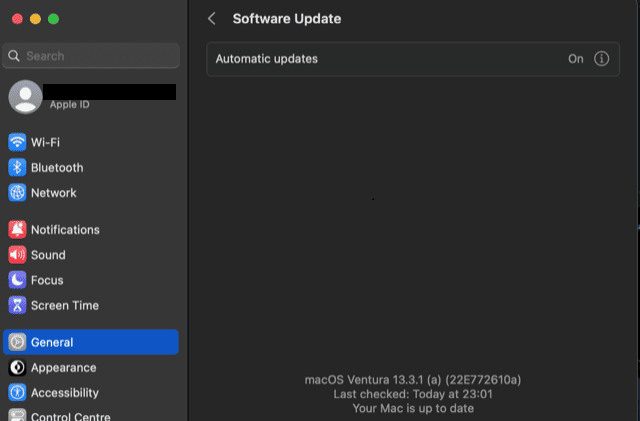
- Update to the latest software: If updates are available for your Mac, these may contain fixes that can help resolve Wi-Fi-related issues. By updating to the most recent version of your operating system, you will improve overall system performance, which can effectively address various Wi-Fi-related issues on your Mac. Keeping your software up-to-date ensures you have access to the latest features and optimizations, providing a smoother and more reliable Wi-Fi experience. To update your Mac to the latest software, go to Apple Menu > System Settings > Software Update.
- Check the hardware creating your Wi-Fi signal: Whether you are using a router, MiFi, or connected to your iPhone or Android hotspot, you can resolve Wi-Fi issues by ensuring that the hardware generating your Wi-Fi signal is in good condition. If there is no obvious problem with your router, MiFi, or iPhone, turn the hardware responsible for your Wi-Fi signal on and off.


If these basic checks do not resolve your Wi-Fi issue, you may want to try the following more advanced troubleshooting steps to address your “Wi-Fi not configured” issue.
How Do I Fix Wi-Fi Not Configured on Mac?
1. Renew DHCP Lease.
If you get your IP address automatically, you can make your computer get a new IP address. Sometimes, this can fix problems with your internet.
Time needed: 1 minute
Here’s how to renew the DHCP lease on your Mac:
- Click the Apple menu at the top left corner of your screen.
- Click System Settings.

- After that, click Network. On the right side, click the internet connection that needs a new IP address. Then, click Details.
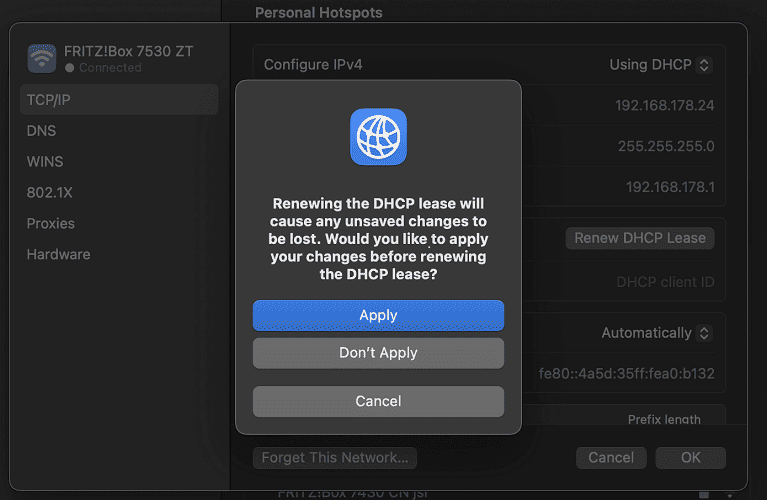
- Next, click TCP/IP, and you’ll see an option that says Renew DHCP Lease.
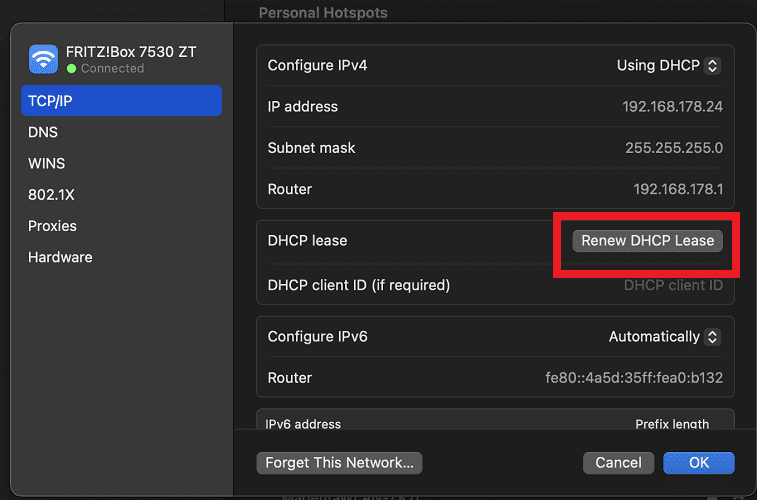
- Finally, click apply and follow the onscreen instructions. This should get you a new IP address.


2. Restart Your Mac in Safe Mode
Restarting your Mac in safe mode can help resolve Wi-Fi connection issues. Firstly, you need to know that starting up an Apple silicon MacBook in safe mode is different from starting up your Intel-based MacBook in safe mode.
Check out my article to find out if your macOS computer uses an Apple Silicon or an Intel processor.
2.1 How To Start My Mac With Apple Silicon in Safe Mode
- Click the Apple menu and choose Shut Down.
- Wait until your Mac is completely off. When the screen is black, and the lights are off.
- Press the power button until Loading Startup Options” appears on the screen.
- While choosing an option, press and hold the Shift key and click Continue in Safe Mode.
Your computer will restart. Once it’s ready, you’ll see “Safe Boot” in the menu bar at the top.
2.2 How Do I Restart My Intel-Based Mac in Safe Mode
- Start or restart your Mac.
- Hold the Shift key until the login page appears.
- Log in, and you’ll notice Safe Boot in the menu bar on either the first or second login window.
If this problem persists try the steps below.
3. Reset NVRAM
To reset NVRAM for Intel-based Macs:
- Turn off your Mac.
- Find the Option, Command, P, and R keys.
- Turn on your Mac and immediately press and hold these four keys.
- Keep holding them for about 20 seconds, then let go.
- Your Mac will restart. Test to see if the problem is resolved. Otherwise, try the process below.
Macs with Apple Silicon processors do not support NVRAM resets due to differences in logic board architecture. NVRAM settings are likely integrated into the processor, so a simple shutdown or restart is all that’s needed instead.
4. Reset SMC
4.1 Resetting the SMC on Your Mac Laptop With Apple T2 Chip
- Shut down your Macbook.
- On your keyboard, press and hold the following keys: Control on the left side, Option on the left side, Shift on the right side.
- While holding these three keys, press and hold the power button. Your Mac may briefly turn on during this step.
- Continue holding all four keys (Control, Option, Shift, and the power button) for 7 seconds.
- After 7 seconds, release all four keys.
- Wait a few moments, and then press the power button to turn on your Mac.
4.2 Reset SMC for Apple Desktop With T2 Chip
- Shut down your Mac.
- Unplug your power cord. After 15 seconds, plug it back in.
- After 5 seconds, press the power button.
4.3 Reset SMC for Macbooks With Apple Silicon
- Plug your Mac into a power source.
- Choose one of the following options:
- Restart: Click Apple menu > Restart.
- Shut Down: Click Apple menu > Shut Down, then press the power button to restart your Mac.
No further steps are needed for Macs with Apple silicon.
4.4 Reset SMC for Older Macs Without Apple Silicon or the T2 Chip
Reset SMC For Older Mac Laptops
- Shut down your Mac.
- Press and hold Shift, Control, Option, and the power button on your keyboard.
- Keep them held for 10 seconds.
- Release all keys, then press the power button to restart.
Reset SMC For Older Mac desktops
- Shut down your Mac.
- Unplug the power cord.
- Wait 15 seconds, then plug it back in.
- After 5 seconds, press the power button.
With these troubleshooting tips, you should be able to resolve the ‘Wi-Fi not configured on Mac’ error message. Sometimes, the issue with your Wi-Fi is that it hasn’t been properly configured. Here’s how to configure Wi-Fi on your Mac.
How Do I Configure Wi-Fi on My Mac?
You can connect your Mac to Wi-Fi, whether it’s a public network or a hidden one. For public networks, simply choose and enter the password, while hidden networks require you to provide network details before connecting.
Joining a Public Wi-Fi Network:
- Click the Wi-Fi icon in the Mac menu bar.
- Select your desired network from the list.
- If the network isn’t visible, click “Other Networks” to find nearby options.
- If prompted, enter the network password, then click “Join.”
Joining a Hidden Wi-Fi Network:
- Gather the hidden network’s name, security protocol, and password.
- Click the Wi-Fi icon in the Mac menu bar.
- Choose Other Networks and select Other at the bottom.
- Enter the network name in the Network Name field.
- From the Security menu, pick the wireless security type used by the network.
- Fill in any additional required information like username and password.
- Click Join to connect.
Conclusion
In summary, encountering “Wi-Fi not configured on MacBook” can be frustrating, but you can resolve it by following troubleshooting steps like reconfiguring Wi-Fi, renewing the DHCP lease, starting in safe mode, resetting NVRAM, and resetting SMC. Connecting to Wi-Fi, whether public or hidden, is straightforward as explained in this guide. Properly configuring Wi-Fi on your Mac is crucial for a smooth internet experience.
Check Andrew Orr’s guide to learn How to Use This Keyboard Shortcut to View Wi-Fi Details on Mac. Have you managed to resolve the “Wi-Fi not configured on your MacBook” error message? Please share your troubleshooting tips in the comment section below.


