
If you ever have a problem with your Mac and cannot get it working through the normal methods, it might be time to try booting your computer from a USB drive such as a clone or other backup. Learning to boot my Mac from my USB has saved me from a lot of hassles. I prepared this guide to help you understand why you need learn how to boot macOS from USB, how to get installation files for any version of macOS, how to create a bootable USB installer, and how to boot your Mac through a bootable USB drive.
Why Do You Need to Boot Your macOS From USB?
It is very important to know why you may need to boot your macOS from a USB drive before you learn how to do so. If you are already familiar with the advantages of booting your Mac from USB, skip this subheading and learn how to get an installation file that you will use to create a bootable installer.
Don’t miss the best of The Mac Observer
Set us as a preferred source and our Apple reporting ranks higher in your Google Search results and Discover feed — one tap, no account changes.
- When your Mac cannot boot: The most important reason is when your macOS undergoes a technical issue that prevents it from booting. By having a USB drive prepared for this situation, you can easily solve the problem.
- For installations on several Mac devices: if you are looking to install macOS on several devices, booting from USB will be the most convenient thing to do.
- To enjoy a modern Mac experience: You may need to boot from USB if you would like to have a modern version of macOS. This might allow you to enjoy a wider range of modern applications that may not be compatible with the Mac.
- Fix errors, and remove viruses from a Mac: Installation of a new OS from scratch can fix errors, remove viruses from a Mac device, and create a user-friendly experience devoid of unnecessary problems. Is there an outdated application that would not work on your modern version of macOS? You can boot from a USB device to have access to it.
- Experience and compare macOS versions: Booting from USB will allow you to experience and compare any macOS version available in the market. If your Mac is becoming slow and unresponsive, booting from USB can help you enjoy a faster experience.
How Can I Get Installation Files To Create My Bootable USB Installer?
First, I would like to explain what I mean by a “bootable installer.”
A bootable installer simply refers to a USB device with all the required installation files necessary to run a version of macOS. It can contain any version of macOS found here. macOS Ventura and macOS Monterey are the two most recent versions of macOS as of this writing. The installation files for macOS Ventura are about 14GB, and it will need free space of about 45GB to install.
What Do You Need To Create a Bootable USB Drive?
For a USB device, please use a standard USB drive on which the capacity is accurately labeled. I use SanDisk drives, and they work fine. You will need to get a USB device with a lot of space on it. Your USB drive should have at least 16GB of free space.
Also, please back up the information available on your USB device on another USB or in a folder on your device. This is because the process you are about to embark on will automatically delete every file on your USB device. If you can get a new USB-3 device for this purpose, it is faster and offers better efficiency. You will also need the installation files for the macOS version you are looking to install on your USB drive.
In case your USB device needs to be formatted on your Mac, follow the steps below; otherwise, skip to the next subheading.
How to Format USB Drive on Mac
- Insert your USB Drive into the USB port.
- Click on Finder on the desktop or home page.
- Under Finder, click on Applications > Utilities > Disk Utility.
- Click on your USB Drive on the displayed list.
- Select Erase from the options available at the top bar.
- Rename the USB with a suitable name.
- Select the APFS format and click on Done to format.
- Once the process is complete, click on Done.
These processes will help you have an empty USB in the required format, APFS. This is exactly what you need to create your bootable USB installer.
You might also be interested in how to format a drive With GUID for macOS Ventura.
How To Get an Installation File From Previous Software Updates
Although many people may think that a previous update doesn’t provide access to the installer files, I’m here to tell you that you can access the installer file from a previous update by following the steps below:
- Navigate to System Settings and click on General.
- Under the General page, click on Software Update.
- It will prompt your device for an update, if there is any, select the Update Now option.
- After the update, check your Applications folder for an installation file.
You will find an installation file in the Applications folder and you can use your new installation file for future needs.
How To Get an Installation File if You Are Using an Older Version Of macOS
On older versions of Mac, you can get the installation files in your App Store account. Your App Store contains a list of all the installers you’ve purchased in the past. This method should work for you if you’re using any version between macOS X Cheetah (10.0.4) and macOS X Snow Leopard (10.6.8).
How To Create an Installation File if You Are Using a Newer Version of macOS (Ventura)
The official website of Apple is there to help anyone with a more recent version of macOS get an installation file. You can do this on any macOS version from Lion 10.7 to the latest Ventura 13.
- Click on your macOS version on the official website

- Click on Get.

- Click on Download.

- After the Download, minimize the App Store
- Go to the top bar on the home page and click on Go > Applications

- In the application folder, you will see a file labeled Install macOS Ventura. Click it and save it to another folder.

Now that you have everything you need to create a bootable USB installer, including your installation file and an empty USB device, you can create your bootable USB installer from your terminal by following the steps below.
How To Create USB Bootable Installer?
- Insert your empty USB device into your USB port (USB-2 or USB-3 device will work fine).
- Rename your USB device to MyVolume. You can do this by clicking on Finder on the home page. On the left-hand side, you will find locations. Under locations, you will find your USB device. Right-click and scroll down until you find Rename. Click on rename and replace your default USB name with MyVolume. This step is optional, especially if you won’t find it hard to replace MyVolume with your default USB name in the command you will type on your terminal.
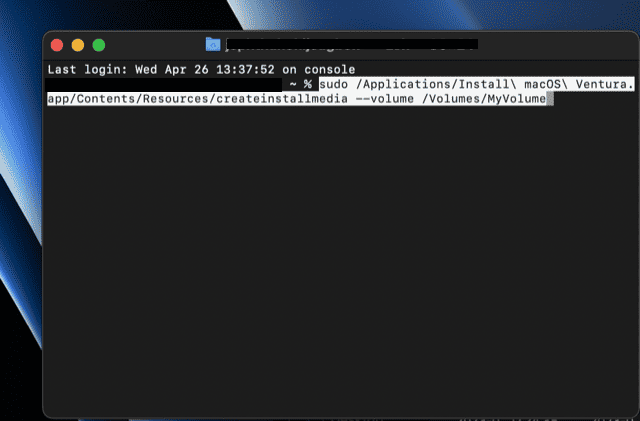
- Navigate to Desktop Page > LaunchPad > Terminal. Find Terminal by searching for it .


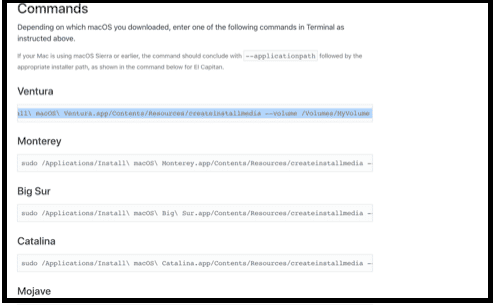
- Copy and paste or type the command from here into your terminal.


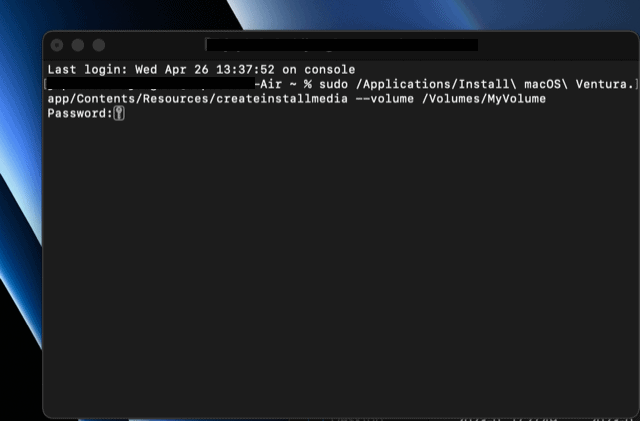
- Type your administrator password and press return after it prompts you to input your administrator password. Note that the terminal will not display your password on the screen in case you are concerned about the privacy of your password.

- When prompted, type Y to confirm that you agree to permanently delete the files on your USB drive or volume. You do not need to worry about this, as we have already advised you to back up the files on your USB if it is not a new flash drive.
- After you delete all files on your USB flash drive, you will see an alert message asking you to grant permission for the terminal to access the files on your USB. Grant permission by clicking OK. After this, the terminal will start preparing your bootable USB installer.
- Close your terminal and eject your USB device for safe removal after your terminal has finished preparing your bootable USB installer. It’s worth noting that your USB drive will be automatically renamed by this process.
How Do I Force My Mac to Boot From a USB?
Now that your bootable USB installer is ready, you’re ready to boot your Mac. However, you need to find out if your Mac uses an Apple Silicon or an Intel processor. Mac devices using Apple Silicon look nearly identical to those using Intel processors. Devices with Apple Silicon are the most modern; the transition from Intel processors to Apple Silicon began toward the end of 2020. If you already know this, skip the next subheading and learn how to boot your Mac from your USB. Please check the FAQ at the end of this page to learn how to check if your Mac device uses Intel processor or Apple Silicon.
How to Boot macOS From USB
Time needed: 10 minutes
How to Boot macOS From USB Using Apple Silicon
- Insert your bootable USB flash drive into your macOS device. Make sure that your internet is connected. Note that this installation does not need the internet to download macOS because you have your macOS installation file on your USB device. The internet connection will grant access to information peculiar to your version of Mac. The internet will also automatically get firmware that is useful for the successful completion of the process.
- Switch on your Mac device with the Power Button and do not stop pressing the power button until you see a window that displays a list of drives connected to your Mac. The list may also include other volumes or storage devices connected to your Mac.
- Click on your USB device with your already prepared bootable installer. Select Continue and wait for the macOS installer to open.
- Simply follow the straightforward instructions that appear on the screen to boot your Mac from USB
How To Force Mac to Boot From USB on macOS (Using Intel Processor)
- To start, plug your USB flash drive into your Mac device. Make sure your internet is connected to your Mac, but note that downloading macOS doesn’t require an internet connection because your USB device already has the installation files. However, you will need an internet connection to access information specific to your Mac version and to download the firmware required for the process.
- Next, turn on your Mac device using the power button. Press and hold the Option or Alt button until a dark screen appears displaying a list of USB drives and other storage devices connected to your Mac.
- Choose the USB device with the bootable installer you have prepared. Use the onscreen arrow to select it, then press the Return or Enter button.
- Select your preferred language from the list that appears.
- The utility window will appear on the screen. Click on Install macOS and select Continue.
- Follow the on-screen instructions to boot your Mac from USB. It’s easy!
FAQ on How to Boot macOS From USB
Check your macOS menu bar and select the Apple logo.
A drop-down menu will appear on the screen. Click on About This Mac.
Check the label displayed on the screen. If your Mac uses Apple Silicon, the item displayed will be labeled “Chip”. Otherwise, it will show an item labeled “Processor”. 
The processor label will show that your Mac uses an Intel processor.
Some other important details about your Apple Silicon or Intel processor will also be displayed. These will help you know if it’s Core i5, i7, M1 chips, or M2 chips.
Aside from using this info for booting your macOS from USB, it can also help you know about your battery health, performance efficiency for heavy-duty, and processing speed.
If your Mac is not booting from USB, you may need to check the paragraph below:
Ensure that you firmly connected your flash drive to the USB port. Use a different USB port if the previous one has an issue. Create a new bootable drive. Shut down and reboot your Mac, if its using an Apple Silicon processor. If your Mac uses an Intel processor, reset the SMC, NVRAM, and PRAM. Also, check whether your macOS is compatible with the macOS on your bootable installer.
The primary difference between a bootable USB drive and a regular USB flash drive is that a bootable USB drive contains files that enable you to boot your computer, while a regular USB flash drive does not. A bootable USB drive is specifically designed to boot your computer with the necessary installation files stored on it.
Summary
To successfully boot your Mac from USB, simply follow the steps mentioned in this guide to get your installation files, then create and boot from the USB device.
- Get your installation file.
- Create a bootable USB drive.
- Boot your Mac from the USB device.
Final Thoughts
Whether you’re installing an operating system on multiple Mac devices or seeking to upgrade your device’s performance, learning how to boot from a USB can prove invaluable. By following the steps outlined in this guide, you can experience the full potential of various versions of macOS, whether you want to explore old applications or enjoy the latest features. So, take the time to learn how to boot your Mac from a USB, and unlock its full potential.
Check out Jeff Butts’s article on how to install FUSE on Mac. Did you know that you can reboot your Mac using a keyboard shortcut? It’s possible! Also, you can learn more about booting your M1 Mac device. Want to keep your Mac clean? Learn about uninstallers for removing apps from your Mac. We have a long list of informative articles that will help you enjoy a seamless experience with your Mac device.


Boot from USB or from Thunderbolt for the ultimate speed. And specially useful to boot Macs at work and home from the very same external disk. The Mac in your pocket.
Great Remark, thanks for your comment Macsee