
Formatting your drive the right way is key to making sure your macOS system works well. Today, we’re going to talk about GUID (Globally Unique Identifier) formatting for macOS Ventura and why it matters for your drive.
What is GUID and Why is it Important for macOS Installation?
GUID is a way of organizing the data on your hard drive. It’s better than the old system (MBR) because it can handle much bigger hard drives – up to a crazy big size, and it can create lots of partitions. Plus, it’s better at protecting your data, making it easier to recover if your drive crashes.
Don’t miss the best of The Mac Observer
Set us as a preferred source and our Apple reporting ranks higher in your Google Search results and Discover feed — one tap, no account changes.
What Is the GUID of a Hard Drive?
The GUID of a hard drive is a unique code that shows how the drive is divided into different sections (partitions) and what each section does.
What Format Is GUID?
GUID format refers to the GPT partitioning scheme, which is an advanced system that handles larger sizes and provides more robust data protection than its predecessor, MBR.
What Is the Best Format for a Mac Internal Hard Drive?
The best format for a Mac internal hard drive depends on the specific use case, but generally, “Mac OS Extended (Journaled)” or “APFS (Apple File System)” are recommended.
- Mac OS Extended (Journaled): Also known as HFS Plus, this file system is optimized for mechanical hard drives. If your Mac uses a Hard Disk Drive (HDD), this is typically the best choice. It is also the recommended format if your macOS version is older than High Sierra.
- APFS (Apple File System): Introduced in macOS High Sierra, APFS is optimized for Flash/SSD storage and provides strong encryption, space sharing, and improved file system fundamentals. If your Mac uses a Solid State Drive (SSD), or if you’re running macOS High Sierra or later, APFS is usually the preferred option.

Should I Use MBR or GUID for the External Drive?
With macOS Ventura, it’s best to use GUID for all drives, internal or external. It’s just better all-around, especially for larger drives.
What Is the Difference Between MBR and GUID?
MBR is old-school and only supports up to 2TB hard disks and four partitions. GUID is the new way to go, supporting huge hard drives and lots of partitions.
Should I Format SSD MBR or GUID?
Definitely format your SSD with GUID. It’s just better, no matter how big your SSD is. You might also be interested in how to securely erase your Mac’s SSD.
How Do I Format a Mac Hard Drive GUID?
Before formatting a drive with GUID, ensure you back up all your data. Always double-check you’ve selected the correct drive or partition before formatting. Finally, keep your macOS updated to ensure compatibility with the latest formatting protocols.
Time needed: 1 minute
Here is a step-by-step guide on how to format your Mac hard drive with GUID on macOS Ventura:
- Connect your external drive to your Mac then open Disk Utility.
- Click on View in the top-left corner and select Show all devices from the drop-down menu.

- Select the drive you want to format.
- Click on Erase, give the drive a name then change the format to exFAT or APFS.
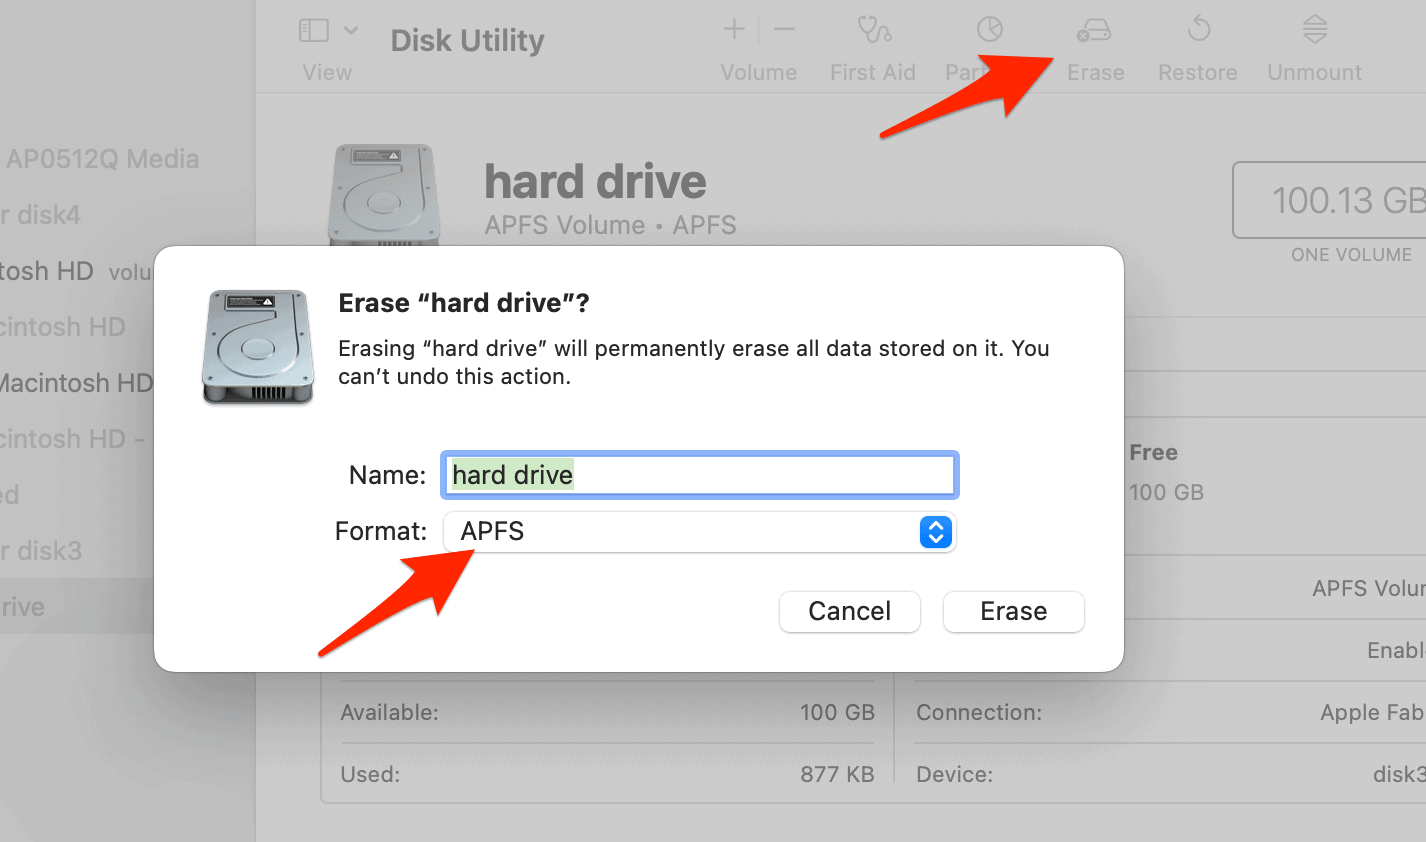
- Under Schemes, select GUID Partition Map.
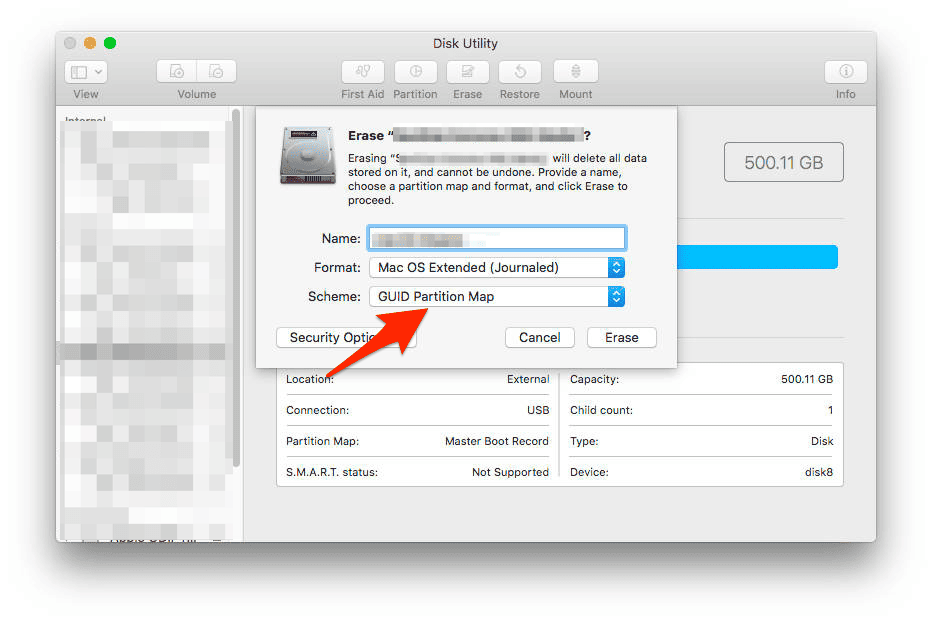
- Press the Erase button.
Your drive is now formatted with the GUID partition map scheme.
How to Fix Erase Process Has Failed
This error usually means something’s wrong with the drive. It could be because the drive is corrupted, physically damaged, or not connected properly.
- Try formatting the drive again: Sometimes, giving it another go works, especially if the issue was just a temporary glitch. Be sure to pick the right format and partition scheme.
- Switch up the scheme: If you were trying to format with a specific scheme (like GUID) and it didn’t work, try a different one (like Master Boot Record) and then switch back. This can help fix partition table problems.
- Try a different drive: If you keep getting this error, your drive might be failing. Test with another drive. If the error doesn’t show up on the new drive, then the first one might be damaged and need replacing.
How Do I Find the GUID of a Disk?
On a Mac, use Disk Utility to find a disk’s GUID. Select the disk, right-click, choose Get Info, and you’ll see the GUID in the Disk / Partition UUID section.

How Do I Find My Drive GUID?
To find your drive’s GUID on a Mac, you can use the same steps as finding the GUID of a disk, through Disk Utility: select the disk, right-click, choose Get Info, and you’ll see the GUID in the Disk / Partition UUID section.
For further reading, check out how to boot macOS from USB.
 NOTE
NOTE


YAY! Thank you for this!!! I had an external drive I erased/reformatted a few weeks back that was showing only HALF the capacity of it (it was completely empty). But here is the kicker I didn’t realize: Disk Utility only showed part of the drive. When I followed your instructions and went to VIEW and SHOW ALL, it showed ALL of it. I went to the main drive (not one in the drop down) and BAM! Done. full drive again! :). THANK YOU!!!!!!
I was trying to format an external SSD drive as a boot drive on a 2018 iMac using macOS 137.7. Ran into needing to change the boot record from MBR to GUID, but the Disk Utility erase menu didn’t show me the option to change the boot partition table from MBR to GUID. Turns out, Disk Utility was only showing me the logical volume, not the physical device. Turns out that selecting Show All Devices in the View menu showed me the physical device as well. Clicked on the physical device, then clicked Erase: and there is was, the mythical option to specify the partition table type.
Unfortunately Apple has removed the option for format scheme GUID Partition Table so you have to find an old version to format an SSD as a bootable drive. Very frustrating.
Who formats Mac drives as MBR other than thumb drives where you need compatibility with PCs or media players? Formatting Mac drives as GUID has been the standard for like 17 years now since the transition from PPC. There’s nothing Ventura-specific in this story copied and pasted from 2018. ?
We occasionally refresh older articles to provide the most up-to-date directions and/or screenshots. Whether you realize it or not, there are still folks seeking current instructions on formatting a drive with a GUID partition scheme. Thus this refreshed article.
I did this as you stated on an internal drive of a 2017 iMac, booted from a temp Mac OS High Sierra on an external drive. The internal drive got corrupted during an attempt to upgrade to Big Sur (from High Sierra and is formatted as APFS). Everything was previously saved by Time Machine onto another partition on the external drive. Doing what you suggest in the article Disk Utility just hangs with the msg ‘Erasing (“drive device description”) and creating “iMac Hardrive”, Nothing shows in the window after many minutes, with the progress bar showing nothing happening. Now what? Is the internal drive dead?
Hello Hilokid and sorry for the delayed reply. You may need to try deleting every partition on the drive using Disk Utility (from Recovery Mode) and then rebooting without creating a new partition yet. Reboot back into Recovery Mode and try to create a partition. If it still hangs then the drive is likely dead or dying.
Thank you, thank you, thank you! I recently upgraded to Catalina, and needed to reformat an external drive to APFS for my backup software to work with it. The partition command was grayed out, and I couldn’t for the life of me figure out why. Clicking View and selecting Show All Devices allowed me to see the drive I needed to convert.
THANK YOU!!!
i was having an issue but everywhere else i looked left out “show all drives.” that small step was all i needed to fix my issue thanks again
Jeff,
Thank you for this information. Like others, I spent a good amount of time chasing this down before finding your post. One would think that Apple would have this information noted someplace easily found. Good job!
Regards,
Andy
Thank you for this priceless tip. At last I found out about this extra layer of Apple Disk Utility being able to set GUID table on an SD-Card or USB stick. At last my MacBook Pro 7.1 mid 2010 is creating a bootable external drive with “Install macOS High Sierra” from the App Store, so that I can upgrade the internal disk to WD Blue 250GB SSD and make this machine whizz along with LibreOffice.
thank you
Thank you so much Jeff Gamet! I spent a good hour combing the internet and finally found this site and the tip you gave on how to get the scheme to show up via the view button really saved my hide on this one. Thanks again!