
If you run your business on a Mac, QuickBooks for Mac offers a powerful and familiar way to handle bookkeeping and accounting. It’s built specifically for macOS and designed for users who prefer desktop software that integrates smoothly with Apple systems while still offering the reliability of QuickBooks’ trusted accounting features.
Table of Contents
Installing and Using QuickBooks for Mac
Installation
Time needed: 15 minutes
- Go to the official Intuit website and download QuickBooks Desktop for Mac.
- Open the .dmg file, double-click the installer icon, and follow the instructions to complete setup.
- Launch QuickBooks Desktop for Mac, then sign in or register your license to start a new company file.
- Once installed, go to Help > Check for QuickBooks Updates to stay compatible with the latest versions of macOS.
 NOTE
NOTE
QuickBooks for Mac Initial Setup: Configuring Your Company File
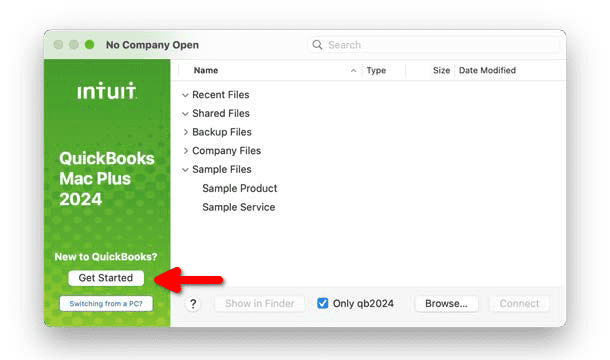
- On the menu bar, select File > New Company to create your business profile, or click Get Started.
- Enter details such as company name, start date, and fiscal year settings.
- Restore previous data if available by choosing File > Restore Company.
- Customize invoices from Lists > Templates—add your logo, set payment terms, and select preferred fonts or layouts.

Importing Bank Transactions and Linking Accounts
- In Banking, connect your bank or credit card account to automatically download transactions.
- Categorize downloaded transactions, confirm payees, and adjust descriptions where needed.
NOTE
Generating Key Reports
- Open Reports > Company & Financial > Profit & Loss Standard for income and expense summaries.
- Access Reports > Company & Financial > Balance Sheet Standard to view assets and liabilities.
- Adjust columns, filter dates, and export reports to Excel for deeper analysis.
- Save report templates to run the same layout each month.
Upgrading or Switching to QuickBooks Online
- If you want remote access or shared bookkeeping, consider QuickBooks Online.
- Use File > Utilities > Export > To QuickBooks Online to begin migration.
- Compare QuickBook plan options, complete the wizard, and review that data syncs correctly.
QuickBook for Mac: Tips
- Back up your company file via File > Back Up Company before updating macOS.
- Keep QuickBooks and macOS updated to prevent data errors.
- Use class tracking to monitor income and expenses for each department or project.
- Assign user permissions through Company > Users > Set Up Users and Roles.
- Optimize performance by using File > Utilities > Condense Data.
FAQ
The desktop version installs locally on your Mac and stores data offline. The online version works in the browser, making it easier to access from multiple devices. The desktop app feels more integrated with macOS, while QuickBooks Online prioritizes mobility.
Yes. QuickBooks Desktop Mac Plus 2024 supports both Sequoia and Tahoe, but only specific builds. Sequoia compatibility starts in version v23.1.4 R5.1, while Tahoe support begins with 23.1.9 R10.1.
QuickBooks Desktop for Mac typically supports up to three simultaneous users, depending on your license.
Yes. You can connect bank accounts, upload receipts, and integrate with select macOS banking apps and other compatible software, to streamline workflows.
Summary
- QuickBooks for Mac provides a reliable accounting solution built for macOS users who prefer desktop apps.
- Install the app, set up your company file, and automate banking or expense tracking.
- Check version compatibility before upgrading to macOS 15 Sequoia or macOS 26 Tahoe.
- Back up regularly and optimize company files to keep performance smooth.
- Consider QuickBooks Online if you need access across devices or shared editing.
If you’re a Mac user looking for dependable accounting software for macOS, that fits seamlessly into the Apple ecosystem, QuickBooks for Mac remains one of the most capable options. It combines the control of desktop bookkeeping with modern integration features, giving small business owners and freelancers a solid balance between usability and flexibility.


