
iPhone Error 2009 usually shows up during a restore or update and prevents the process from finishing. It often points to a connection failure between your iPhone and the computer, or interference from software running in the background.
While it can look serious, many users have solved it with simple, practical fixes. Below are the solutions that have worked reliably for others and me.
How to Fix iPhone Error 2009?
1. Check the USB Cable and Port
One of the most common reasons for Error 2009 is a faulty or non-certified USB cable. A weak or unstable connection interrupts the restore process and causes iTunes or Finder to stop.
- Using an Apple-certified Lightning or USB-C cable makes a big difference.
- Plugging directly into the computer instead of a hub also reduces the chances of failure.
- If the error continues, try a different USB port or even another computer to see if the issue disappears. Replacing the cable also works for iPhone Error 53.
2. Enter DFU Mode and Restore
DFU (Device Firmware Update) mode goes deeper than regular recovery mode and forces your iPhone to communicate directly with iTunes or Finder. Many users find that entering DFU mode allows the restore to complete without triggering Error 2009.
- Connect your iPhone to your computer using an Apple-certified Lightning or USB-C cable.
- Open Finder on a Mac (macOS Catalina or later) or iTunes on Windows or older macOS.
- Depending on your iPhone model, follow the correct button sequence to enter recovery mode.

- On your computer, Finder or iTunes will show a message that it has detected an iPhone in recovery mode.
- Choose Restore iPhone or Update iPhone depending on whether you want to reinstall iOS with or without erasing your data.

3. Restart both the iPhone and the Computer
It may sound simple, but many users report success after restarting both devices. A fresh start clears out background processes that may be interfering with the connection.
Restarting the computer ensures iTunes or Finder is reloaded properly, while restarting the iPhone resets its communication channels. Together, this often helps complete the restore without errors!
4. Update or Reinstall iTunes or Apple Devices App
Outdated or corrupted software on your computer can trigger Error 2009 during a restore. Keeping iTunes updated on Windows or ensuring macOS is running the latest version gives your device the best chance of connecting smoothly.
Updating iTunes also helps fix iPhone Error 9.
If updates do not help, reinstalling iTunes or the Apple device drivers can refresh the connection and solve the error.
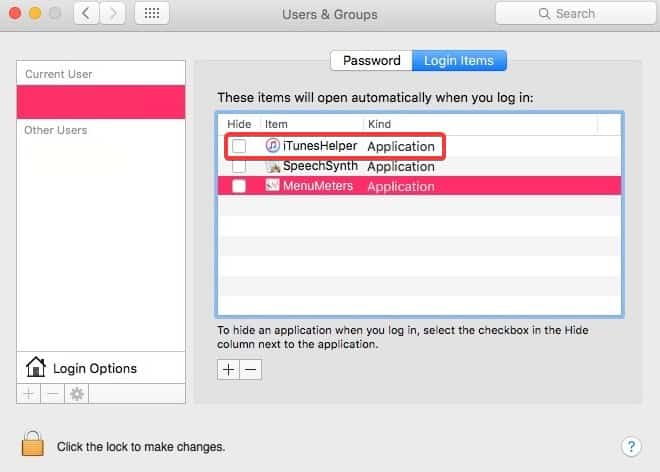
5. Disable iTunes Helper
iTunes Helper is a background program that launches automatically with your computer. In some cases, it interferes with the restore process and causes Error 2009. Removing iTunes Helper from startup items prevents it from running in the background while you restore.
- On Mac: System Preferences > Users & Groups > Login Items > remove iTunes Helper.
- On Windows: Run Task Manager > Startup apps > select iTunes Helper > click on Disable.
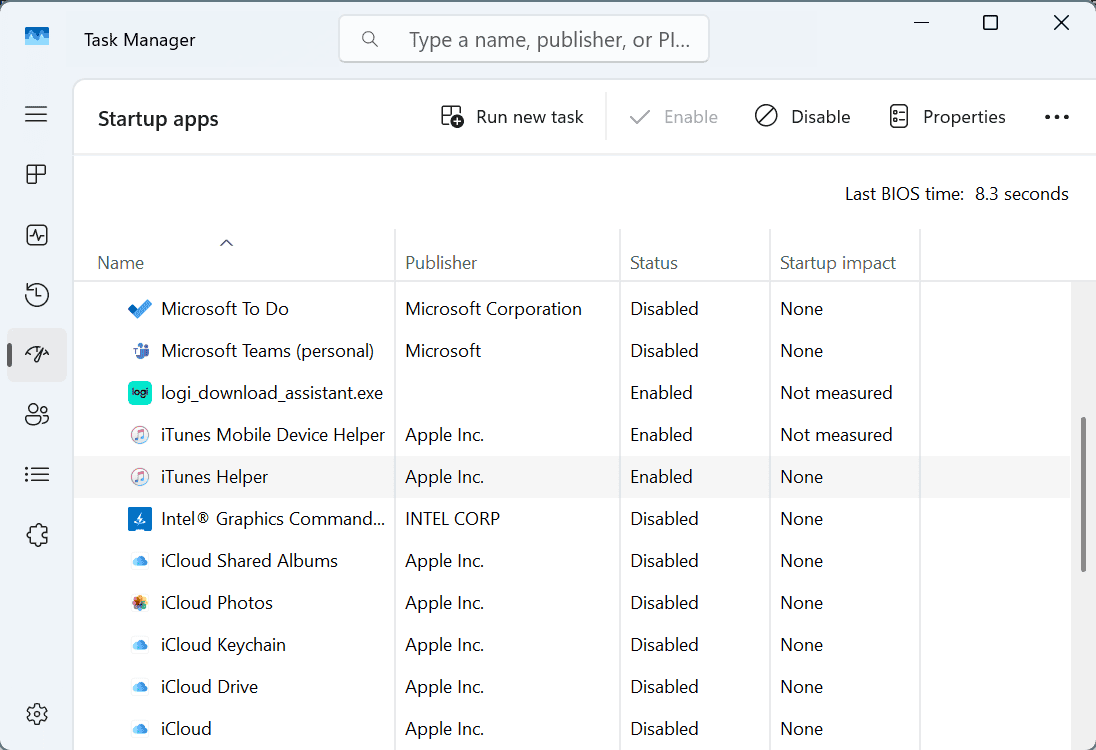


Users found that turning off this helper process stops unwanted interruptions.
6. Disable or Update Antivirus Software
Security software can block the communication between your iPhone and Apple servers during a restore. Temporarily disabling antivirus or firewall programs has helped many users solve Error 2009. Once the restore is complete, you can turn the software back on to stay protected.
If you prefer not to disable, updating your antivirus to the latest version may also solve the issue without completely switching it off.
7. Use a Special iOS Repair Tool
If none of the standard solutions work, several iOS repair tools have been designed specifically to fix restore errors like 2009. These programs help bypass errors by rebuilding parts of iOS that may be corrupted.
For users who want to avoid losing personal files, this is often a safe last resort before going to Apple Support.
Tips
- Always back up your data before attempting a restore.
- Use certified Apple accessories rather than cheap alternatives.
- Connect your iPhone directly to your computer, not through hubs or adapters.
- If you try DFU mode, keep the phone connected and follow the steps carefully.
- Test the restore on another computer if the error repeats.
Frequently Asked Questions
It is usually caused by unstable USB connections, outdated iTunes, interference from antivirus programs, or corrupted iOS software.
Yes, DFU restore will erase everything on the device. If you want to keep your data, try updating in recovery mode first or use a repair tool that offers no data loss options.
Absolutely. Many users solved Error 2009 instantly after switching to a genuine Apple cable or trying another computer.
If all fixes fail, the issue may be hardware-related. In that case, visiting Apple Support is the best option to check for deeper problems.
Summary
- Replace the USB cable or switch ports and computers.
- Try restoring in DFU mode for a deeper repair.
- Restart both the iPhone and the computer.
- Update or reinstall iTunes or Apple software.
- Disable iTunes Helper from startup.
- Temporarily turn off or update antivirus software.
- Use iOS repair tools that prevent data loss.
Conclusion
In most cases, you can fix iPhone Error 2009 by testing different connections, trying DFU mode, and removing potential conflicts like antivirus software or iTunes Helper.
If all else fails, iOS repair tools or Apple Support can help you get your iPhone running again without permanent issues.


