
It’s pretty easy to clean your DNS cache using macOS, and there’s a couple of reasons why a user may need to do this. I’m going to explain what DNS cache is, why a user may want to clear it, and also show how to perform this task using virtually any version of macOS. Following the steps is rather simple, though users will be exclusively using the terminal.
DNS, or Domain Name System cache is a user’s record of all queries made to a DNS server from a web browser. When a user inputs a URL into their browser, this sends a request to a DNS server to ask for the IP address for the URL. Your browser will then load the website after receiving the IP address. Your computer then keeps a copy of these records. Therefore, flushing your DNS cache clears IP addresses as well as other DNS records.
Why Should I Flush My DNS Cache?
There’s a couple of reasons why a user may want to delete their DNS cache. Primarily, users will delete it if they were tinkering around with certain files. However, clearing your DNS cache can also be useful for security purposes. For example, bad actors can attack your machine and gain access to your DNS cache. You may know this is occurring if your browser continues to redirect you to fraudulent websites.
In other cases, clearing your DNS cache is also useful for regaining access to certain websites. If a website recently moved to a new domain name, your computer may not update the information right away, and you may see a 404 error for that website. However, clearing temporary files and cookies is typically an easier solution for this.
Additionally, clearing your DNS cache can also be useful for privacy. Considering this cache is essentially a ledger of the websites you visit, flushing your cache can keep this information away from bad actors or data collectors.
Quick Tip:
Besides using your macOS to clear your DNS cache, many cleaning apps can help you erase cache more extensively. For instance, Intego ONE caught our attention a while ago because of its capability to delete cache files, temporary files, duplicate files, and many more, optimizing the macOS with a single click.
Clear Your DNS Cache within macOS Ventura and macOS Monterey
To clear your DNS cache in macOS Ventura and macOS Monterey, you’re going to be using terminal to accomplish this.
Time needed: 2 minutes
How to clear your DNS cache in macOS Ventura and Monterey
- First, open your terminal. You can most likely find it within the Utilities folder.
You can also find your Terminal through Spotlight by pressing Command + Spacebar. Type ‘Terminal’ into Spotlight and select it.
- Within Terminal, copy and paste the following command into the command line:
sudo dscacheutil -flushcache; sudo killall -HUP mDNSResponder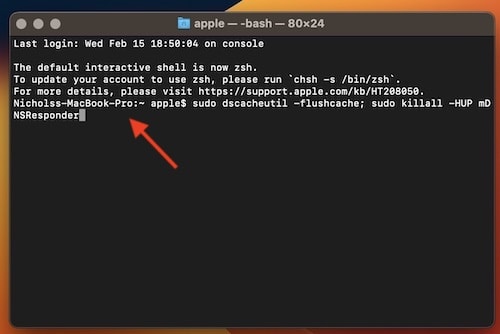
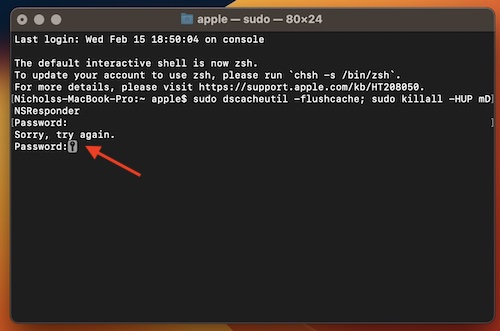
- Hit Return. You will be asked for for the admin password.
Enter the password and hit return again. (Note that Terminal will not show your password.)
- While the Terminal will not report anything, your DNS cache will be cleared and wiped clean.
You can now quit the Terminal.
And that’s all there is to it! One simple command in Terminal will flush-out your DNS cache. For those using older versions of macOS, the command is different. For the following versions of macOS, you can follow the same steps as above, but replace step two with the following commands:
- macOS Lion, Mountain Lion, Maverick, El Capitan, Sierra High Sierra and Mojave:
sudo killall -HUP mDNSResponder - Yosemite: sudo discoveryutil mdnsflushcache
- Tiger:
lookupd -flushcache
Moreover, check out how to clear browser cache on Mac for Chrome, Firefox and Safari.
Conclusion
Flushing your DNS cache on a regular basis can be a good idea for privacy and security purposes. If you are having issues visiting certain websites, or are just looking for an additional element to protect your computer from phishing and other security attacks, it may be a good idea to clear your DNS cache. Fortunately, it’s as simple as going to your Terminal and entering a command.
Following the steps above, this method can ensure that you have a clear DNS cache. Be sure to remember to use the right command for whatever version of macOS you are using. Other than that, following the steps should be rather simple. If you haven’t flushed your DNS cache in awhile, it may be a good idea to do so.


