
Perhaps one of the most frustrating errors you might encounter when installing macOS Ventura is the installer 702 message. This roadblock to your upgrade is particularly troublesome because there’s no clear-cut explanation for it. Nevertheless, there are several troubleshooting steps that can help pinpoint what’s getting in the way of the installation. Let’s walk through them.
macOS Ventura Installer Error 702: An Oldie, and a Baddie
This particular installer 702 error code isn’t new or unique to macOS Ventura. In fact, this error has been bringing upgrades to a screeching halt since at least as far back as OS X 10.11 El Capitan, trying to upgrade to macOS 10.12 Sierra.
The full error is usually “The operation could not be completed: (com.apple.OSInstallerSetup.error error 702),” sometimes not appearing until you think the installation is almost complete. From various reports on Apple Support Forums and other sources, the culprit behind the error can be one of a number of things.
- Incompatible Mac computer.
- Insufficient disk space.
- Disk corruption.
- A corrupted macOS installer.
- A configuration file from a Multi-Device Management (MDM) profile prohibiting the installation.
Troubleshooting the 702 Error
Whenever an installation error appears, you’ll usually want to start with the simplest possible fix first. This will be making sure your particular Mac is compatible with macOS Ventura.
According to Apple, the following models are able to run macOS Ventura.
- 13-inch MacBook Pro (2017 or later)
- 15-inch MacBook Pro (2017 or later)
- 14-inch MacBook Pro (2021 or later)
- 16-inch MacBook Pro (2021 or later)
- MacBook Air (2018 or later)
- 12-inch MacBook (2017)
- iMac Pro (2017)
- All other iMac computers released in 2017 or later
- Mac mini (2018 or later)
- Mac Studio (2022)
- Mac Pro (2019)
Next, you’ll need to make sure the error isn’t caused by an MDM configuration restriction.
How to Know If an MDM Configuration Profile Is Behind Error 702
If the Mac you’re trying to upgrade to macOS Ventura is corporate-owned, there’s an excellent chance it’s managed by an MDM service like JAMF. If this is the case, you have little recourse but to contact your technical support department for assistance.
That being said, if you have the required privileges to modify the configuration profile, here’s what you should look for.
- In JAMF, locate Configuration Profiles> Media.
- Under Recordable Disks, uncheck Require Authentication.
- Reboot the Mac and retry the installation.
Ensure Your Mac Has Sufficient Disk Space
Next, you’ll want to make sure your Mac has plenty of space for the installation. If you’re upgrading from macOS Sierra or later, you will need at least 35GB of free space on your drive. For upgrades from earlier versions of the operating system, you need at least 44GB of free space.
To check for sufficient free space on your drive, follow these steps.
- Click the Apple logo from the menu bar.
- Click About This Mac.
- Click Storage > Manage.
- If your drive doesn’t have the required free space, check the desired options to free up room for the installation.
Once that’s done, you can retry the macOS Ventura installation and hopefully proceed past the 702 error.
Make Sure Your macOS Ventura Installer Isn’t Corrupted
From time to time, problems can happen while downloading the macOS Ventura installation package that cause it to become corrupted. When this happens, you will need to download the potentially corrupted file and then re-download the installer.
- Open Finder > Applications.
- Drag the macOS Ventura application to the Trash.
- From the Dock, click the Trash icon.
- Click Empty Trash.
Once that’s complete, reboot your Mac and redownload the macOS Ventura installer from the Mac App Store. Then you can try the installation again.
Disk Corruption Causing Installer Errors
Finally, problems with your Mac’s storage drive itself can result in a macOS Ventura installer error 702. You can try to repair the volume using Disk Utility’s First Aid, but failing that you may need to either perform the installation from Safe Mode or as a clean install.
To run First Aid to repair a corrupted volume, follow these steps.
- Reboot your computer in macOS Recovery.
- For an Intel-based Mac, reboot the computer while pressing and holding Command-R until you see an Apple logo or other image.
- On an Apple silicon-based computer, turn on your Mac and continue to press and hold the power button until you see the Startup Options window.
- Choose Disk Utility > Continue.
- Next, click View > Show All Devices.
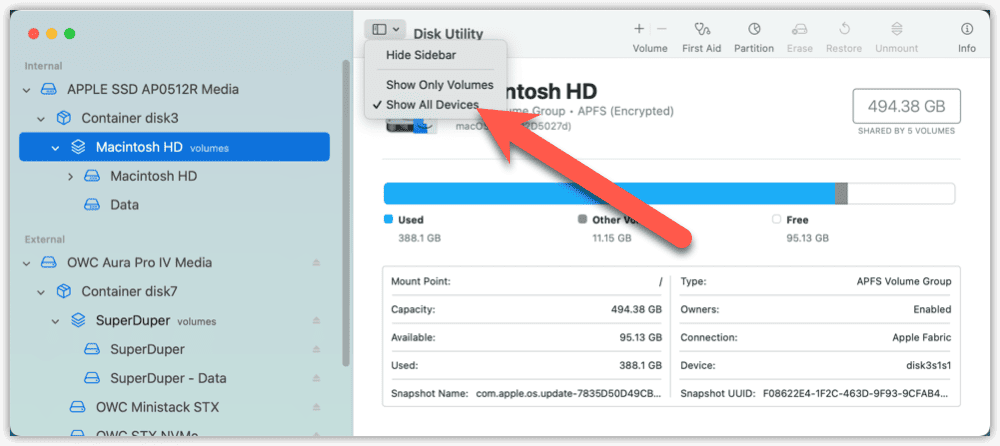
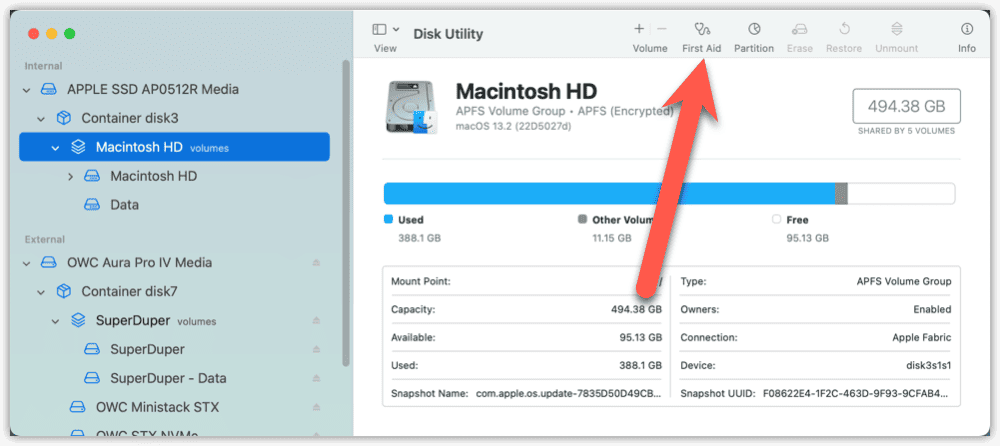
- In the sidebar, select the proper volume (usually Macintosh HD), then click the First Aid button.


Once the process is complete, reboot your Mac and retry the macOS Ventura installation.
Attempting to Install macOS Ventura In Safe Mode
If the previous steps haven’t helped, your next step is to try installing macOS Ventura in Safe Mode. In Safe Mode, many login items, inessential system extensions and other software doesn’t run. Occasionally, this can resolve problems with the macOS installation.
This is a simple process, but time-consuming.
- Reboot your Mac, pressing and holding the Shift key as it starts up.
- When you see the login screen, release the Shift key.
- Now, log into macOS using your Admin account. You may be asked to do this twice.
- The words Safe Boot should appear in the upper right corner of your display.
- From Applications, run the macOS Ventura installation package. If it’s not there, you’ll need to download it from the Mac App Store.
As a Last Resort, Perform a Clean Install
If all else fails, you may need to do a clean install of macOS Ventura. This means formatting your startup disk, wiping it off all operating system files, applications and other data.
Before you begin, create another backup of your disk. You can use Time Machine or whatever backup method you prefer.
You will need a USB drive large enough for the installer, at least 16GB.
To perform a clean install of macOS Ventura, you’ll need to do the following.
- Download and install macOS Ventura on your Mac from the App Store.
- Create a USB installer from Applications > Utilities > Terminal with this command:
sudo /Applications/Install macOS Ventura.app/Contents/Resources/createinstallmedia --volume /Volumes/Installer --nointeraction
Replace Installer with the name of your USB drive. - Reboot your Mac in Recovery mode as described above.
- Adjust your Mac’s startup security to allow it to boot from your USB installer.
From the top menu, click Utilities > Startup Security Utility > No Security.
From the same location, select Allow booting from external media. - Save the settings, then shut down your Mac.
- Connect your USB installer drive to your Mac and start the computer.
For an Intel-based Mac, hold the Option key until you see the boot options, then choose Disk Utility.
On an Apple silicon-based Mac, hold the power button until the boot options appear, and choose Disk Utility. - When Disk Utility loads, click View > Show All Devices
- Choose your Mac’s internal disk, usually named Macintosh HD.
- Next, click Erase > APFS > Erase to format the drive.
- Install macOS Ventura.
Once the cleaning process is done, click Install macOS 13 Ventura to proceed with the installation.
Enjoying Your macOS Ventura Upgrade
Hopefully, one of the above steps will take care of your issues and your computer will complete the macOS Ventura installation. After that, it’ll be time to start getting to know the new and updated features.
If none of that resolves your macOS Ventura installer 702 error, your only remaining option will be to take the computer to your nearest Apple Service Center for help.


