
Let’s take a look at the several steps that you can take when you encounter macOS Ventura Wi-Fi issues. Although Wi-Fi issues in macOS Ventura are not that rampant, it would be wise to get ahead and learn how you can easily fix the problem if you do encounter issues.
Identify Where The Wi-Fi Problem Happens
As with any other computer-related problem, the first thing you need to know is whether the Wi-Fi issue occurs with an application, your Mac, or your Wi-Fi router. In short, you must identify the problem first.
macOS Ventura Wi-Fi Not Working in an App
Sometimes, you might run into problems with your Wi-Fi while using only a particular application. The best thing to do first is to restart the application. Additionally, if the application happens to be a web browser, clearing your browsing data could help ensure that the Wi-Fi problem won’t happen again.
Therefore, if you’re using Safari and your Wi-Fi stops working, restart the app. Then, go to Menu > Clear History > Select the time range > Clear History. This should erase your browsing information in the specified time range.

Wi-Fi Not Working on Multiple Applications
If you encounter problems with Wi-Fi in macOS Ventura while using several applications, it would be best to restart your Mac. Hopefully, restarting the Mac, which clears out temporary files, will solve your Wi-Fi not working issue.
Wi-Fi Not Working Due to Router Issue
Another test that you can perform if your Wi-Fi is not working is to try using another device, such as your Phone. If the Wi-Fi works on that device, the issue is with your Mac. However, if the Wi-Fi still does not work, there is likely an issue with the router.
In this case, you should contact your Internet provider to help resolve the issue.
Once you’ve identified that the problem is with your Mac running on macOS Ventura, follow the steps below to solve the Wi-Fi problem.
How to Fix Wi-Fi Not Working on macOS Ventura
1. Toggling Wi-Fi On/Off
Whenever I encounter an issue with Wi-Fi while working on my Mac, the first thing I do is toggle the Wi-Fi switch. Most of the time, that solves the Wi-Fi issue. While you’re on the Wi-Fi menu, be sure to check also that your Mac is connected to the correct Wi-Fi network and not somewhere else. The quickest way to do this is to Go to Control Center > Wi-Fi > On/Off.

2. Flushing DNS Cache
If toggling the Wi-Fi switch does not solve the issue, the next thing to do is to flush your Mac’s DNS cache. Simply put, DNS is the service that your Mac uses to match URLs to IP addresses. Your Mac stores the DNS of websites that you regularly visit to save time looking up each time you visit the website. The inability to connect to a website is sometimes caused by cache problems. To flush your Mac’s DNS cache, you can use one of the most widely used tools, Intego Washing Machine. This tool will free up space within a few moments and immediately improve the efficiency of your Mac.
You can also flush the DNS cache by issuing the following Terminal prompt:L
sudo killall -HUP mDNSResponderYou will need to enter your admin password to execute this command.
3. Changing DNS Servers
If the preceding steps don’t solve the Wi-Fi problem, changing the DNS server might do the trick. Normally, your Mac is configured to use your internet provider’s DNS server. So, switching to another DNS server could solve the issue. For instance, you can switch to Google’s free DNS server. If you want to try it, follow the steps below.
Time needed: 2 minutes
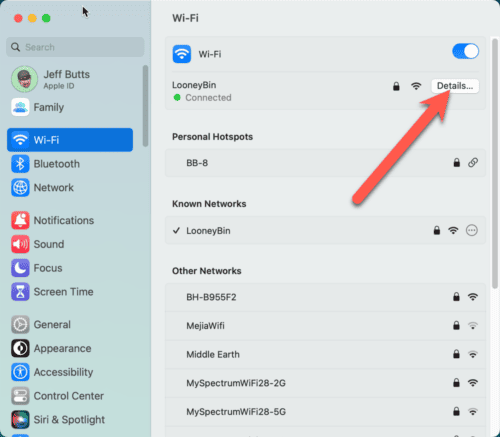
- Go to System Settings > Wi-Fi
- Find your connected Wi-Fi network and click Details
- Click DNS
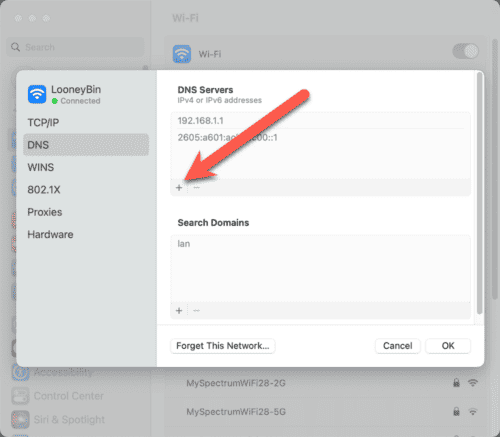
- Use ‘–‘ to remove existing DNS addresses.
- Click ‘+‘ and type: 8.8.8.8
- Press OK.
- Quit System Settings


4. Resetting Mac Network Settings
You may also try resetting your Mac’s network settings if the three methods above still won’t solve the Wi-Fi issues. See below for how to reset your Mac’s network settings.
- Turn off Wi-Fi on your Mac.
- Open Finder and press Command-Shift-G.
- Paste this location and click Go: /Library/Preferences/SystemConfiguration
- Select these files and move them to Trash:
- com.apple.airport.preferences.plist
- com.apple.network.eapolclient.configuration.plist
- com.apple.wifi.message-tracer.plist
- NetworkInterfaces.plist
- preferences.plist
5. Removing Unsecured Wi-Fi Networks
Have you noticed that your Mac retains all the Wi-Fi networks it connected to before? Well, if don’t regularly delete these networks, it might cause Wi-Fi issues later on. This is especially true if you’ve connected to an unsecured public Wi-Fi before. The next time that your Mac is within the proximity of that network, it will automatically connect to that network. So it would be wise to remove those networks. To do so, simply scroll down to the bottom of the Wi-Fi settings and click advance. From there you can see a list of all networks and you can remove them one by one.

6. Reinstalling macOS Ventura
Finally, if all else fails, the last thing you can do is reinstall macOS Ventura. Note that you should do this only as a last resort. Follow the steps below to reinstall macOS Ventura on your Mac. To do so, restart your Mac in recovery mode and select, Reinstall macOS from macOS Utilities. Make sure that you back up your Mac before reinstalling macOS Ventura. Rebooting your Mac into recovery is different for Intel-based Mac and Mac with Apple Silicon. Please see the steps below.
Start Intel-Based Mac In Recovery Mode
- While your Mac is off, press and hold Command-R, then press the power button.
- When the Apple logo appears on the screen, release Command-R.
- Enter your admin name and password when prompted.
- The macOS Utilities window appears on the screen.
- Select the option to Reinstall macOS Ventura.
Start Apple Silicon Mac Into Recovery Mode
- While your Mac is off, press and hold the power button until the startup options appears on the screen.
- Click Options then Continue.
- Type in your admin name and password.
- The macOS Utilities window appears on the screen.
- Select the option to Reinstall macOS Ventura.
There you have it. We hope that following one of the steps we’ve provided above will get your Mac connected to the Internet again. Be sure to follow The Mac Observer for more tips and how-tos for your Apple devices.


