
Those with a Pro Series iPhone may want to know how to use the new ProRAW options that arrived with iOS 17. My friends know I go with the iPhone due to the high-quality images its powerful camera consistently produces. It’s so powerful, in fact, that even professional photographers can shoot in ProRAW on their iPhone, which vastly improves the editing capabilities of the photo. Without further ado, let’s take a look at how you can use this feature.
How Do I Use ProRAW Mode?
 NOTE
NOTE
Time needed: 2 minutes
To use ProRAW mode, it’s really just a matter of knowing where your ProRAW format settings are located:
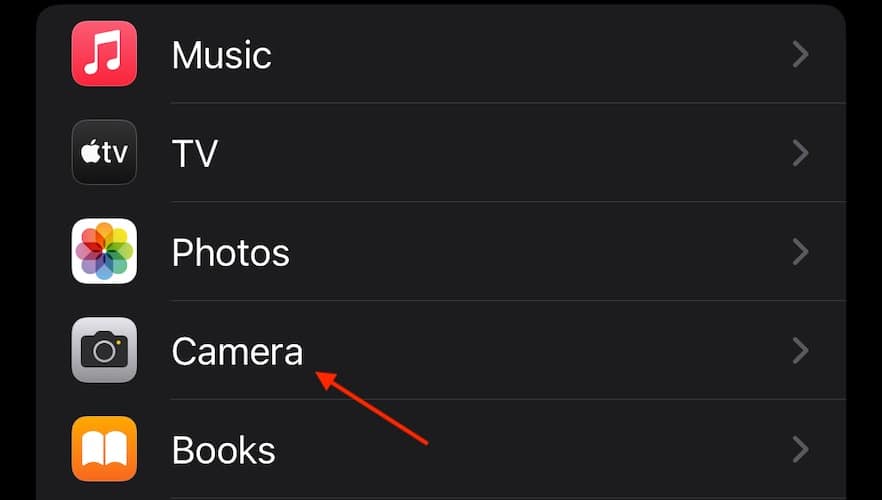
- From your iPhone, go to Settings.
- Select Camera.
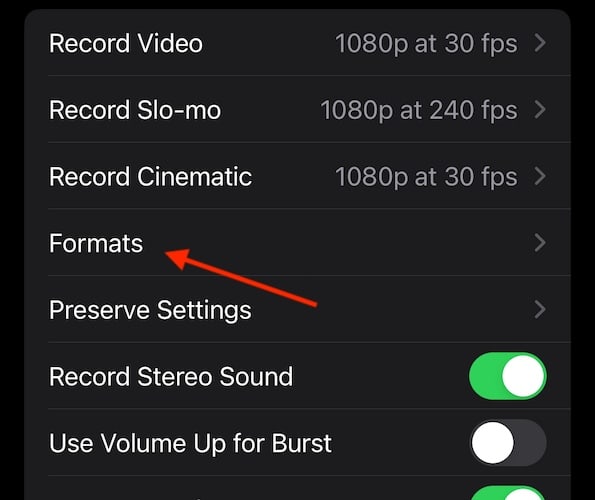
- Tap Formats.
- Ensure ProRAW & Resolution Control is enabled.
- Go to Pro Default.
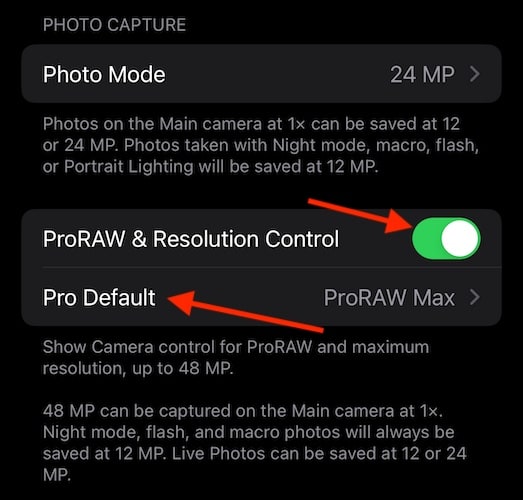
- You then have three options: HEIF Max (up to 48 MP), ProRAW 12 MP, and ProRAW Max (up to 48 MP). Make your selection. Note: the higher the MP, the higher the file size and photo quality.


Additionally, Apple provides photo quality information for each category. For instance, HEIF at 48 MP is approximately 5 MB, ProRAW at 12 MP is around 25 MB, and ProRAW at 48 MP is about 75 MB.
Apple also informs you of the capabilities of each lens. For example, keep in mind that Live Photos can be saved at 12 MP or 24 MP, and Night Mode, Macro and Flash photos will always save at 12 MP.
If this is confusing to you, consider using the High Efficiency format that’s at the top of Settings > Camera > Formats. Going with High Efficiency will still give you quality photos ready for social media, but the file size will save you on storage space.
What Is the Difference Between iOS RAW and ProRAW?
The largest difference between iOS RAW and ProRAW is that Apple ProRAW is a combination of the standard RAW format alongside the image processing of an iPhone. This means that you have more options and flexibility when editing the white balance, color, and exposure of your photos. ProRAW already gives photographers great editing options, whereas Apple’s ProRAW gives users options that are also specific to the iPhone.
Should Apple ProRAW Be On or Off?
You should only turn on Apple ProRAW if you plan on taking high-resolution photos suitable for professional work. If you casually snap photos, you likely don’t need it. The camera on an iPhone (especially the Pro series) is going to take high-resolution photos perfect for social media and sharing. Going the ProRAW route without doing any professional editing is going to leave you with high-resolution photos, yes, but at the cost of your storage space.
Conclusion
Whether you’re an experienced professional or just someone getting into mobile photography, the iPhone Pro series offers stellar cameras capable of incomparable image quality. ProRAW offers extreme editing flexibility, perhaps almost too much for the casual photographer. However, if you want fantastic image resolutions and an extreme level of image quality, you now know how to truly harness the power of your iPhone camera.
If you have any additional suggestions or ideas, please let us know in the comments below.


