
Do you dislike how your iPhone processes (rather overprocesses) photos after you capture them? You’re not alone and many people have raised their concerns about this. If you don’t like overly enhanced photos on your new iPhone, keep reading to learn how to turn off the auto-enhance photos feature on your iPhone.
Can You Disable Photo Auto-Enhance on iPhone?
No, you cannot disable the auto-enhance photos feature on your iPhone. Because Deep Fusion – Apple’s image processing system – is responsible for automatically enhancing photos captured on the iPhone. This feature was introduced on the iPhone 11 and has been present on every iPhone launched since then.
Deep Fusion works by capturing multiple frames of a photo and then combining them into one “perfect” image. The Neural Engine (a part of the iPhone processor) handles this task of auto-enhancing photos. Moreover, all of this happens in the background right when you capture a photo.
Every smartphone processes images after capturing them and there’s no way to prevent this from happening. However, there are a few workarounds that we will cover in this article that can help you capture photos with little to no post-processing.
How To Prevent iPhone From Automatically Enhancing Photos
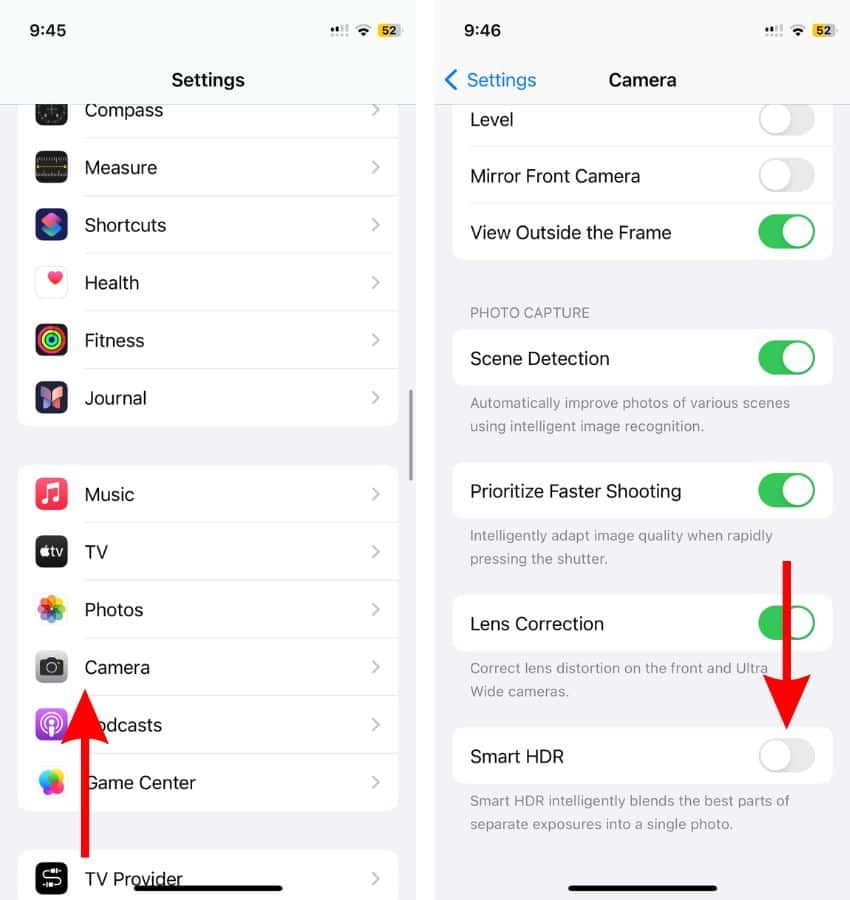
1. Disable Smart HDR To Turn Off Auto-Enhance Photos
High Dynamic Range (HDR) refers to the amount of detail a camera can capture both in the highlights and shadows of a single photo. HDR mode in the iPhone Camera helps you capture detailed images in high-contrast conditions. It does so by capturing multiple images at different exposure levels and blending them to offer excellent details in both the highlights and shadows of a photo.
However, these photos are auto-enhanced and you might not like how it looks. While the iPhone 13 and later automatically use HDR whenever required, you can manually control HDR on iPhone 12 and earlier models. If you own an iPhone 12 or earlier model, here’s how to disable automatic HDR on your iPhone.
Time needed: 2 minutes
Steps to disable Smart HDR on iPhone 12 and below.
- Open the Settings app on your iPhone. Navigate to the Camera settings.
- Navigate to the Camera settings.
- Disable the Smart HDR toggle.

2. Disable View Full HDR
Does your screen suddenly brighten up when viewing certain photos in the Photos app? That is because the display adjusts its brightness to show the complete dynamic range of an HDR photo. If you don’t like how the display brightens suddenly, you can disable the View Full HDR feature in the Settings.
- Open the Settings app on your iPhone.
- Navigate to the Photos settings.
- Disable the View Full HDR toggle.

3. Disable HDR Video To Turn Off Auto-Enhance Photos
The iPhone 12, iPhone 13, iPhone 14, or iPhone 15 series offer the option to capture Dolby Vision HDR videos with “true-to-life color and contrast.” However, these bright videos might look overly enhanced and you might not like the result. Therefore, here’s how to disable the HDR Video feature on your iPhone.
- Open the Settings app on your iPhone.
- Navigate to the Camera settings.
- Tap the Record Video option.
- On the next page, disable the HDR Video (High-Efficiency) toggle.
4. Shoot Photos in RAW Mode To Turn Off Auto-Enhance Photos
Another way to disable processing (at least most of it) is to capture photos in RAW mode. The Apple ProRAW format captures photos with minimal processing so that you can later adjust the exposure, color, and white balance according to your preferences.
The ProRAW feature is only available on iPhone 12 Pro and later PRO model iPhones. Also, on iPhone 14 Pro and iPhone 15 Pro series, you can capture ProRAW photos in 12MP or 48MP. We suggest selecting the latter for the highest quality.
- Open the Settings app on your iPhone.
- Navigate to the Camera settings.
- Tap the Formats option.
- Enable the Apple ProRAW toggle.
- Now, tap on the ProRAW Resolution option.
- On the next screen, select the 48MP option.
- Next, open the Camera app and you’ll see a RAW option at the top right corner.
- Tap the RAW option to capture photos in ProRAW mode.
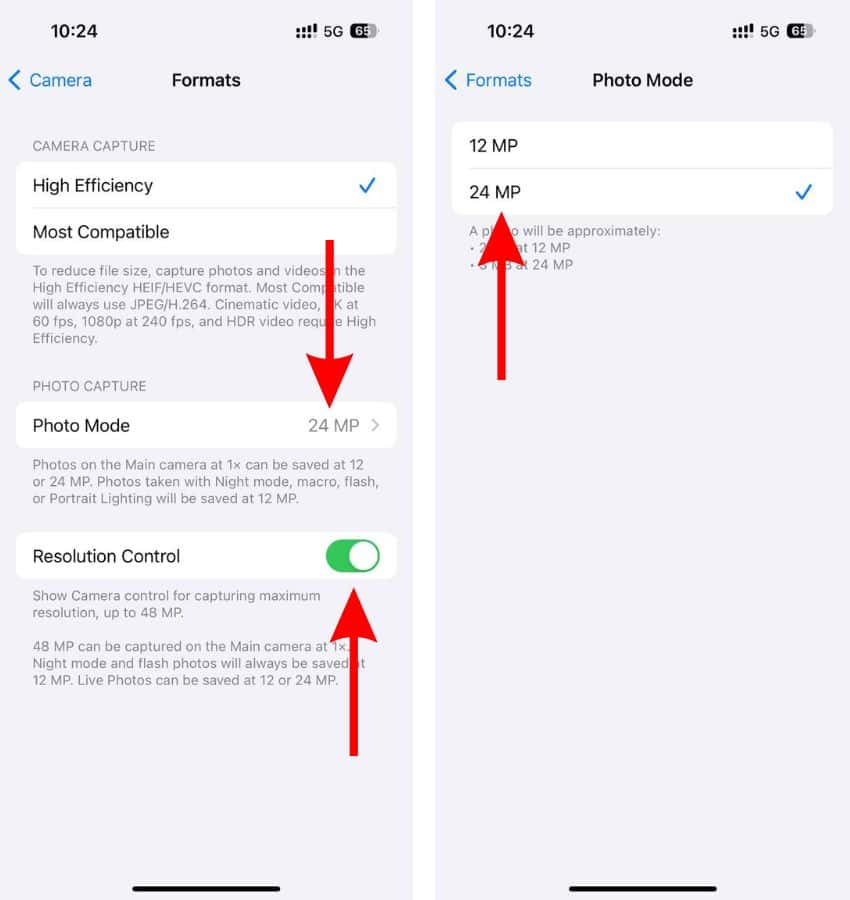
5. Switch to 48MP Mode on iPhone 15 Series
The iPhone 15 series has a 48MP primary camera and it captures photos in 24MP by default. We suggest switching to the 48MP mode as it will help capture more details. Now, even the 48MP photos will certainly undergo post-processing.
However, they won’t undergo pixel binning and might be comparatively less processed than their 24MP or 12MP counterparts. Therefore, click photos in 48MP to reduce the auto-enhancement of photos on your iPhone.
- Open the Settings app on your iPhone.
- Navigate to the Camera settings.
- Tap the Formats option.
- On the next page, enable the Resolution Control toggle and then tap the Photo Mode option.
- Select the 24MP option.
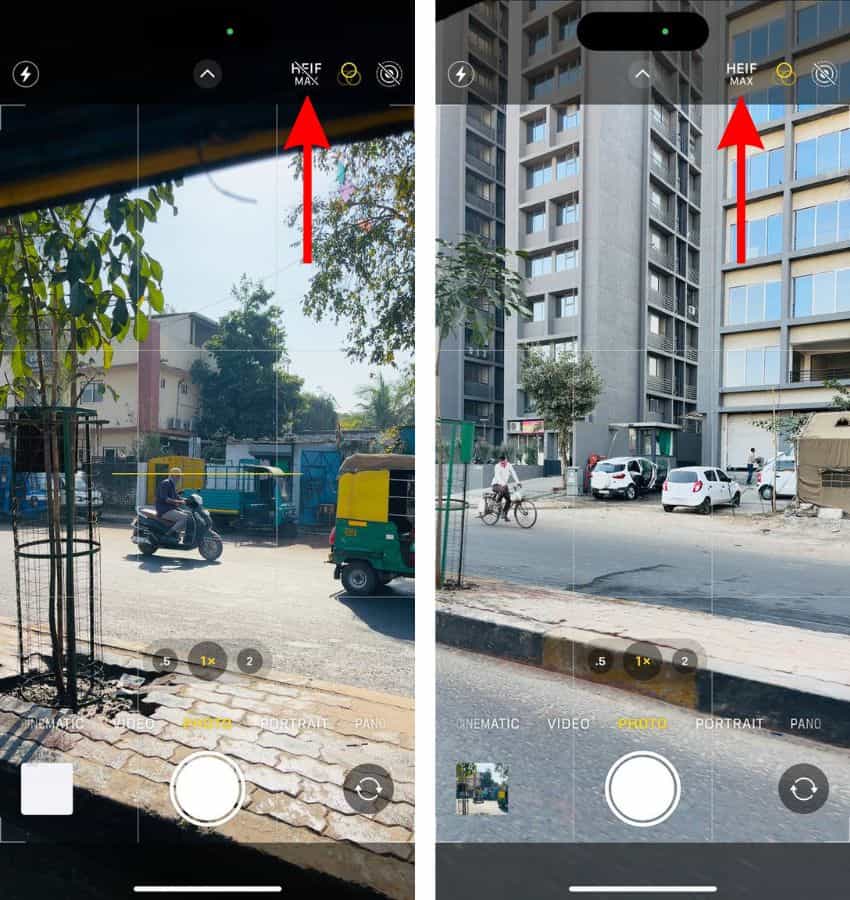
- Next, open the Camera app and you’ll see a HEIF Max option at the top right corner.
- Tap the HEIF Max option to enable it and click pictures in 48MP.


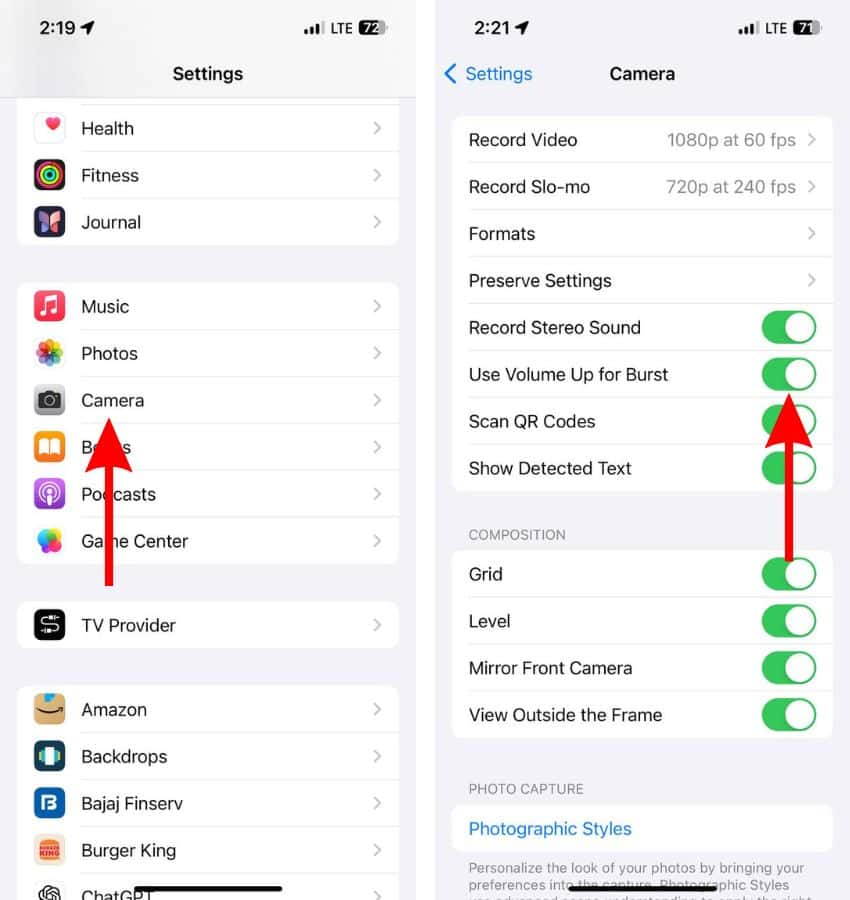
6. Enable Prioritize Faster Shooting To Turn Off Auto-Enhance Photos
We’ve already spoken about how Deep Fusion merges multiple photos and creates a single “best” photo. The entire process happens within a fraction of a second which is why there isn’t any shutter delay. However, if you want to turn off the auto-enhancement of photos, we suggest enabling the Prioritize Faster Shooting feature.
When the Prioritize Faster Shooting toggle is enabled, your iPhone prioritizes on capturing the frame when you press the shutter. This leads to lesser post-processing as the focus is to capture the exact frame rather than the best frame.
- Open the Settings app on your iPhone.
- Navigate to the Camera settings.
- Enable the Prioritize Faster Shooting toggle.

7. Click Pictures in Burst Mode To Turn Off Auto-Enhance Photos
When you click photos in Burst Mode, the iPhone focuses on capturing multiple frames within seconds. Again, the device prioritizes capturing as many photos as possible and since it doesn’t have a lot of time to do so, the processing is minimal. Therefore, we suggest clicking pictures in burst mode if you don’t like auto-enhanced photos.
- Open the Settings app on your iPhone.
- Navigate to the Camera settings.
- Enable the Use Volume Up for Burst toggle.
- Next, open the Camera app and press and hold the Volume Up button to click photos in Burst mode.
- Alternatively, you can also tap and drag the Shutter button to the left to take photos in Burst mode.

8. Click Live Photos To Turn Off Auto-Enhance Photos
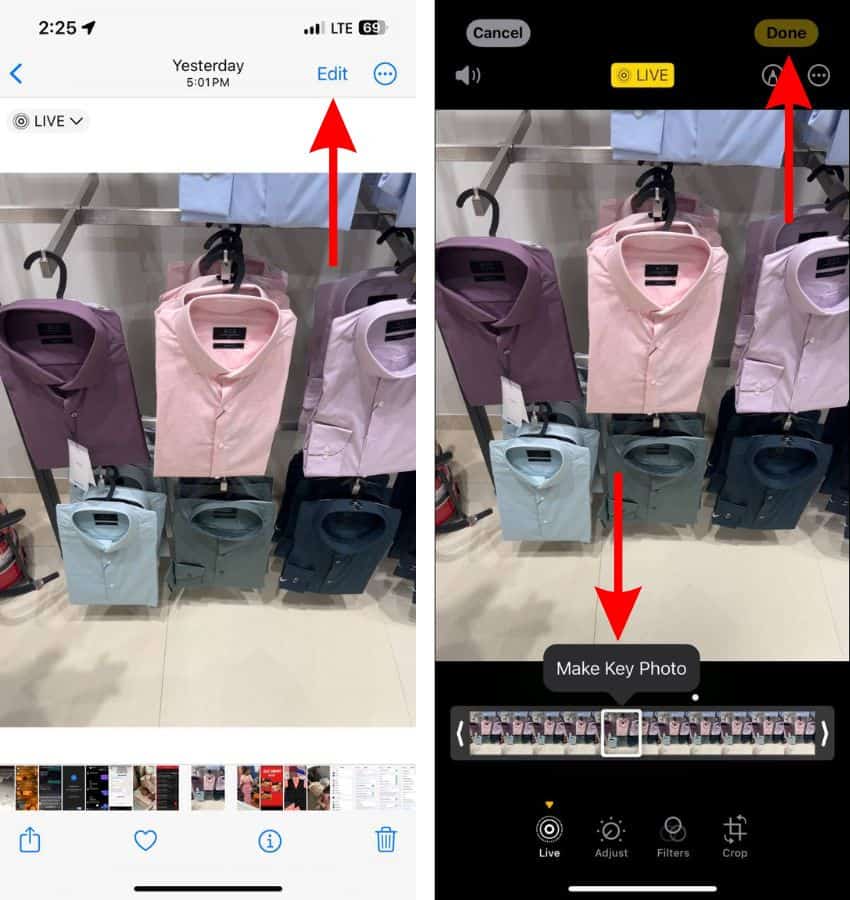
When you take a Live photo, your iPhone captures 1.5 seconds of the scene before and after you press the shutter. So, after you capture a Live photo, you can tap and hold on to it and it will play like a short video. The best part about this is that you can select a different frame from these 3 seconds and make it the Key Photo. Therefore, we suggest clicking Live Photos as iOS won’t be able to auto-enhance a selected frame after you’ve clicked the photo.
- Open the Camera app on your iPhone.
- Tap the Live Photos icon at the top right corner to enable the Live Photos feature.
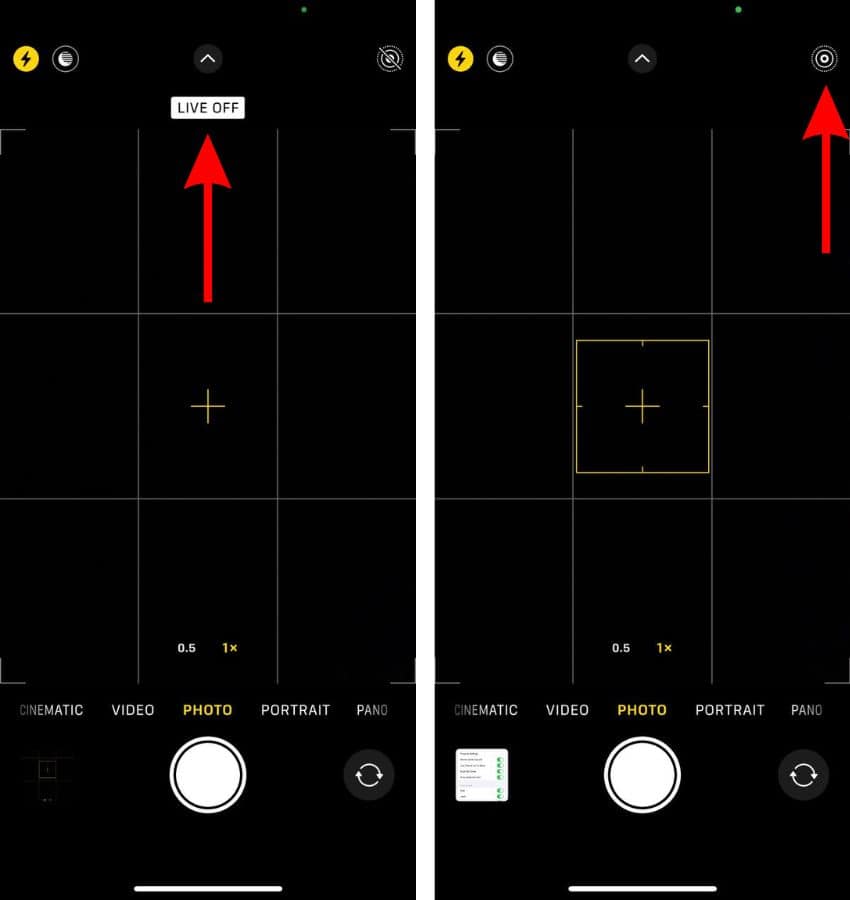
- Tap the shutter and click a photo.
- Next, open the Photos app, navigate to the photo you just clicked, and tap the Edit button at the top right corner.
- Tap the Live option at the bottom left corner.
- Move the slider to change the frame.
- Tap the Make Key Photo pop-up.
- Finally, tap the Done button at the top right corner to save the changes.


9. Disable Night Mode To Turn Off Auto-Enhance Photos
The iPhone automatically enables Night mode Whenever you click photos in a low-light environment. The camera automatically adjusts some settings to click a brighter image that captures details even in these conditions. However, these photos might not look natural and also seem to be overly processed. Therefore, disabling Night mode might help turn off auto-enhancement of photos in low-lighting conditions.
- Open the Camera app on your iPhone.
- The Night mode icon will appear on the top left corner beside the Flash icon
- Tap on the Night mode icon to disable it.

If none of these methods deliver the desired results, you can try clicking photos in third-party apps as iOS doesn’t auto-enhance photos there. For example, try clicking photos using Instagram, Snapchat, or you can even try other Pro-Camera apps like Moment, Halide, etc. That said, if you have any further doubts, please let us know in the comments below.
FAQ’s
To stop your iPhone from automatically adjusting the exposure, tap and hold on to the subject on which you want to lock the exposure.
To disable Lens Correction on iPhone, head to Settings > Camera > Disable the Lens Correction toggle.


