
For those using macOS Ventura, they may be curious how to set preferred networks within the operating system. Unfortunately, I have some bad news for them, as the tried and true methods have been removed within the operating system. While there is a fix, many users are likely not going to be happy with this solution. Keep reading to find out more.
Prior to macOS Ventura, users may have been familiar with going to their Advanced Network Preferences and simply dragging and dropping their preferred networks in an order that works for them. Unfortunately, the recent changes to macOS Ventura no longer allows for this. If you’re using an older versions of macOS, you’re still able to do this, but with Ventura, you’re going to have to take a different route.
How Does macOS Ventura Choose a Preferred Network?
As mentioned, Ventura no longer has a way of prioritizing networks manually, macOS Ventura does it automatically. Of course, when it comes to auto-joining networks, macOS Ventura typically chooses preferred networks right from the start. After that, it will prioritize by private networks, and then public.
Essentially, your Mac will prioritize networks in this order:
- “Most Preferred” networks. Concerning this route, macOS Ventura scores the most known networks and it’s determined by your actions. For example, if you manually switch to a certain network often, that will increase the ‘score’ of the network. Disconnecting from the network will decrease the score. The highest scoring network will be the most preferred.
- Private networks: This typically includes networks that are setup in homes and offices. This can also include Personal Hotspots. Concerning priority, macOS Ventura will reconnect to known private networks in the order they were most recently joined.
- Public Networks: These networks are usually attached to a public area, such as one from an airport or a coffee shop. Additionally, this list also includes networks such as Hotspot 2.0, EAP-SIM, Passport, or a Wi-Fi network that a cellular carrier or network access provider may supply.
Of course, if macOS Ventura finds multiple public or private networks, it will prioritize networks and determine which one is best based on security level.
Therefor, Ventura will choose a network based on the following order:
- EAP
- WPA3
- WPA2/WPA
- WEP
- Unsecured / Open
Users should note that macOS Ventura will not auto-join an unsecured or open network unless it has been connected within the past two weeks. It is also important to note that if Ventura finds multiple networks within an identical category and security level, the OS will select the SSID that has the stronger received signal strength indication, or RSSI. Lastly, users should know that after restarting their Mac, if FireVault is enabled, Wi-Fi credentials will only be available after you unlock your device.
How to Set Preferred Networks in macOS Ventura. . . Kinda
For some Ventura users, this can be incredibly annoying. For example, let’s say you have a split network. One may be faster, but the other may have more range. You may find that Ventura insists on connecting to the slower network. There is a solution to this issue, however, keep in mind that it isn’t pretty.
Essentially, what a lot of users are suggesting is to go through nearby connected networks, and disabling auto-join. Essentially, if you want to “prioritize” a certain network in your area, you’re going to need to shut-off the auto-join feature for all of the other networks that you have the option of joining. Like I said, I warned this option isn’t going to be pretty.
How to Stop Ventura from Auto-Joining Networks
To do this, you will have to follow these steps for every network you don’t want to “prioritize”. To do this, follow these instructions:
Time needed: 1 minute
How to stop a network from auto-joining on Ventura.
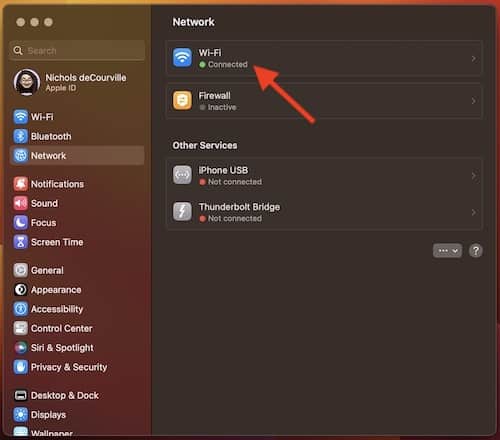
- Go to Apple > System Settings in the Menu Bar.
- Select Network and go to Wi-Fi.

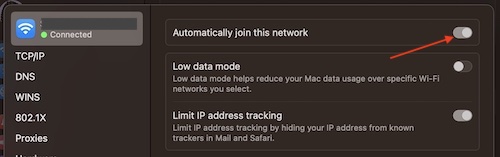
- Next to the network you do not want to auto-join, hit Details.

- Turn off Automatically Join this Network.


Repeat this step until you are prioritizing the network you want. You will then need to join a different network manually from the Wi-Fi icon in the Menu Bar.
Out with the Old, in with the New
While some may not be happy that macOS Ventura no longer features a way to prioritize networks, there is kind of a way to get it back how you want, though I suspect many may not be happy with this method either. Hopefully for those that truly enjoy the old ways of doing things, Apple will correct this in a future update.
While being able to prioritize your networks is essential for some, understanding how Apple chooses to prioritize networks can at least bring about an understanding to the methods. While macOS Ventura users are no longer able to adjust and set network preferences, there is technically a work around. For those that really need to be picky with their networks, they’ll simply have to hope Apple brings the feature back in a future update.