If your iPhone says “iPhone is disabled, connect to iTunes,” it means your device has been locked due to too many incorrect passcode attempts. Whether you’re using a Mac or a Windows PC, we’ll walk you through all your options, including Finder, iTunes, iCloud, and Recovery Mode.
Table of contents
- Why Does My iPhone Say “iPhone Is Disabled, Connect to iTunes”?
- How to Fix “iPhone Is Disabled” on Mac (Finder)
- How to Fix “iPhone Is Disabled” Using iTunes (Windows or macOS Mojave and earlier)
- Unlock Your iPhone Using a Dedicated Tool
- How to Fix a Disabled iPhone Without iTunes or a Computer
- Summary
- Final Thoughts
Why Does My iPhone Say “iPhone Is Disabled, Connect to iTunes”?
This error appears when someone enters the wrong passcode too many times in a row. Here’s how it works:
- After 6 wrong attempts: iPhone locks for 1 minute
- After 7: locked for 5 minutes
- After 10: your iPhone becomes disabled and shows “Connect to iTunes” or “Connect to a computer”
Apple does this for security, to protect your data in case someone is trying to guess your passcode. Once disabled, the only way to unlock your iPhone is to erase it and restore it from a backup.
How to Fix “iPhone Is Disabled” on Mac (Finder)
If you’re using a Mac with macOS Catalina or later, you’ll use Finder instead of iTunes:
Step 1: Put Your iPhone in Recovery Mode
- Connect your iPhone to your Mac using a Lightning cable.
- Quickly press and release the Volume Up button, then the Volume Down button.
- Press and hold the Side button until you see the Recovery Mode screen (a cable pointing to a computer icon).
Step 2: Restore Using Finder
- Open Finder.
- Select your iPhone from the sidebar.
- When prompted, choose Restore.
- Finder will erase your iPhone and install the latest iOS version.
- After it restarts, follow the on-screen steps to restore from a backup or set up as new.
How to Fix “iPhone Is Disabled” Using iTunes (Windows or macOS Mojave and earlier)
Step 1: Connect and Enter Recovery Mode
- Connect your iPhone to your Mac using a Lightning cable.
- Quickly press and release the Volume Up button, then the Volume Down button.
- Press and hold the Side button until you see the Recovery Mode screen (a cable pointing to a computer icon).
Step 2: Restore Using iTunes
- Open iTunes on your PC or older Mac.
- Click the device icon when it appears.
- Choose Restore.
- Wait for iTunes to erase your iPhone and reinstall iOS.
- Set up your iPhone when finished.

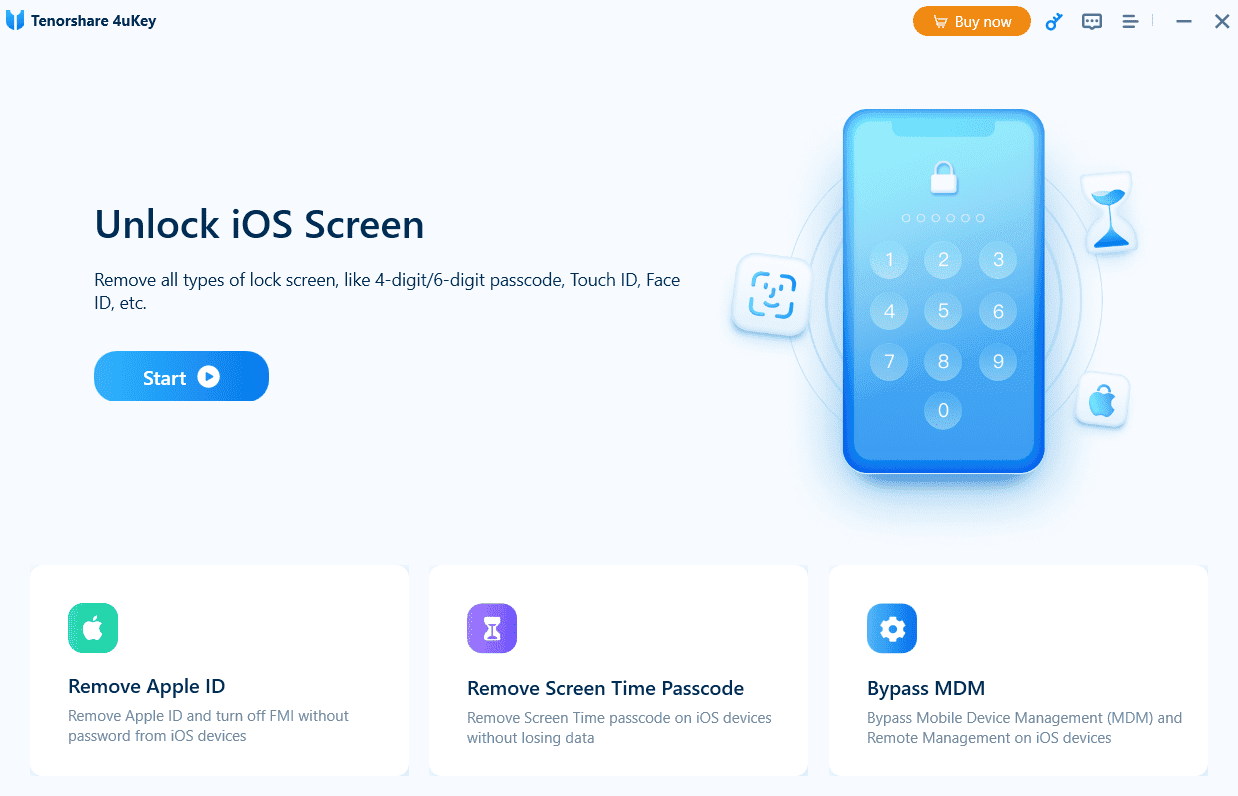
Unlock Your iPhone Using a Dedicated Tool
If iTunes or Finder isn’t working, or you don’t want to go through the hassle, you can use a third-party iPhone unlock tool, such as Tenorshare 4uKey.
4uKey is designed to remove 4-digit and 6-digit passcodes, Touch ID, or Face ID from any iPhone or iPad, including the latest models. It works with both macOS and Windows and supports all modern iOS versions.
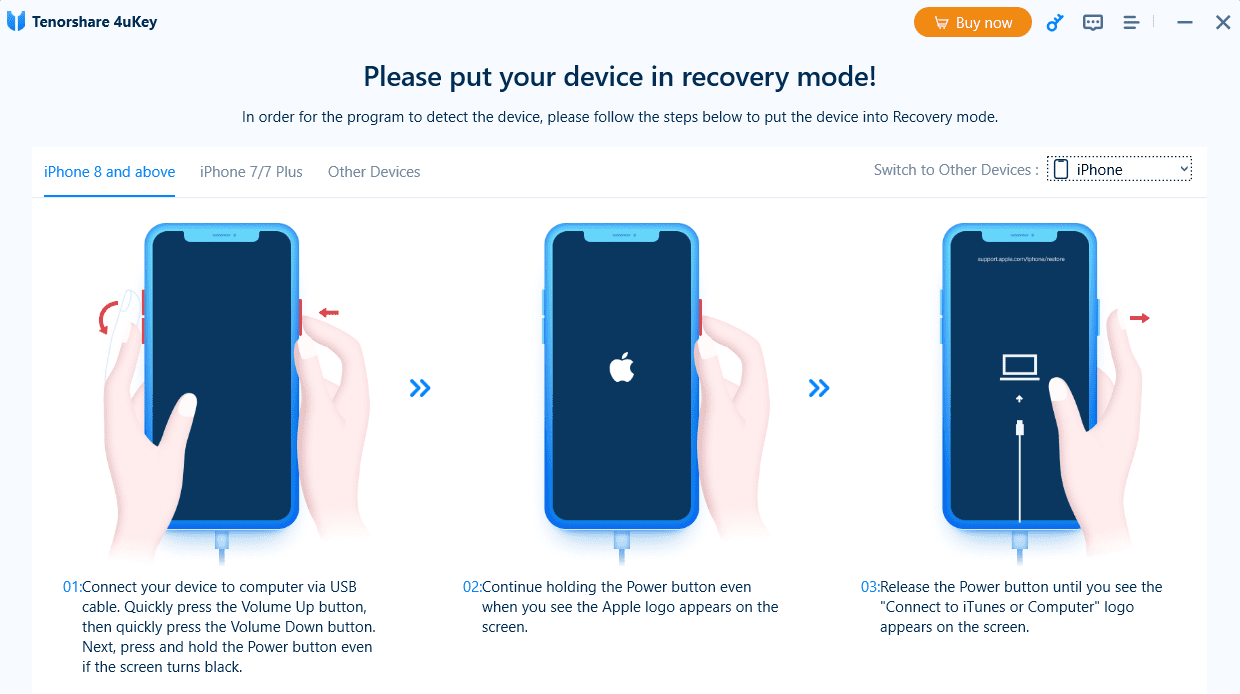
- Download and install 4uKey on your computer.
- Launch the tool and click Start to begin.

- Connect your disabled iPhone using a Lightning cable.
- Click the Start button once again.
- Click Next.

- Now you will see a “No device detected” message and instructions on how to enter recovery mode.
- Select your Apple device, plug in your device, then follow the onscreen instructions.


After a few minutes, your iPhone will reboot without the passcode, fully accessible and ready to set up as new or restore from backup.
4uKey requires a paid plan to complete the unlock process. Choose the option that works best for your situation.
How to Fix a Disabled iPhone Without iTunes or a Computer
Don’t have access to a computer? You can erase your iPhone using iCloud, as long as Find My iPhone is enabled.
- Visit iCloud.com/find and log in.
- Click All Devices, then choose your disabled iPhone.
- Click Erase iPhone.
- Once erased, you can restore it from iCloud or iTunes/Finder.

Your iPhone will erase and restart. After that, you can set it up from scratch or restore from iCloud.
Important: Your iPhone must be online and have Find My enabled. If it’s offline, the erase will happen the next time it connects to Wi-Fi or cellular.
Summary
- Too many wrong passcodes disable your iPhone.
- You must erase the iPhone to unlock it, via Finder, iTunes, a third-party tool or iCloud.
- Recovery Mode is the key step in restoring your device.
- Always back up your iPhone regularly to avoid data loss.
Final Thoughts
Just follow the steps above, and you’ll be back up and running. For future peace of mind, consider enabling iCloud Backup and Find My iPhone so you’re prepared in case this ever happens again.
Need more help? Visit Apple’s official support page or head to your local Apple Store.