
For those looking to add a HomePod to the Home app, you’ve come to the right place. Whether it’s the latest HomePod or HomePod mini, figuring out how to connect the device to the Home app is a breeze. I’m going to take a look at how to connect these devices to the Home app, while also going over some common issues one may have while connecting. If you need to connect your HomePod or HomePod mini to the Home app, worry not, as you’re only a few short steps away.
Concerning the HomePod or HomePod mini, it can be ideal for controlling all of your smart home devices, so long as they are compatible. From their high-fidelity audio, to their ability to interact with Siri, a HomePod can be extremely useful for around the house. Of course, being able to access these features is only possible through making sure that your device is actually connected to the Home app. With it being the destination for all your smart-home accessories, you’re going to need it to get the most out of your HomePod.
How to Connect HomePod to the Home App
To connect your HomePod to the Home app, it’s as simple as merely following a couple of quick directions. If you just recently purchased your HomePod, or you needed to perform a hard reset, you’re going to need to connect the device to the Home app.
Time needed: 2 minutes
Simply follow these steps to connect your HomePod or HomePod mini to the Home app.
- First, plug in your HomePod, and then wait for the white light to appear. You will need to plug it in via a power supply or USB-C adaptor.
- Hold your iPad or iPhone close to the HomePod. Make sure that your iPhone/iPad is unlocked.
- Once your iPad or iPhone discovers the HomePod, select Set Up to begin the process.
- The lights on your HomePod will then change. Your iPad or iPhone will then ask you to use your camera to scan an animation that will appear on the HomePod’s top display. Your HomePod will then receive a connection to your mobile device, as well as your Apple ID.
- From here, you can then customize and then complete the setup process for your HomePod. Your iPad or iPhone will help you complete the process.
Why Won’t My HomePod Connect to My Home App?
If you are having issues connecting your HomePod or HomePop mini to the Home app, there’s a number of things you can try. More than likely it is a simple software issue or network connectivity problem rather than something far more serious. Let’s take a look at a couple of examples. I’ll also provide some more detailed solutions through some different article suggestions.
Check Wi-Fi Connection
One of the first things you should do is check your Wi-Fi connection. Your HomePod is going to automatically connect to the same network as your iPad or iPhone.
However, if you need to check your signal strength, follow these steps:
- Open the Home app.
- Select your HomePod.
- Scroll down, or choose the Settings icon, then scroll down to Wi-Fi network. You will see the signal strength next to the network name.

If you are seeing two bars or fewer on your signal strength, this might be an issue. Of course, if you haven’t connected your HomePod yet, you can also check the signal strength on your iPhone or iPad. Either way, if the signal strength is low, you may need to move your HomePod closer to the router. Essentially, you are looking to reduce wireless interference.
Restart Your HomePod
You may also just need to restart your HomePod or HomePod mini. If your device isn’t connecting to your iPhone or iPad, it’s more than likely a small software issue that a soft reset will typically fix. Of course, if you have yet to connect your HomePod to the Home app, all you need to do to reset is unplug it from its power source, wait about ten seconds, and then plug it back in.
If you think you’re having larger issues, I would also suggest looking into my articles on what to do if a HomePod not responding, or what you can do if your HomePod is stuck configuring. Both of these articles provide a lot of solutions to common device problems. Additionally, both also offer some relatively easy-to-follow solutions.
Of course, you should also make sure that your iPhone or iPad is up to date. Go to Setting > General > Software Update and check to see if one is available.
How Do I Add an Accessory to My HomePod?
Of course, if you’re looking to add additional accessories to your HomePod, connecting them to the device is a breeze. Simply follow these steps:
- Ensure that the accessory is turned on and close to your HomePod.
- From your iPhone or iPad, open the Home app and tap the Add + button.
- Select Add Accessory.
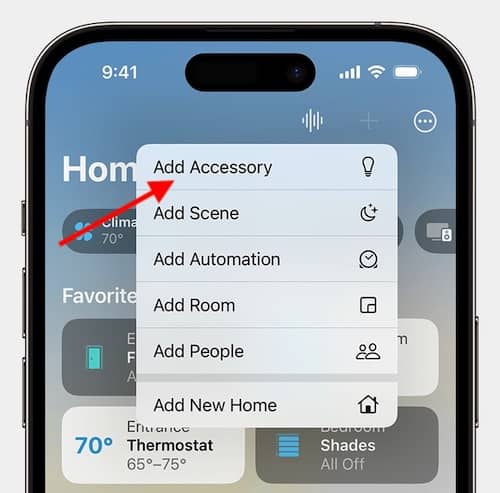
- Follow the instructions that appear in the Home app.
- Select your accessory once it appears. You may be asked to add the accessory to the network. Choose Allow should it ask.
- You can then assign the accessory to a room. You may also give the accessory a name.
- Then, select Continue and choose Done.

How Do I Add HomePod mini to My Home hub?
Fortunately, whenever you set up a HomePod or a HomePod mini, they will automatically become hubs for Home. However, one important thing to remember is to make sure that you are signed in to iCloud on either your iPad or iPhone with the same Apple ID that you used when setting up your Matter and/or HomeKit accessories when in the Home app.
Conclusion: Connecting Your SmartHome
Having a HomePod around the household can be extremely helpful. Naturally, if your HomePod is running the latest software, then you’re also able to implement two of them to create a surround-sound experience in your home. There’s a lot of reasons the HomePod makes a great smarthome accessory. However, the first step toward making it a great accessory is ensuring that it is properly connected to the Home app.
Additionally, if you’re having issues setting up your HomePod in the Home app, the solution is likely only a few steps away. It is pretty rare that users will need to go above and beyond when it comes to diagnosing and solving problems with their device. However, if you find that none of the resources provided above are solving your problem, it may be wise to get ahold of Apple Support.


