
When it comes to a user wanting to connect a MacBook Pro or other various Macs to multiple displays, there’s a multitude of options for users. While this guide will primarily stick to what Apple offers in terms of multi-display support, there are other options available if users do not mind installing third-party software and purchasing third-party devices. If a user is willing and capable, there’s a world of multi-display goodness waiting.
While the M1 and M2 series of chips for Macs offer plenty of power and features, one thing some Apple fans may find bothersome is the lack of support for additional monitors. With both the M1 and the M2 capable of only natively supporting one external monitor, this is quite different from the support offered by previous generations of the Intel-based Macs, which could run two displays with a hub or docking station.
Don’t miss the best of The Mac Observer
Set us as a preferred source and our Apple reporting ranks higher in your Google Search results and Discover feed — one tap, no account changes.
Looking at Various MacBooks
Concerning the M1 Mac, it offers native support for one external monitor. The M1 Mac mini is capable of supporting two: one connects via HDMI and the other connects via USC-C/Thunderbolt. This means that while you get two with the Mac mini, MacBook users are left with just one additional monitor.
While the M1 can support two monitors with certain configurations, the M1 Pro and M1 Max line offer support for additional monitors. Going by Apple specifications, the M1 Pro is cable of supporting two external displays with up to 6K resolution, while the M1 Max is capable of three external displays with up to 6K resolution and support for an additional 4K resolution screen.
With the M2 series, things are a bit different. The M2 itself finds the same limitations as the M1, with support for an additional monitor. While the M2 Pro ramps things up a bit, with support for up to two external displays with 6K support. With the M2 Max, you can have up to four external displays with up to 8K support.
Using Third-Party Software: DisplayLink
If you are using an M1/M2 MacBook, there are ways around the limitations of an additional single monitor. One of these ways is through installing DisplayLink software drivers. This way, you can use a third-party dock to connect additional monitors, with support from third-party drivers.
It is worth noting that certain third-party manufacturers do not support using docks. Be mindful when purchasing the right dock, and I will make some suggestions as well.
Third-party docks are able to maneuver around the M1/M2 limitations by using native USB-C Alternative Mode (“Alt Mode” video-out that is native) alongside DisplayLink tech. Also note that this requires installing third-party drivers, which do not receive support from Apple.
How to Install DisplayLink
To use Mac DisplayLink drivers, follow these steps. Be warned that software updates from Apple may prevent DisplayLink from operating properly. Should this happen, you will need to update your drivers.
- Go to the DisplayLink macOS Software page and download the latest DisplayLink Manager.
At the time of this writing, the latest available is 1.8, which features support for macOS Ventura 13, Monterey 12 and Big Sur 11. - During installation, it will inform you that you need to permit DisplayLink access to Screen Recording for the software to properly run.
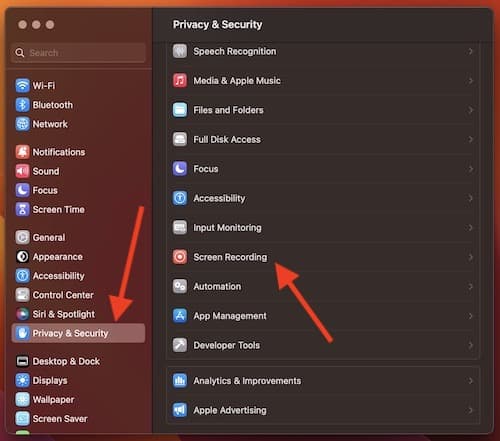
Clicking Continue will take you automatically to the Screen Recording Settings. - However, if you accidentally clicked-through this, you can find the settings in the Menu Bar under Apple > System Preferences > Privacy & Security > Screen Recording. In both instances, you will need to know your device’s admin password. You also need to quit and restart DisplayLink.
- From here, you can connect the device to a docking station.
The first screen will connect via the dock’s HDMI or DisplayPort, which the M1/M2 MacBook will handle natively. - This can also be done by connecting the first display through the dock’s additional display ports, or by utilizing a USB-C to Thunderbolt to HDMI or DisplayPort adapter.
Going from the HMDI or DisplayPort will require no additional drivers, however the second and third displays will then rely on the DisplayLink software.

Software Alternative: InstantView
Alternatively, InstantView software can also provide a solution to the M1/M2 limitations. InstantView operates similarly to DisplayLink, while also providing support for some of the hardware hubs available.
However, it should be noted that InstantView can be disabled through one of Apple’s software updates. Should this happen, a user will need to install a new version of the software. Users will also need to give the software permission to Screen Record, which is also rather easy to accomplish.
Choosing the Right Dock to Connect Your Mac to Multiple Displays
When it comes to using the right third-party docks, there’s a host of options. Going with OWC docks can be the right call, as they consider Mac users first and foremost.
One of their best docks is the OWC Thunderbolt, which includes 3x Thunderbolt (USB-C) Ports, 3 USB 3.2 (10Gb/s) Type A ports, as well as Dual Display support up to 4K and Display support up to 8k. OWC also makes Thunderbolt 3 Docks as well, which can offer similar features. Note that this dock provides the same support as what Apple typically provides.
Similarly, there’s also the UGreen USB-C Triple Display Docking Station, which features support for up to three external displays on an M1/M2 MacBook using DisplayLink software. Additionally, the UGreen also features two HDMI ports, a DisplayPort and provides support for three 4K displays at 60Hz. You will need to use the DisplayLink software with this one, so keep that in mind.
However, if you’re looking to go big, there is the Plugable USB-C to Quad HDMI Adapter which features support for four additional screens. While none of them support 4K, using the InstantView software (detailed above), users can implement the four HDMI ports to make themselves an epically-large screen. However, Plugable doesn’t recommend using this for gaming, video editing, protected-content (HDCP) playback and digital audio workstations (DAWs).
Choosing the dock that is right for you can also take a bit of exploring. Remember that when looking for docks that feature DisplayLink or InstantView support, a macOS update from Apple may kill these third-party drivers at any time. You will likely need to update these drivers every time Apple releases an update. This may cause future issues down the road for your multiscreen display.
There’s little risk to running more than monitor through a dock, or running more than the number of monitors Apple recommends. The only real issues you may face in terms of risks is that it may give-out from an update. This will not harm your system.
How to Extend or Mirror Your Monitor on Mac with Multiple Displays
Once you have your display situation sorted, it’s time to put those monitors to use. With Screen Mirroring, you are able to show the entire desktop on each display.
To set this up, simply follow these steps.
Time needed: 2 minutes
How to Mirror your monitor on Mac.
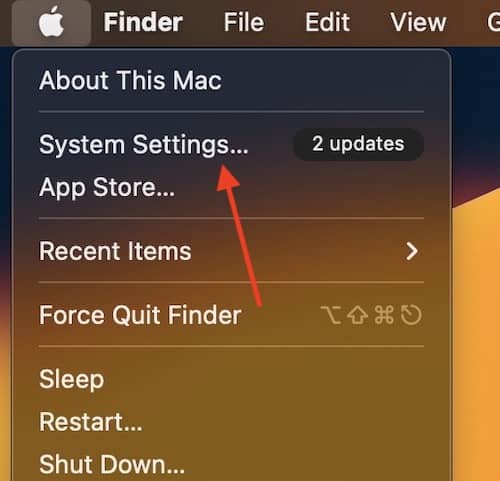
- On your Mac, go to Apple > System Settings in the Menu Bar.
- Click Displays
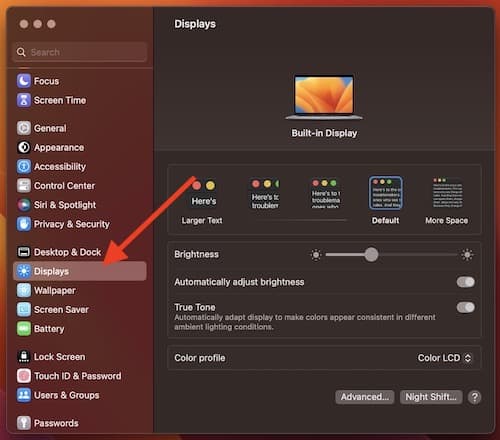
- Choose your displays, and click the “Use as” pop-up menu. Choose Mirror for the Display.


If you are looking to create one large continuous desktop, you are looking for an extended desktop. Follow the same steps as above, only replace “Mirror” with “Extended Display” in the third step.
Additionally, if you have more than two displays connected, you can have some screens mirror, and some screens extend. To do this, set all displays to extended, then press and hold the option key to drag one display into another. This will mirror only those displays.
Conclusion: Connecting a MacBook Pro to Multiple Displays
Attempting to connect multiple displays to a MacBook Pro or any other Mac can be rather complicated. While there are more options available when using the M1/M2 Pro or Max, users may find themselves wanting to push the limits of what their device is capable of doing. Using this guide, there are some alternatives to adding additional displays to your MacBook, though be mindful of Apple updates, and ensure you keep your drivers up to date as well.
If you don’t mind bothering with resolution and refresh rates, there’s a multitude of devices that can give you additional options for displays. While the M1 and M2 series of chips does have limitations, the M1/M2 Pro and Max series does the best it can to remedy this. Either way, if you’re looking to connect multiple displays to your MacBook Pro, you do have a plethora of options.


Discussion