
Welcome to the rollercoaster ride of tech updates, where every twist and turn brings exhilarating new features! But hold onto your iPhones, folks, for in this fast-paced digital realm, we’re about to embark on a journey that will make your heart skip a beat: the daring quest to downgrade from iOS 16 to iOS 15! Okay, pardon my overzealousness, I’ll tone it down now.
The allure of iOS updates lies in their promise of improved features and enhanced performance. However, with every update, there’s the risk of unintended consequences that might not align with your preferences.
Don’t miss the best of The Mac Observer
Set us as a preferred source and our Apple reporting ranks higher in your Google Search results and Discover feed — one tap, no account changes.
Whether you encounter compatibility issues with certain apps or devices, experience performance concerns on your older iPhone, or simply yearn for the familiar user interface of the previous iOS version, the desire to downgrade iOS 16 to iOS 15 can be irresistible. The process of downgrading from iOS 16 to iOS 15 opens the gateway to a familiar experience. It restores the interface you cherish and resolves any compatibility woes you may have encountered.
Embracing this step-by-step walkthrough will empower you to reclaim control over your device’s operating system. This will put you back in the driver’s seat of your iPhone experience. So, let’s embark on this journey together and navigate the path to a more familiar and satisfying iOS version.
The Risks of Downgrading iOS 16 to iOS 15: A Cautionary Tale
Venturing into the realm of downgrading from iOS 16 to iOS 15 demands caution. It also requires a keen awareness of the potential risks that accompany this journey. While the allure of returning to a previous version may tempt you, recognizing the potential pitfalls that lie ahead is crucial.
- Risk of data loss: First and foremost, the ominous risk of data loss looms large if you fail to perform a proper backup before initiating the downgrade process. Your iPhone houses a treasure trove of cherished memories, important documents, and valuable files. Without a comprehensive backup using iTunes or iCloud, bidding farewell to these irreplaceable digital treasures becomes a real possibility.
- Compatibility Issues: Downgrading may introduce compatibility issues. This may lead to certain apps or services not functioning optimally on the older iOS version. With each iOS update, apps optimize themselves to work seamlessly with the latest features. Reverting to an older version can disrupt this harmony, potentially causing app crashes or even complete incompatibility, thus hampering your daily iPhone usage.
- Security Issues: Another significant risk lies in the realm of security vulnerabilities. Apple diligently addresses and patches potential security flaws with every new iOS release to protect users from potential threats. By downgrading to an older iOS version, you may unwittingly expose your device to security vulnerabilities that are no longer safeguarded by the most recent software updates.
Before proceeding with the downgrade, it is essential to carefully assess your needs and requirements. Take into account whether specific apps or services you heavily rely on may be impacted by the downgrade. Consider whether the trade-off of returning to a familiar interface outweighs the potential inconveniences or limitations you may encounter.
Prerequisites for Downgrading From iOS 16 to iOS 15
The process of downgrading from iOS 16 to iOS 15 requires a few prerequisites to ensure a smooth transition. Here are the key requirements you need to consider before downgrading iOS 16 to iOS 15:
- Compatible IPSW file: Obtain the iOS 15 IPSW file specific to your device model. Ensure that you download the correct IPSW file to avoid any compatibility issues during the downgrade process. Get the iOS 15 IPSW file here.
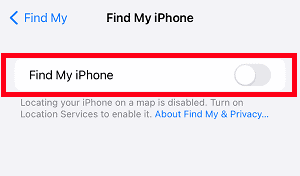
- Disable Find My iPhone: Before downgrading, disable the Find My iPhone feature on your device. To disable Find My iPhone, go to Settings > [Your Name] > Find My > Find My iPhone and toggle off the feature. You may need to enter your Apple ID password to complete this step.
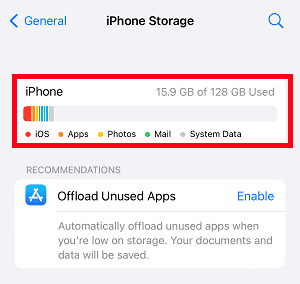
- Sufficient storage space: Check if your iPhone has enough available storage space to accommodate the iOS 15 installation. The downgrade process requires adequate space to complete without any interruptions. You’ll need about 5GB of free space to download and install iOS 15 update. To check if your iPhone has enough available storage space, Go to Settings > General > iPhone Storage.
- A Computer with Finder or iTunes: Ensure you have a computer with the latest version of Finder (for macOS Catalina and later) or iTunes (for macOS Mojave and earlier). This will serve as your bridge to connect with your iPhone during the downgrade.
- USB Lightning Cable: Have your trusty USB lightning cable on hand to establish a secure connection between your iPhone and the computer. This cable facilitates data transfer and ensures a smooth communication channel.
- Internet Access: If you encounter any issues with the standard downgrade process, consider having access to a reliable internet connection for Internet Recovery. This enables you to download the appropriate IPSW file directly from Apple’s servers.


Why a Complete iPhone Backup Is Needed Before You Downgrade iOS 16 to iOS 15
As you prepare to downgrade iOS 16 to iOS 15, you should understand why creating a complete iPhone backup is non-negotiable. Our iPhones are more than just devices; they hold snapshots of our cherished memories, important files, and irreplaceable moments. A comprehensive backup acts as our guardian angel. It ensures that we can confidently traverse the downgrade path, knowing our treasured data remains safe and sound.
Consider the myriad of files and memories that reside within your iPhone. From those candid photos capturing moments of joy and laughter to the crucial work documents that underpin your professional life. Without a complete backup, the risk of losing these invaluable digital treasures during the downgrade process is a haunting reality.
The process of downgrading can be likened to a journey, with twists and turns that may lead to unexpected challenges. Apps that once harmoniously functioned on iOS 16 may encounter turbulence in the older iOS 15 landscape. By having a complete backup at your disposal, you empower yourself to gracefully address these potential incompatibilities, allowing for a seamless transition back to the iOS 15 interface.
Perhaps one of the most crucial considerations is that of security. With each iOS update, Apple diligently fortifies its operating system, addressing potential vulnerabilities and bolstering your iPhone’s defenses. By downgrading without a backup, you risk leaving your iPhone exposed to security loopholes that might have been patched in the latest iOS version.
To safeguard your digital realm, initiate a complete iPhone backup using iTunes or iCloud. This single act can make all the difference, granting you peace of mind as you revert to iOS 15. A complete backup is your safety net, ready to catch you if unexpected challenges arise, ensuring that your precious data remains protected and accessible at all times.
Backing Up Your iPhone Using iTunes
To initiate a complete iPhone backup using iTunes, follow the steps below:
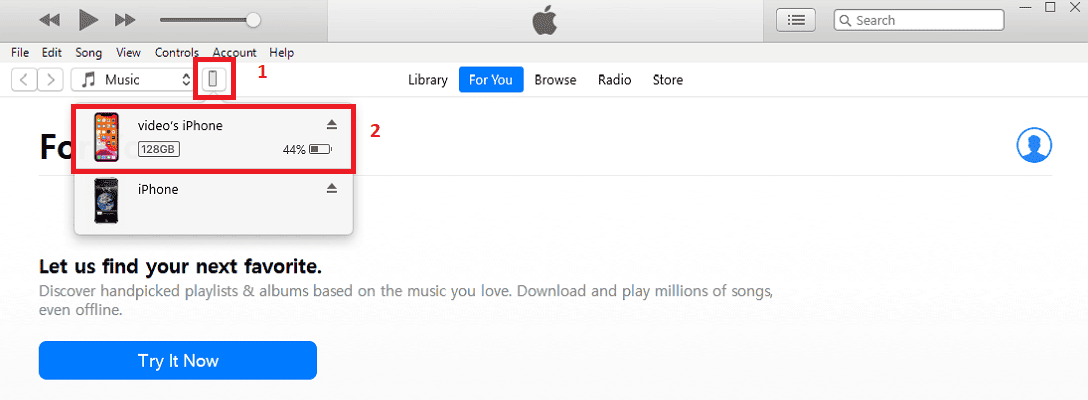
- Connecting Your iPhone: begin the backup journey by downloading and launching iTunes on your computer. For macOS Catalina or later, open Finder instead. Connect your iPhone to your computer using a USB cable. Upon connection, iTunes or Finder should automatically recognize your iPhone.
- Trusting Your Computer: If it’s your first time connecting your iPhone to this computer, a prompt will appear on your device asking if you trust this computer. Tap Trust to proceed with the backup process.
- Selecting Your Device: In iTunes (or Finder), you’ll find your device icon at the top left or in the sidebar. Click on it to access your iPhone’s Summary page.
- Backing Up Your iPhone: On the Summary page, navigate to the Backups section. You have two options for backing up your iPhone. The first is Back Up Now. This allows you to create an immediate backup of your iPhone’s data. Simply click Back Up Now and iTunes will start the backup process. The duration of the backup depends on the size of your data.
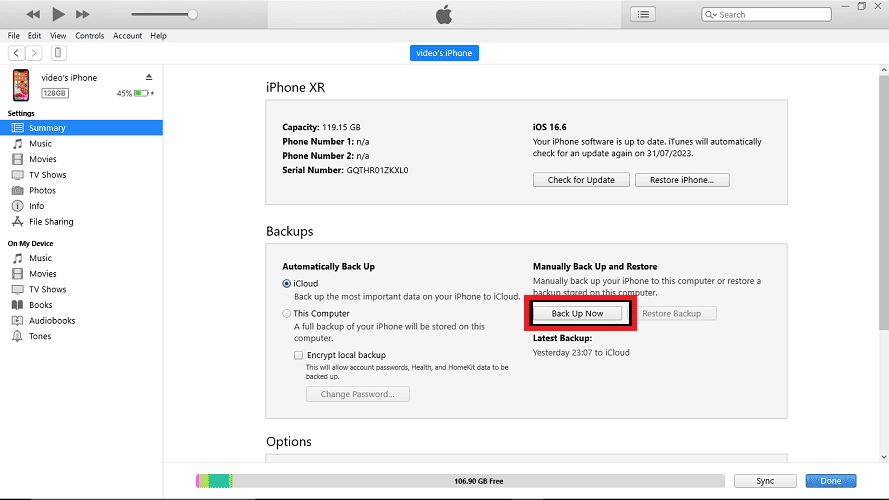
The second option is Encrypt iPhone Backup: By ticking the Encrypt iPhone backup option, you ensure that your sensitive data, such as passwords and Health data, is included in the backup. A password prompt will appear, and you’ll need to create a secure backup password.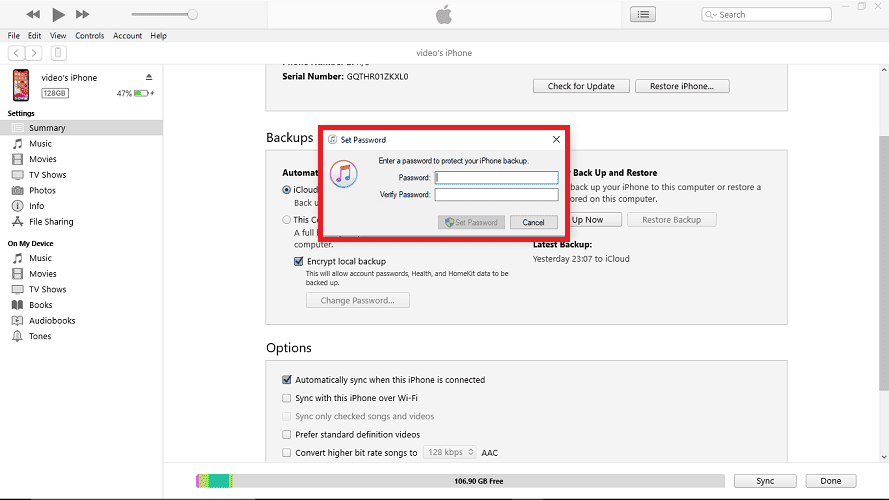
- Monitor the Backup Progress: As iTunes performs the backup, you’ll see a progress bar indicating the percentage of completion. It’s essential to ensure your computer remains connected to power and doesn’t enter sleep mode during the backup process to avoid interruptions.
- Verifying the Backup: After the backup is complete, you can verify its success by checking the Latest Backup timestamp in the Backups section on the Summary page.


How to Safely Downgrade iOS 16 to iOS 15
Now that you have safely backed up your data and acquired the right iOS 15 IPSW file, it’s time to revert to iOS 15. Here is how to go about it using iTunes:
Downgrade iOS 16 to iOS 15 Using iTunes
Time needed: 10 minutes
To downgrade iOS 16 to iOS 15 using iTunes, follow these steps.
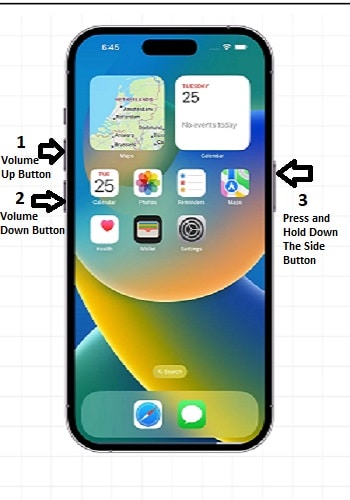
- Place your iPhone in recovery mode. Depending on your iPhone model, follow these steps: For iPhone 8 or later, Press and quickly release the Volume Up button, then the Volume Down button. Press and Keep holding down the Side Button even when the Apple logo appears. Wait until a symbol, like a USB cord, appears on the screen. You can stop holding the side button as soon as the USB symbol appears.
For iPhone 7 or 7 Plus, press and hold both the Sleep/Wake button and the Volume Down button until the Apple logo graces your screen.
For iPhone 6s or earlier, press and hold both the Sleep/Wake button and the Home button until the Apple logo blesses your sight.
- Next, launch iTunes on your computer.
- While your iPhone is in recovery mode, connect it to your computer using a reliable USB cable. As the connection is established, iTunes will acknowledge your iPhone is in Recovery Mode.
- At this point, iTunes will display a message confirming your iPhone’s recovery mode status and prompt you to Restore it before further use. Click on Restore iPhone, then follow the on-screen instructions.

- A new window will appear, guiding you to select the iOS 15 IPSW file you downloaded. Choose the correct file.
- With your iOS 15 IPSW file in tow, the downgrade process commences. The duration may vary, contingent on the size of the IPSW file.
- Once the downgrade is complete, your iPhone will restart, now running the familiar iOS 15.


Downgrade iOS 16 to iOS 15 Using Finder
Here are the steps to downgrade from iOS 16 to iOS 15 using Finder on your Mac:
- To begin the process, make sure your iPhone is connected to your Mac using a Lightning cable, then launch Finder.
- Once Finder is open, you’ll find your connected iPhone listed in the sidebar under Locations or Devices. Click on your iPhone to access its overview.
- Within the overview, you’ll see various tabs. Click on the General tab to access the device’s general settings.
- In the General tab, you’ll find the Restore iPhone button. Click on it to initiate the restoration process.
- After clicking the Restore button, Finder will prompt you to choose the specific iOS 15 IPSW file that you previously downloaded. Locate the file and select it.
- Once you’ve selected the appropriate IPSW file, click on the Restore button to confirm and initiate the downgrade process.
Remember, downgrading iOS versions can have some risks, so it’s essential to be cautious and ensure you have a recent backup before proceeding. Always check for updates and follow official instructions from Apple for a safe downgrade process.
What Is the Apple Signing Window and Why Is It Important?
Understanding the significance of the Apple signing window is crucial when attempting to downgrade from one iOS version to another on your iPhone. The Apple signing window is a limited timeframe during which Apple allows users to install specific iOS versions on their devices. Outside this window, downgrading becomes considerably more challenging, if not impossible.
Apple maintains strict control over the iOS versions that iPhone owners can install on their devices to ensure stability, security, and a consistent user experience.
If you are considering a downgrade, it is crucial to monitor the Apple signing window and act promptly if you wish to revert to a previous iOS version. This may involve doing some research beforehand to determine the availability of the desired iOS version and being aware of the signing window’s closure date.
To check the signing status of any iOS or iPadOS firmware, you can use ipsw.me, a convenient website for this purpose. Just head to the ipsw.me website, and there you can select your specific device model and the firmware version you want to check. The site will display the signing status.
Restoring Your Backup
You’ve successfully downgraded your iPhone from iOS 16 to the comforting embrace of iOS 15. Now, it’s time to bring back the essence of your digital realm, rekindling the cherished memories and files that make your iPhone uniquely yours. Allow me to guide you through the final steps of this restoration process:
- First, connect your iPhone to your computer. Then launch iTunes (or Finder if you’re on macOS Catalina or later).
- Next, you’ll find your iPhone’s icon at the top left or in the sidebar of iTunes (or Finder). Click on it.
- Next, click on the Summary tab.
- Now comes the moment you’ve been waiting for, the magical Restore Backup option. Select it under Backups, and witness the array of backups that lay before you, preserving snapshots of your digital journey through time.
As the restoration completes, your iPhone restarts, and the world of iOS 15 greets you with open arms. There it is – the familiar home screen, your favorite apps in their rightful places, and the reassuring sense of continuity. Your digital realm is once again whole, rekindling the memories and experiences that make your iPhone uniquely yours.
Frequently Asked Questions
Yes, you can safely downgrade from iOS 16 to iOS 15 without losing your data, provided that you have created a complete backup of your iPhone using iTunes or iCloud before initiating the downgrade process. Backing up your data is essential to ensure that your cherished files and memories are preserved during the transition.
Unfortunately, if you haven’t made a backup of your data before downgrading to iOS 15, you will lose your data. Without a backup, there’s no way to recover your files after the downgrade process. It’s crucial to have a backup before considering any iOS update or downgrade.
During the downgrade process, it’s possible to encounter unforeseen issues or errors. If you encounter any problems while you downgrade iOS 16 to iOS 15, it’s recommended to check your internet connection, update iTunes to the latest version, or try using a different USB cable. If the issue persists, seeking assistance from Apple Support or reputable tech forums can be helpful in troubleshooting the problem. Remember, having a backup ensures you have a safety net to fall back on in case of any difficulties.
Conclusion
Armed with this comprehensive step-by-step guide, you now possess the knowledge and confidence to navigate the process of downgrading your iPhone’s operating system from iOS 16 to iOS 15. With the outlined instructions at your fingertips, you can confidently embark on this transformative journey, reclaiming the familiarity and stability of iOS 15.
As you delve into the world of iOS downgrades, remember the golden rule: always back up your data before undertaking any procedure. Safeguarding your precious files and memories is an essential precaution that ensures you can tread the downgrade path with peace of mind.
We’d love to hear about your personal experiences with the downgrade process! Feel free to share your thoughts and insights in the comments section below. Whether you encountered any challenges, discovered helpful tips, or simply want to share your journey, your feedback is invaluable to our community. You may also want to check out Jeff Butts’ article on Apple’s updated versions of its operating systems.


Discussion